
First Class
Teacher’s User Manual

First Class Email System
There are 2 types of clients that can be used.
a) The Full Client: The full client is already installed at school. This client is
much faster and more functional.
b) The Web Client This method doesn’t require the installation of any
software. In this method you are able to connect to the
First Class server using Microsoft Internet Explorer,
Firefox, Safari, or Netscape. It can much slower, is more
awkward to use and lacks some features of the Full Client
but has the advantage of allowing you the ability to access
your mailbox, etc ... from anywhere. The address that you
will type on your web browser is http://fc.ycs.wednet.edu
How the First Class System Operates Differently than Most Email
Systems
In most email systems such as Outlook Express or Corel Central/Netscape’s system
when you get email it is sent from the mail server to your computer and removed from
the central mail server. This is known as popping your email. First Class doesn’t POP
email by default. In First Class your messages/files stay on the server until deleted or
they expire.
Logging Into The First Class System
The description and pictures in this manual refer to the use of the full client only.
Direction for accessing the web client are at the end of the manual.
Steps:
1) There is an icon in the Teacher Applications folder
or on the dock. Double click on the First Class icon.
2) You will be presented with a login screen that looks something like: To get this
requires that the full First Class client software is installed. Once this screen is
presented to you please enter your user id and password and then click on the
Login button or simply hit enter. Your user id is given to you at training and is

usually the same as your ID for Skyward and for the secondary teachers also your
domain user name. Your password will always be yelm00 when you login for the
first time. If you do this correctly and there are no technical problems you should
see the First Class teacher desktop.
To Change your Password:
Click on the menu “Collaborate” and then choose the item called Change
Password. Your new password must contain both letters and
numbers and must be at least 6 characters long. It is case
sensitive. You will need to enter your old password and then enter your new
password twice. Please remember the new password. If you forget your
password, you will need to call the tech office (458-6232) and we will reset your
password back to yelm00.

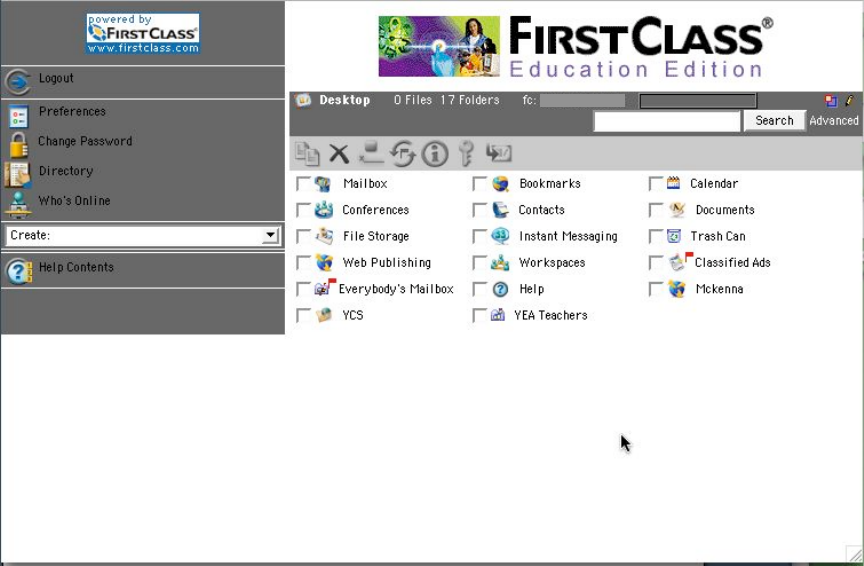
The Instructional Staff Desktop
The following is the desktop a teacher will see initially when you first log into First Class
using the full client. As you use the system more your desktop will change as you add
folders and more conferences are added, particularly at the school level. Depending on
your school and your assignment you may have some added icons on your desktop

Parts of the Instructional Desktop:
1)
Mail Box:
This is location which we
use to do personal email
2)
Everybody’s Mailbox
This is where district news
is stored. There are
folders for business office
forms, facilities schedules,
health news, job postings,
food service, curriculum
and grants This is also
where the Tech 911 folder
is located. You can send
messages to 911, but you
will not be able to see in
the folder
Conferences within Everybody’s Mailbox
3)
YCS
This conference folder
contain folders for each of
the schools. Some
principals have lock their
folders to all but their own
staff while others have
them open to all

4)
Classified Ads
This is where district
employees may advertise
things that they would like
to sell. Please read the
disclaimer.
Directory
All users in our First Class private email system are located in the Directory and can be
found easily when doing any messaging tasks..
Directory Icon on Toolbar
A typical teacher listing in the directory looks like this:
User Name User ID Organization
John Smith johns McKenna Elementary
In searching for someone enter the first few letters of the last name in the name box of the
directory screen and it will produce a list of names starting with those letters. Then
choose from that smaller list the user you want For example if you are looking in the
directory for a teacher that has the word “smith” in their name (first or last) type in the
word “smith” and select the appropriate name from the list provided.

In this section we give all necessary instructions on how to send and receive messages.
The fundamentals of this section are used through out First Class. If you double click on
the Mail Box Icon. You should see something like the following except you may not have
a message there yet.
Some of the commonly used Icons on the mailbox tool bars are: (Most of these
functions can also be
achieved using right click or they can be found on the Message menu)
-
1)
New Message
Click on this to start a new message
-you can also right click and choose New
Message
2)
Reply to
Sender
Use this to reply instead of the regular reply
button
3)
Reply to All
Use this to reply to all people on the
original message including those who are
cc’d
4)
Forward
Use this to redirect a message to someone
else you can also use right click and choose
forward
5)
Attachment
(paperclip)
Use this to include a file with your email
message You can also goto to File Menu
and choose Attachment
6)
History
Use this Icon or right click to get the History
choice Use this to see what happened to your
message this technique will reply to all, as
well
8)
Unsend
Click on this button if after you send a
message you realize that it was sent to the
wrong person or if you want to correct a
mistake. This cannot unsend to people who
already read the message or people outside
the district.

The Meaning of the Red Flag
Whenever there are new messages or files in your mailbox or conferences a red flag will
appear on your mailbox or the conference. This flag tell you that “You’ve Got Mail” The
mail box would look like:
It is a neat feature of First Class which makes easy to tell if anything has changed and if
you should look. Please note that the red flag only goes one level deep. New messages in
a sub-conference will cause a red flag to appear on the sub-conference, but not on the
main conference. You need to open the main conference to check for red flags further
down.
Unopened Mail No unopened Mail
Retrieving Messages
To see an actual message you double click on the message.
When you are finished reading the message you must close that message’s box by
clicking on the X in the top right corner.
Replying to Messages:
Right click on a message and choose “Reply to Sender” or click the
equivalent icon A box will pop up. Enter a message in the message box

and then click on the Send and Close icon.
Replying to All
The use of this choice will send your reply message to all people that were
listed on the original message. To do this right click on a message and
choose Reply to All or use the equivalent icon. Everything else is the same
as reply to sender
History Feature
This feature will tell you who received and read your message and anything
else they did with your message within our First Class system. It can’t tell
you what happens to a message outside of our system in the Internet. To use
this feature right click on the message you wish to check and choose History
or click on the equivalent icon
Unsend Feature
This choice allows you to retract a message provided it hasn’t been read
by anyone.
Method: Select a message you have just sent and then right click on
that message and choose Unsend or click on the equivalent
icon.
Adding Attachments to Messages
An attachment is a file that you wish to send to someone as part of the message.
Many times people prefer to type their message in a word processor or spread sheet and
then attach that file to the message instead of typing out the message in the message box.
You can also attach pictures, videos, report card files, etc ....It is a way of sending in
lesson plans to school if you are home sick. If you have a good activity you can send it to
another person or a conference using an attachment.

Example of how an attached file should look: Attachment is called Surplus.xls
Receiving Files With Attachments - Saving an Attached File
If you receive a file which has an attachment you will often want to save that attached file
to your personal space. At school your personal space is H: drive If a file has an
attachment you will see a flag in the mailbox in the second column from the left.
Steps: 1) Open the file which has the attachment. It will look like the
previous box
2) If you can’t see the attachment box you may need to open the
top part to be wider or simply use the scroll bar.
3 Right click on the attachment and choose either View to simply see the
file or choose Save Attachment to be able to save the file to your personal
space.. The default folder for saving attachments at school is \download.
You will need to find the correct folder by browsing and then click on
save.
Deleting Files
It is very important that you are constantly deleting files, especially those with
attachments that you don’t need from your Mailbox, folders and conferences to insure
you don’t run out of space and to help us keep the server space from getting too full.
The fact is that if everyone used their maximum available space on the server

there would not be enough room.
Methods to delete a file or files:
1) Click on the file and then hit the delete button You will be presented with a
box asking you to confirm the deletion. Hit delete if you are sure.
2) To be able to delete more than 1 file at the same time (ie 2 or more files):
Click on the first file as you normally would For subsequent files when you
click on them you should also be holding the CTRL key When doing this you
will see several files being highlighted. Once you have selected all the files
you wish to delete hit delete and then confirm if you are sure.
Forwarding Mail
When you forward a message you send an exact copy of the message with its
attachment to another user. That other user could be outside of our First Class system.
You can only forward messages.
Steps:
1) Open your mail box or a conference containing a message you wish to forward.
2) Right click on the message you wish to forward and choose
forward or click on the message and then click on the Forward
Icon.
3) The message will open up. Now enter a name of a person or an
outside email address in the To: or cc: boxes.
4) Once you enter the address you can also edit the message you are
forwarding, adding your own thoughts and if you wish you can add additional
attachments or remove existing attachments.
Retrieving Files that have been deleted:
There are times when you accidentally delete files. These can be retrieved provided
you try to recover them before 2:00 next morning. Somewhere between 2:00 and 7:00
everyday the system runs something called trash collection. At this time all deleted files
and expired messages will be permanently removed from the system to save space.
To recover deleted files:
1) Click on the View menu and then select Show deleted Items
2) This will cause all files you deleted that day to appear in your mail box.
3) Find the item you wish to undelete and then right click on that message and
then choose Undelete.
4) Do the same for any other messages you wish to undelete.

5) Now return to the View Menu and select Hide Deleted Items.
Sending Email to People Who are Outside of the First Class System - To
the Internet
There will be a number of people whom you wish to send email to whose email accounts
are not part of our First Class System. One example would be your own current email
address. Sending email from First Class to your own personal email address or vice
versa is a neat way to backup important email messages or files.
How: To send email to an outside address you must use
the full address: example: [email protected]
These outside addresses can be saved in your First Class address book which then causes
the addresses to come up in the directory as if they were a regular First Class User.
Sending Email From an Outside Address to Your First Class Mail Box.
If you are at home using your regular email and wish to send or forward a message to
your Board First Class Account you must enter your full Board First Class address.
If your userid is jsmith then your full mail address at our First Class Server is:
Tip: One of the first things you should do is send yourself an email to your regular
home email account, if you have one. Once you receive it you can then add it to
your home email address. Then reply to that message. When you get home you
can log into First Class and receive that reply and use it to add your home address
to your First Class Personal Address book.
Using The First Class Address Book
This tool is a place to save addresses of people who are outside of our system and it
is a place to make mail lists.
A mail list is group mail address. You don’t need to add addresses of users who are on
our system
You may make mail lists for groups you often send to such as your department, or your
grade level. You don’t need a mail list for your school staff because there is special
conference setup for each school to communicate with staff as a whole.

If you are often communicating with a group and exchanging information with a group
the preferred method is to setup a conference and add those people to that conference.
Adding an Entry to Your Address Book
Method 1 - manually
Steps:
1) Open the Address Book Folder
2) Click on the Icon called New Contact at the top
3) A window will open in which you can type the new email
address in the email box and then enter their first and last
name, etc .... Please try this ... The box should like:
4) When finished click OK
5) What is important to remember is that in the future when you enter a
pattern in the To: box when sending an email, all members of the address
box will also be included in your search.

Method 2 -Using the Computer to Add Addresses to the Address Book.
You have a message in your mail box from someone outside our system You want to add
their address to your Address Book.
Steps:
1) Open the message
2) Right Click on the persons name you wanted added to your address book and then
Choose the item Add to Address Book ... At that point you should also enter their
correct first name and last name since only their email address gets added.
3) When finished click on OK
Creating A Mail List in Your Address Book
As stated a mail list is a group mail address. When you send messages to a name which
represents a mail list it will be sent to all members which are added to that list..
Steps:
1) Open your address book
2) Click on the New Personal Mail List Icon or click on the File
Menu and then click on New and then choose New Personal
Mail List.
3) Once you click on the icon or menu choice the following type of box will appear:
Please enter a name for the mail list and then begin to select the members. When
selecting members from our first class system you can use the directory and
pattern matching. For outside members you will need to type the entire address
unless you have previously placed them in your Address Book, in which case a
pattern match will find them

When finished entering the members click on OK.
To use this mail list enter the name of the mail list in the To: box when sending a
message.
Please note that in general it is preferred to use a conference to send email to the same
group on a regular basis.
Copying Files from a Folder or Conference to Your Personal Space
(Downloading)
In this situation you have put files or messages in the folder or conference either at
home or at school or else where and now you want to retrieve or view these files for
use at another location.
Techniques – Please try them
1) If it is a message with an attachment open the message by double clicking
and save the attachment as described before.
2) If it is a file only there are several options:
a) Double click on the file to view it. Once the application is open (for
example if it s a Word file, Word will open) Save the file from within the
application using that application’s regular save features.
b) Right Click on the file and select the option Download. Download means
the same as save attachment Now find a place to save it in your personal
computer space and then click the save button
c) You can drag and drop it from First Class back to a folder in My
Computer. In this case you would do the reverse of before. Before you
start this make sure My Computers in Windows is open so you can see it
on the status bar from First Class.
Most people will find a) or b) easier than c) unless they are very experienced
computer user
Conferences
Conference are folders which are shared by more than one user.
They are the best way to communicate/collaborate with groups of people on a regular
basis.
A conference acts like a folder except whatever you put there, any message or
file, is seen by all members of that conference.
Because conferences are treated like users all conferences must have unique names.
In conferences teachers can add items to the conference, but can only delete their own
items. Conferences can be setup in such a way that anyone you want can be made a
member and you can custom tailor the permissions in such a way that members can only
be allowed the access you think is needed.

Logging On to FirstClass from Home
If you have a network connect at home, you can read and write email from home. Pull up
your internet browser. The address for the web page of our email is:
http://fc.ycs.wednet.edu/
To open the email, click on the desk
A dialog box like the one below should come up.
Type in your user ID: (usually your first name and the first initial of your last name)
Type in your password:
You should see the screen below.
