
1
INSTALLATION INSTRUCTIONS
AbsoluteCedar™ Siding and Trim by Woodtone
Effective: June 2023
SECTION I GENERAL INFORMATION
AbsoluteCedar™ products are designed for use in exterior applications where a textured or smooth trim or
fascia product is desired.
STORAGE
Products must be protected from the elements at all times; preferably stored in a warehouse or covered area.
At the job site keep materials off the ground, aligned on stringers and protected from the weather until used.
Material wrap is slippery when wet or frozen. To prevent injury, do not allow workers to walk on bundles.
PRIOR TO INSTALLATION
• Consult and follow all applicable local building codes and safety procedures including personal
protective wear when cutting and installing.
• AbsoluteCedar™ products must be kept free from any source of moisture. As with all wood products,
do not apply AbsoluteCedar™ products to a structure having excessive moisture conditions or over wet
building materials during the building stage.
• Do not install any defective material. Installation constitutes acceptance of the delivered material.
Product installed becomes the buyer’s responsibility.
• To ensure longevity, AbsoluteCedar™ products must be installed following the instructions.
• AbsoluteCedar™ products are graded and manufactured for the best face. This means resawn face is
to be installed resawn face out only. If a smooth face is required, order S4S (smooth four sides) for
that application.
• NOTE: Woodtone does not warrant AbsoluteCedar™ products when used as batten strips in a board
and batten application.
AbsoluteCedar™ products are kiln dried siding products are the preferred choice for consistency, stability, paint
adherence and overall performance. These siding products have been dried at the mill to 12-15% moisture
content. If the siding has not been wetted prior to arrival on the job site, it may be applied upon arrival except
in hot and dry conditions where 3 to 5 days of well-ventilated storage away from direct sunlight is generally
required. If the siding has been wetted, it must be separated and allowed to dry to the local equilibrium
moisture content.
JOB SITE STORAGE
Until installed, AbsoluteCedar™ products need protection from direct
sunlight, water saturation, snow, ice, dirt, and other elements. Store
the siding flat and off the ground on stickers and a vapor barrier so
that moisture is not absorbed through the bottom boards of the stack.
Protect with a waterproof covering elevated in the center so that water
does not pool on the cover. Do not completely seal the bundle, as
good air circulation is required. Ideally, the siding should be stored in
an enclosed building such as a garage prior to use.
FIELD CUTS
Regardless of the time of the year of the installation, all field cuts
must be finished. Siding with end cuts coated with alkyd oil primer can
be installed before drying without compromising the coating’s
effectiveness. Above 50 degrees, a high quality 100% acrylic-latex
primer will suffice to coat exposed end grain if allowed to dry before
installation. With either primer, follow manufacturer’s recommendations.

2
CUTTING
Use a fine-tooth hand saw or power saw with a combination blade. The cutting action of the blade should be
into the face of the material. Carbide-tipped blades are recommended. Seal all end cuts with an appropriate
primer/paint.
Follow ALL jobsite safety requirements for cutting Western Red Cedar.
FASTENERS
Stainless steel nails are the best choice, especially if the siding is to be finished with transparent, semi-
transparent stain or bleaching oil. Use No. 304 stainless for general siding applications and No. 316 for
seacoast exposures.
Hot-dipped galvanized as per ASTM A-153, aluminum and stainless steel fasteners are all corrosion-resistant
and all can be used to fasten Western Red Cedar. Other types of fasteners (including electroplated and
mechanically galvanized) are not recommended. They can rust and disintegrate and react adversely with the
natural preservative present in cedar, resulting in stains and streaks.
FASTENERS: TYPE
For best result use “splitless” ring shank siding nails. These have thin
shanks and blunt points to reduce splitting. Textured heads should be used
to reduce the glossy appearance of the nail head.
Hand Nailing is Preferred.
Nails should be driven with care into the framing members. To ensure nailing accuracy, run chalk lines to mark
framing locations. At mitered corners, near edges and near ends, nail holes may need to be pre-drilled to avoid
splitting. Avoid the use of pneumatic nailers if possible. If a pneumatic nailer must be used, reduce the air
pressure and tap nails flush.
Overdriven nails must be remedied immediately. Fill overdriven nail holes with exterior grade wood putty
specifically designed for filling exterior nail holes.
FASTENERS: PLACEMENT
Siding should be fastened to each stud or blocking with nails spaced at a maximum of 24 inches on center.
Nail placement depends on the siding pattern and width. The key is to fasten the siding securely without
preventing it from moving in response to the moisture content in the air. In general, each piece of siding must
be nailed independently. Nailing overlapping pieces together restricts the natural movements of each piece
and may cause splitting.

3
FASTENERS: SIZE
The size of nails to use depends on the type and thickness of siding. Use ring-shank siding nails long enough
so that they penetrate solid wood by a minimum of 1 ¼”.
* Important: For application over foam sheathing, add the thickness of the foam to the tabulated nail length.+
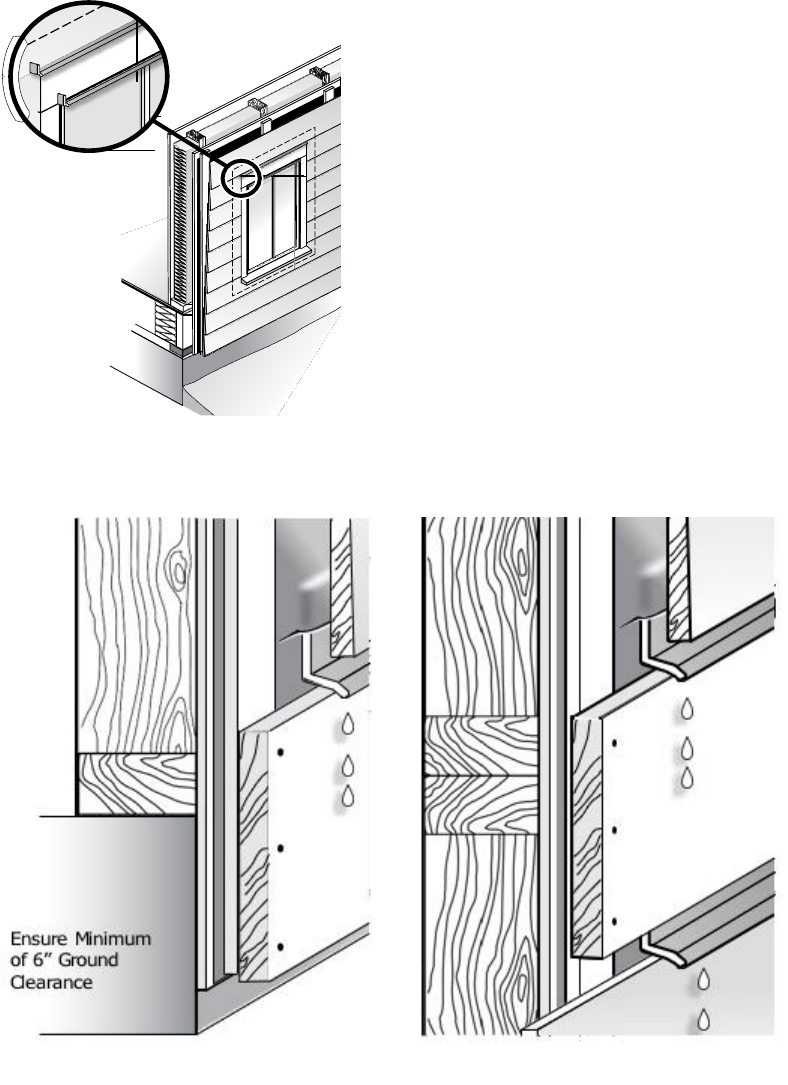
CONTROLLING MOISTURE: VAPOR BARRIERS AND BUILDING PAPER
Housewrap installed on the outside face of the sheathing helps prevent rain and snow from penetrating the
walls but allows the escape of moisture vapor. Woodtone recommends the use
of rainscreen wall construction (see diagram and related section later in this publication) especially when
installing over rigid foam.
Proper wall construction includes the use of breathable or gas permeable housewrap (such as DuPont™
Tyvek® DrainWrap™) or building paper and interior vapor barriers. These are extremely effective in helping to
prevent moisture problems.
Minimum 6” Clearance
ground Level
Absolute Siding
Strapping
Flashing
Absolute Trim boards
Vapor Barrier
Stud
Insulation
Sheathing
House Wrap
(eg. Tyvek® DrainWrap™)
•

4
WALL CONSTRUCTION
Like all siding materials, AbsoluteCedar™ performs best when installed properly on a suitable frame. Siding
should be securely nailed to framing members, furring members or to blocking between framing members.
Standard stud walls generally require no special preparation for horizontal siding installation. Siding should be
nailed into studs or blocking at maximum of 24 inches on center when applied over wood based sheathing and
16 inches on center when siding is installed without sheathing. In instances where an air space between siding
and sheathing is desired (see rain screen wall construction), nail siding to furring strips, sheathing and framing.
• Maximum spacing for furring strips is 16 inches on center. Spacing for furring strips should match the
spacing of the studs.
Vertical siding applications require horizontal nailers, blocking or other wood framing members spaced no
more than 24 inches on center. Check your building code to verify requirements in your area.
Lumber Size and Spacing for Blocking and Furring
1
1. Furring must be securely fastened to studs.
2. Can be used in moist and severe climates to form an air space between siding and sheathing (i.e. rain screen).
MASONRY WALLS
Masonry walls require furring strips for horizontal and vertical siding installation. Furring strips must be thick
enough to allow for nail penetration of 1 ¼” into solid wood. (check with local building codes for the
appropriate techniques in your area).
SECTION II INSTALLING WESTERN RED CEDAR SIDING
FLASHING
Before installing siding, make sure that flashings are installed to prevent moisture from entering wall and roof
spaces. Flashing is an important line of defense in controlling moisture in wall assemblies. Flashing intercepts
and directs the flow of water away from the building to designed drainage paths. Install horizontal flashing
extending from the top of all wall penetrations (i.e. all windows and doors) and at any material or material
directional change (i.e. bandboards, water tables or the introduction of any alternative material). The flashing
should tilt downward to allow water to drain away from the wall. Siding or trim should be ¼” above the flashing
ledge. Do not caulk where the flashing and trim or other materials meet. Note that caulking in lieu of flashing is
not acceptable.
5
DOOR AND WINDOW FLASHING
The purpose of flashing window and door headers is to intercept water behind the siding and direct it to the
outside, and to redirect water flowing down the face of the wall to flow away from the wall opening.
Moisture can accumulate behind the siding as a result of:
• Rain penetration through the siding;
• Water vapor diffusion;
• Leakage of moist air from the interior or condensation.
Some moisture will drain through the weepholes at the bottom
of windows. An additional head trim flashing is required at the
head of the window/door to direct water further outward,
beyond the thickness of the window.
SKIRT AND BANDBOARDS
Ground Level Skirtboard
Second Story Bandboard

6
FASCIA FLASHING
The purpose of fascia flashing is to support the shingle edge and to provide a drip edge to prevent water from
running back underneath the roofing shingles and down along the fascia and soffit.
Preformed eaves flashing/drip edge should be installed under the starter course of the shingle roofing. The
extension of flashing supports the edge of shingles. If eavestroughs (rain gutters) are used, the flashing edge
also helps to direct the water into troughs. Fascia flashing protects both the soffit and the fascia board, and
provides a drip edge at the bottom edge to direct water away from the building.
CAULKING
Use high-performance acrylic-latex, acrylic, acrylic-silicone,
polyurethane, sealants to seal gaps around windows, doors,
corners, and other exterior joints that are exposed to
potential water intrusion. Pure silicone and clear caulks do
not workwell on Western Red Cedar and are not
recommended. Caulking is not a permanent solution and as
such requires regular maintenance. If not inspected and
maintained, caulking may fail and trap water, creating
severe moisture problems. Do not rely on it as the only
barrier to moisture penetration. Do not caulk areas that will
prevent moisture from escaping the wall cavity (e.g., under
windows and around flashing).
Self-adhesive, self-healing
membrane for ice-dam protection
Fascia
Shingles
Flashing
Metal Gutter
Furring Strip

7
ROOF AND GROUND CLEARANCE
Siding and Trim that extends down to a roof (dormers, second floors, etc.) and decks requires a minimum of a
2-inch gap to avoid wicking. Trim, such as water table or skirt boards must be a minimum of 6 inches above
the grade.
INSTALLING ABSOLUTECEDAR™ TRIM AND FASCIA (MACHINING)
AbsoluteCedar™ Fascia and Trim can be grooved or machined to provide for decorative applications.
Machining depth should not exceed 5/16 of an inch for both the 1” and 7/8” products. Machining depth
should not exceed ½ of an inch for both the 5/4 and 2” products. Routed or grooved product should not have
any flat surfaces where water can accumulate. An angle of at least 100 degrees from the vertical must be
maintained to provide positive drainage and not allow moisture to accumulate on the material. All machined
product must be re-primed with a high-quality exterior oil or acrylic latex primer formulated for wood. *Trim is
not approved for top handrail application.
FASTENING REQUIREMENTS
AbsoluteTrim™ is designed to be applied to structural framing, sheathing and other materials. It can be used in
conjunction with all exterior cladding materials, including lumber, engineered wood products, vinyl, aluminium,
brick, block, concrete and stucco. For application as fascia, AbsoluteTrim™ must be double nailed and
fastened at a maximum 24 inches on center. For all other applications, fasten trim 24 inches apart using a
staggered nailing pattern or double nail 16 inches on center. Some materials require flashing separation.
Double nail all joints and do not nail any closer than ½” from the edge of material without drilling pilot holes.
Use a 6d or 8d galvanized nail with a 3/16” head diameter, long enough to penetrate 1-1/4” into structural
framing members. Use only corrosion resistant fasteners, such as hot dipped galvanized nails or stainless
steel. Drive nails perpendicular to the framing and trim and do not overdrive or countersink the fasteners.
DO NOT USE STAPLES, T-NAILS OR ANY TYPE OF COUNTER-SINKING FASTENER, such as tapered head or bugle
head fasteners. Use of these fasteners will void the warranty.
Fasten AbsoluteTrim™ from one end to the other end. Do not nail towards the center from both ends.

8
BUTT JOINTS
All joints must fall over a framing member. Caulk all joints. Scarf cut on a 22.5-degree angle. Double nail all
joints on both sides as noted in the diagram. In addition, gluing of joints is also recommended for finished
appearance. End-joints must be re-primed.
INSTALLING ABSOLUTECEDAR™ BEVEL SIDING (ALSO KNOWN AS CLAPBOARDS)
Spacing for the siding should be laid out beforehand. The number of board spaces between the soffit and
bottom of the lowest piece of siding at the foundation should be such that the overlap is as per the table
below.
Start with the bottom course using a furring strip to support the lower edge. Each succeeding course overlaps
the upper edge of the previous one by a minimum of 1 inch. Rabbeted patterns are self-spacing, but leave ⅛”
expansion clearance. Where possible, the bottom of the board that is placed across the top of the windows
should coincide with the window cap.
Bevel siding should be face nailed to studs with 1¼” penetration into solid wood using one nail per piece
spaced at a maximum of 24 inches on center. Place nail just above the overlap. Take care not to nail through
the overlap of two pieces.
Do not reduce the siding overlap recommendations given in the
installation sections of this publication. Doing so could result in
damage from wind-driven water. Use the larger overlaps for
unseasoned sidings to allow for shrinkage and expansion. Take care
not to overdrive fasteners when using larger overlaps. Butt joints
between boards should be staggered and meet on studs. Fit siding
snugly to other pieces and to trim.
RECOMMENDED OVERLAP
* These overlap recommendations must be followed for proper installation.
Sheathing
(Overlap undercourse as per Table)
Stud
Expansion gap 1/8”
House wrap
(eg. Tyvek® DrainWrap™)
Ring shank nails must
penetrate solid wood 1 ¼”
Stud
House wrap
(eg. Tyvek® DrainWrap™)
Ring shank nails must
penetrate solid wood 1¼”
Start with furring strip

9
INSTALLING ABSOLUTECEDAR™ TONGUE AND GROOVE
Tongue and groove siding can be installed horizontally or vertically. In horizontal application, start at the
bottom and work up with the groove edges facing downwards. Siding up to 6 inches wide can be blind nailed
with one siding nail per bearing toe-nailed through the base of each tongue. Wider siding should be face nailed
using two nails per piece. Nails must penetrate 1¼” into solid wood.
In vertical application, start at one corner with grooved edge toward the adjacent wall. Use a level or plumb line
to ensure that the first board is installed plumb. The grooved edge of the first board may have to be trimmed to
ensure a flush fit. Siding is nailed to horizontal blocking lines installed between studs or to furring strips. As
with horizontal installation, pieces up to 6 inches can be blind nailed and wider pieces should be face nailed.
INSTALLING ABSOLUTECEDAR™ LAP SIDINGS
(A) 6” and narrower siding
in normal climatic
conditions
(B) 6” and narrower siding
in hot, dry, windy or
seacoast climates
(C) 8” and wider siding
(A) 6” and narrower lap
siding
(B) 8” and wider lap siding
Stud
Cedar siding up
to 6” wide
Ring shank nails
must penetrate
solid wood 1¼”
Expansion gap 1/8”
for dry siding
House wrap
(eg. Tyvek® DrainWrap™)
Cedar siding up to
6” wide
Exterior sheathing
Ring shank nails
must penetrate
solid wood 1¼”
Stud
Stud
House wrap
(eg. Tyvek® DrainWrap™)
House wrap
(eg. Tyvek® DrainWrap™)
Exterior sheathing
Exterior sheathing
Extra nail
Ring shank nails
must penetrate
solid wood 1¼”
Cedar siding
House wrap
(eg. Tyvek® DrainWrap™)
House wrap
(eg. Tyvek® DrainWrap™)
Stud
Stud
Exterior sheathing
Exterior sheathing
Cedar siding up
to 6” wide
Expansion gap 1/8”
for dry siding
Ring shank nails
must penetrate
solid wood 1¼”
Ring shank nails
must penetrate
solid wood 1¼”
Cedar siding

10
Lap sidings can be installed horizontally or vertically. For horizontal applications, start with the bottom course
and work up with the channels pointing upwards. Allow a ⅛” expansion gap between pieces if the siding is air
or kiln-dried. Do not nail through overlaps. For siding up to 6 inches wide, use one nail one inch up from the
lap.
Face nail with two nails per piece for 8 inches patterns and wider, keeping nails 2 ½ to 3 inches apart to allow
for dimensional movement without splitting. For vertical applications, siding should be nailed to horizontal
blocking or furring strips.
INSTALLING ABSOLUTECEDAR™ BOARD-AND-BATTEN SIDING
Board-and-Batten is a vertical pattern created using cedar boards and battens of various widths for a wide
range of appearances. For nominal 6 inches boards spaced ½” apart, battens should overlap by a least ½”.
With wider boards, increase batten overlap proportionately. While there are no set widths for board-and-batten
siding, an attractive combination is 1x3 battens with 1x10 boards.
Siding should be nailed to horizontal blocking lines or to furring strips. Boards up to 6 inches wide should be
fixed with one nail per bearing driven through the center of the board. The overlying batten covering the gap
between boards should be attached with one nail per bearing, the shank passing between the edges of the
under boards. Use two nails per bearing on boards 8 inches and wider placing the nails 2 ½ to 3 inches apart.
(A) Narrow boards 6”
(B) Wide boards 8” and wider
Exterior sheathing
House wrap
(eg. Tyvek® DrainWrap™)
House wrap
(eg. Tyvek® DrainWrap™)
Batten
Ring shank nails must
penetrate solid wood 1¼”.
Nails 2½”-3”apart
Board
Batten overlap (minimum ½”)
Exterior sheathing
Batten
Batten overlap (minimum ½”)
Board
Ring shank nails must
penetrate solid wood 1¼”.
Nails 2½”-3”apart

11
OUTSIDE AND INSIDE CORNERS
There are two main methods used for outside corners. The choice depends primarily on the desired
appearance but also the experience and skill of the installer.
Mitered corners offer a professional looking finish. They are most commonly used with horizontally applied
siding applications such as bevel. Mitered corners require good carpentry skills. They must fit tightly for the full
depth of the miter.
(A) Mitered Corners
House wrap
(eg. Tyvek® DrainWrap™)
Cedar siding
Sheathing

12
Corner boards are a popular and easier alternative to mitered corners. Thickness of the corner board will
depend on the thickness of the siding. The most common are nominal one inch or nominal 5⁄4” thick. Width is
a matter of taste and proper proportion. Corner boards are applied to the sheathing with siding fitting tightly
against the narrow edge of the boards, allowing for expansion and an adequate caulking bead. The corner
boards and the ends of the siding are nailed to the corner studs, which anchor the wood for a maintenance-
free joint. Designing roofs with an eaves overhang to protect corners from weathering also helps ensure
trouble-free joints. Always apply primer or stain to end cuts. With corner boards, there is the choice of applying
them next to the siding or over top of the siding as shown here.
As in the above illustration, at inside corners, siding is frequently butted against a 2 x 2 trim strip. It can also
be butted against adjoining walls with a trim strip used to cover the joint.
FIELD JOINTS
When butt jointing siding, cut ends at 45-degree angles to form an overlapping joint. This is particularly
important for vertical installation. Ensure joints meet on studs, blocking or furring strips with the nail
penetrating solid wood at least 1¼”.
PAINTING
Paint performance is dependent upon the quality and quantity of paint applied, and the conditions under which
it is applied. Low quality paint and/or thinly applied paint tend to last for a relatively short time, resulting in
discoloration, premature fading, inadequate substrate protection, and frequent repainting – sometimes as
often as every one or two years. Top quality paint, applied in sufficient quantity, will provide the best
performance with the minimum maintenance. Follow coating manufacturer recommendations when selecting
and applying a paint.
SURFACE PREPARATION
The surface must be free of dust, dirt, mildew and other foreign materials before painting. Washing with water
and a mild detergent will usually remove dust and dirt. Allow the surface to dry before painting.
(B) Corners boards
(C) Trim boards
Provide additional stud to allow
for nailing at ends of siding
House wrap
(eg. Tyvek® DrainWrap™)
Sheathing
Caulk
joints
Corner boards
Cedar siding
Trim
Provide additional stud to allow
for nailing at ends of siding
House wrap
(eg. Tyvek® DrainWrap™)
Sheathing
Caulk
joints
Corner boards
Cedar siding

13
PAINT SELECTION
For best results, use satin/semi-gloss or full-gloss exterior acrylic latex or a satin/semi-gloss. Semi-gloss or full-
gloss finishes tend to perform better than flat finishes. Note: Some systems may require the application of a
designated primer and topcoat combination.
DO NOT USE THE FOLLOWING COATINGS
Shake and shingle paints Vinyl acrylic paint * Flat oil paint Vinyl acetate paint Vinyl acetate / co-polymer paint
Clear Coatings Transparent or opaque stains * Note: Although vinyl acrylic exterior paint may be readily
available, it must NOT be used on AbsoluteTrim™ Treated Fascia and Trim. Vinyl acrylic paint tends to weather
more quickly than full acrylic paints and may discolor.
Natural or Semi-transparent stains in oil or water bases can be used on AbsoluteCedar FinishReady™ products.
100% acrylic-latex solid color stains and paints can be used on Absolute Primed materials.
PAINT APPLICATION
Always follow the paint manufacturer’s recommendations for the application and maintenance of field-applied
paints.
1. Prime and paint all field-cut edges of exterior trim using high quality exterior oil or acrylic latex primer
formulated for wood, or a primer recommended by the paint manufacturer.
2. Tannin blocking primers are recommended due to the natural tannins in Western Red Cedar.
3. All exposed surfaces including the bottom edge must be well coated. Because of its location, the
bottom edge is often not adequately protected with paint. Inadequate coverage of the bottom edge
may result in paint failure or premature degradation of the Fascia, Siding and Trim.
4. AbsoluteCedar™ products must be finished with two coats of paint within 60 days after installation. If,
due to unforeseen circumstances, the material is not painted within 60 days, re-prime the trim using
an exterior primer that is specifically recommended for use on wood-based products and is compatible
with the topcoat to be used. Use the same primer for repair of any damage to the original factory
applied primer.
5. A total field-applied dry film thickness of at least 2-1/2 mils is required on AbsoluteCedar™ products
for the duration of the warranty period. This requires the application of two or more non-thinned coats
of paint at the spread rate recommended by the paint manufacturer.
6. Most coatings can be applied with brush, roller, pad or spray. The brush application method tends to
apply the most paint per coat; spraying tends to apply the least per coat.
7. The Siding, Fascia and Trim surface temperature must not be less than 50 degrees for 24 hours
following the application of water-based paint. Paint performance problems can be avoided by not
applying paint in the evenings of cool spring and fall days when heavy dew can form before the
surface of the paint has thoroughly dried. Allow at least 2 hours for the paint to dry before sunset.
Likewise, painting in the morning should not begin until after the dew has had time to evaporate.
Water absorption problems and major finish failure can occur with some latex paints when applied
under these conditions.
Woodtone is not responsible for the performance of field applied finishes. Finish performance is dependent
upon coating quality and application methods which are factors controlled by the finish manufacturer and the
applicator. Please follow the Care and Maintenance document to ensure performance and warranty coverage.
If you require further information, please contact Woodtone directly at 1-800-663-9844.
14
ABSOLUTESIDING™ INSTALLATION QUICK TIPS
All installers should learn and follow “best practices” in order to deliver a better job for their customer and
reduce callbacks.
DO:
• DO: Follow local and national building codes.
• DO: Use construction techniques to create easy drainage planes to shed water accumulations.
• DO: Finish AbsoluteCedar™ prior to installation if possible. Always touch up field cuts.
• DO: ‘Acclimatize’ AbsoluteCedar™ products before you install them.
• DO: Use the correct fasteners: 304 or 316 grade stainless steel, aluminum, or hot dipped galvanized
(as per ASTM A-153).
• DO: Nail all Absolute™ siding into 1¼” of solid wood.
• DO: Ensure butt joints are made over solid wood to provide secure nailing. Join two pieces of siding
with a mitered butt joint.
DO NOT:
• DO NOT: Allow AbsoluteCedar™ products to ‘Weather’ before applying a finish coating to the Cedar.
• DO NOT: Use electroplated or mechanical galvanized fasteners that do not conform to ASTM A-153.
• DO NOT: Install AbsoluteCedar™ products without acclimatizing.
• DO NOT: Fasten AbsoluteSiding™ only to the sheathing material.
• DO NOT: Nail through two layers of siding.
• DO NOT: Fail to finish the end cuts during installation.
• DO NOT: Attempt to ‘blind nail’ bevel siding/clapboards.
• DO NOT: Install or paint over wet siding.
• DO NOT: Use caulking sealant as a substitute for flashing.
• DO NOT: Place siding in direct contact with concrete, masonry, topsoil, mulch, patios, porches and/or
roofs.
QUESTIONS
Additional information is available at woodtone.com or 1-800-663-9844. If you are unsure of installation, care
and maintenance, please call us before installation.
