
Using the FamilySearch Family Tree:
A Reference Guide (18 October 2013)

©
2013 by Intellectual Reserve, Inc. All rights reserved.
This document may be copied and downloaded for incidental, noncommercial Church or your own personal
use.

Using the FamilySearch Family
Tree: A Reference Guide (18
October 2013)
Contents
Copyright and Trademarks. . . . . . . . . . . . . . . . . . . . . . . . . . . . . . . . . . . . . . . . . . . . . . . . . ?
Chapter 1: Getting to Family Tree. . . . . . . . . . . . . . . . . . . . . . . . . . . . . . . . . . . 9
Chapter 2: Seeing Ancestors on a Pedigree Chart or Fan Chart. . . . . . . . 11
A Person’s Summary Card. . . . . . . . . . . . . . . . . . . . . . . . . . . . . . . . . . . . . . . . . . . . . . . . . . . . . 11
A Person’s Details Page. . . . . . . . . . . . . . . . . . . . . . . . . . . . . . . . . . . . . . . . . . . . . . . . . . . . . . . 12
Navigating the Pedigree View. . . . . . . . . . . . . . . . . . . . . . . . . . . . . . . . . . . . . . . . . . . . . . . . . . 14
Displaying More Generations of Ancestors on the Pedigree View. . . . . . . . . . . . . . . . 16
Displaying a Person’s Children and Descendants on the Pedigree View. . . . . . . . . . . 17
Closing Generations on the Pedigree View. . . . . . . . . . . . . . . . . . . . . . . . . . . . . . . . . . 18
Moving the Pedigree View Horizontally and Vertically. . . . . . . . . . . . . . . . . . . . . . . . 18
Moving a Person to the Main Position of the Fan Chart or Pedigree View. . . . . . . . . 19
Displaying Correct Spouses and Parents on the Pedigree View. . . . . . . . . . . . . . . . . . 19
Resizing the Pedigree View. . . . . . . . . . . . . . . . . . . . . . . . . . . . . . . . . . . . . . . . . . . . . . 20
Navigating the Fan Chart View. . . . . . . . . . . . . . . . . . . . . . . . . . . . . . . . . . . . . . . . . . . . . . . . 21
Returning to a Previously Viewed Person. . . . . . . . . . . . . . . . . . . . . . . . . . . . . . . . . . . . . . . . . 23
Chapter 3: Seeing Details about People. . . . . . . . . . . . . . . . . . . . . . . . . . . . . . 25
Viewing an Ancestor’s Photos and Stories in Family Tree. . . . . . . . . . . . . . . . . . . . . . . . . . . . 25
Viewing a Person’s Family Members on the Details Page. . . . . . . . . . . . . . . . . . . . . . . . . . . . 26
Viewing a Couple’s Relationship Information, Including Marriage and Divorce
Information. . . . . . . . . . . . . . . . . . . . . . . . . . . . . . . . . . . . . . . . . . . . . . . . . . . . . . . . . . . . . 28
Viewing Child-Parent Relationships . . . . . . . . . . . . . . . . . . . . . . . . . . . . . . . . . . . . . . . . . . . . 29
Viewing Sources. . . . . . . . . . . . . . . . . . . . . . . . . . . . . . . . . . . . . . . . . . . . . . . . . . . . . . . . . . . . 32
Seeing Contributor Information. . . . . . . . . . . . . . . . . . . . . . . . . . . . . . . . . . . . . . . . . . . . . . . . 33
Seeing Information about Living Relatives. . . . . . . . . . . . . . . . . . . . . . . . . . . . . . . . . . . . . . . 34
iiiFamilySearch Family Tree (18 October 2013)
How Family Tree Displays Living People. . . . . . . . . . . . . . . . . . . . . . . . . . . . . . . . . . . 34
Rules Used to Determine If a Person May Still Be Living. . . . . . . . . . . . . . . . . . . . . . . 35
Chapter 4: Adding and Correcting Information about People and
Relationships. . . . . . . . . . . . . . . . . . . . . . . . . . . . . . . . . . . . . . . . . . . . . . . . . . . 37
Why Others Can Change Your Information and How to Prevent Improper Changes. . . . . . 40
Reason Statements for Adding, Editing, and Deleting Information. . . . . . . . . . . . . . . . . . . . 40
Restricted Records. . . . . . . . . . . . . . . . . . . . . . . . . . . . . . . . . . . . . . . . . . . . . . . . . . . . . . . . . . . 41
Building Your Tree. . . . . . . . . . . . . . . . . . . . . . . . . . . . . . . . . . . . . . . . . . . . . . . . . . . . . . . . . . 41
Starting with a Blank Family Tree. . . . . . . . . . . . . . . . . . . . . . . . . . . . . . . . . . . . . . . . . 41
Adding a New Person to Your Existing Tree. . . . . . . . . . . . . . . . . . . . . . . . . . . . . . . . . 42
Finding a Person Who Is Already in the Tree and Linking Him or Her into Your
Family Line. . . . . . . . . . . . . . . . . . . . . . . . . . . . . . . . . . . . . . . . . . . . . . . . . . . . . . . . 45
Entering Standardized Dates and Places. . . . . . . . . . . . . . . . . . . . . . . . . . . . . . . . . . . . 46
Entering Characters from the World’s Languages. . . . . . . . . . . . . . . . . . . . . . . . . . . . 47
Searching for Records from a Person’s Details Page. . . . . . . . . . . . . . . . . . . . . . . . . . . . . . . . . 48
Correcting, Adding to, and Deleting Information about People Who Are Already in
Family Tree. . . . . . . . . . . . . . . . . . . . . . . . . . . . . . . . . . . . . . . . . . . . . . . . . . . . . . . . . . . . . 49
Correcting Information about a Person. . . . . . . . . . . . . . . . . . . . . . . . . . . . . . . . . . . . 49
Changing a Person’s Living or Deceased Status. . . . . . . . . . . . . . . . . . . . . . . . . . . . . . 50
Adding More Information about a Person Who Is Already in Family Tree. . . . . . . . . 52
Adding a Custom Event or Fact to a Person. . . . . . . . . . . . . . . . . . . . . . . . . . . . . . . . . 53
Types of Information That You Can Add about a Person. . . . . . . . . . . . . . . . . . . . . . 55
Deleting Information about a Person. . . . . . . . . . . . . . . . . . . . . . . . . . . . . . . . . . . . . . 57
Correcting, Adding to, and Deleting Relationship Information. . . . . . . . . . . . . . . . . . . . . . . 58
Relationships. . . . . . . . . . . . . . . . . . . . . . . . . . . . . . . . . . . . . . . . . . . . . . . . . . . . . . . . . 58
Adding, Editing, and Deleting a Couple’s Marriage Information, Including
Divorce Information. . . . . . . . . . . . . . . . . . . . . . . . . . . . . . . . . . . . . . . . . . . . . . . . 60
Adding, Changing, and Deleting Relationship Types between Parents and
Children. . . . . . . . . . . . . . . . . . . . . . . . . . . . . . . . . . . . . . . . . . . . . . . . . . . . . . . . . . 64
Removing a Person from a Family (Deleting Relationships). . . . . . . . . . . . . . . . . . . . 66
Replacing a Wrong Parent in a Family with the Correct One. . . . . . . . . . . . . . . . . . . 68
Adding Reason Statements to People and Relationships. . . . . . . . . . . . . . . . . . . . . . . . . . . . . 70
Deleting a Person from the System. . . . . . . . . . . . . . . . . . . . . . . . . . . . . . . . . . . . . . . . . . . . . . 71
Restoring a Deleted Person. . . . . . . . . . . . . . . . . . . . . . . . . . . . . . . . . . . . . . . . . . . . . . . . . . . . 72
Seeing the Change History and Undoing Changes. . . . . . . . . . . . . . . . . . . . . . . . . . . . . . . . . 73
Seeing and Undoing the Changes Made to a Person or Relationship. . . . . . . . . . . . . 73
Filtering a Person’s Change History. . . . . . . . . . . . . . . . . . . . . . . . . . . . . . . . . . . . . . . 75
Correcting Information Moved from new.FamilySearch.org to Family Tree. . . . . . . . . . . . . 76
FamilySearch Family Tree (18 October 2013)iv
Recommendations for Correcting Names Moved from new.FamilySearch.org. . . . . . 76
Recommendations for Correcting Events and Other Information Moved from
new.FamilySearch.org. . . . . . . . . . . . . . . . . . . . . . . . . . . . . . . . . . . . . . . . . . . . . . . 77
Recommendations for Correcting Relationships Moved from
new.FamilySearch.org. . . . . . . . . . . . . . . . . . . . . . . . . . . . . . . . . . . . . . . . . . . . . . . 78
Uploading GEDCOM Files and Copying the Information to Family Tree . . . . . . . . . . . . . . . 79
Part 1. Upload Your GEDCOM File, and Compare It to Family Tree. . . . . . . . . . . . . . 79
Part 2. View the Results. . . . . . . . . . . . . . . . . . . . . . . . . . . . . . . . . . . . . . . . . . . . . . . . . 81
Part 3. Review People Who Are Potential Matches. . . . . . . . . . . . . . . . . . . . . . . . . . . . 82
Part 4. Review People Who Can Be Added to Family Tree. . . . . . . . . . . . . . . . . . . . . . 84
Part 5. Review People Who Are Already in Family Tree. . . . . . . . . . . . . . . . . . . . . . . . 86
Transferring Information between Family Tree and a Personal Genealogical Database. . . . . 88
Chapter 5: Adding Photos and Stories to Your Ancestors in Family
Tree. . . . . . . . . . . . . . . . . . . . . . . . . . . . . . . . . . . . . . . . . . . . . . . . . . . . . . . . . . . . 89
Guidelines for Using Photos and Stories. . . . . . . . . . . . . . . . . . . . . . . . . . . . . . . . . . . . . . . . . 90
Using Photos. . . . . . . . . . . . . . . . . . . . . . . . . . . . . . . . . . . . . . . . . . . . . . . . . . . . . . . . . . . . . . . 91
Adding a Photo Using Family Tree. . . . . . . . . . . . . . . . . . . . . . . . . . . . . . . . . . . . . . . . 91
Changing a Preferred Portrait . . . . . . . . . . . . . . . . . . . . . . . . . . . . . . . . . . . . . . . . . . . . 91
Attaching an Uploaded Photo to a Person in Family Tree. . . . . . . . . . . . . . . . . . . . . . 92
Tagging a Photo. . . . . . . . . . . . . . . . . . . . . . . . . . . . . . . . . . . . . . . . . . . . . . . . . . . . . . . 93
Resizing and Repositioning Tags. . . . . . . . . . . . . . . . . . . . . . . . . . . . . . . . . . . . . . . . . . 95
Removing Tags. . . . . . . . . . . . . . . . . . . . . . . . . . . . . . . . . . . . . . . . . . . . . . . . . . . . . . . 96
Deleting a Photo. . . . . . . . . . . . . . . . . . . . . . . . . . . . . . . . . . . . . . . . . . . . . . . . . . . . . . 96
Identifying the Contributor of a Photo. . . . . . . . . . . . . . . . . . . . . . . . . . . . . . . . . . . . 97
Adding Stories. . . . . . . . . . . . . . . . . . . . . . . . . . . . . . . . . . . . . . . . . . . . . . . . . . . . . . . . . . . . . . 97
Adding a Story. . . . . . . . . . . . . . . . . . . . . . . . . . . . . . . . . . . . . . . . . . . . . . . . . . . . . . . . 97
Attaching a Previously Written Story to a Person in Family Tree. . . . . . . . . . . . . . . . 98
Tagging a Story. . . . . . . . . . . . . . . . . . . . . . . . . . . . . . . . . . . . . . . . . . . . . . . . . . . . . . . 99
Editing a Story and Its Photo. . . . . . . . . . . . . . . . . . . . . . . . . . . . . . . . . . . . . . . . . . . . 99
Removing a Story. . . . . . . . . . . . . . . . . . . . . . . . . . . . . . . . . . . . . . . . . . . . . . . . . . . . 100
Deleting a Story. . . . . . . . . . . . . . . . . . . . . . . . . . . . . . . . . . . . . . . . . . . . . . . . . . . . . . 100
Adding Comments . . . . . . . . . . . . . . . . . . . . . . . . . . . . . . . . . . . . . . . . . . . . . . . . . . . . . . . . . 101
Using Social Media or Email to Share A Specific Photo or Story. . . . . . . . . . . . . . . . . . . . . . 101
Reporting Questionable Material. . . . . . . . . . . . . . . . . . . . . . . . . . . . . . . . . . . . . . . . . . . . . . 102
Chapter 6: Finding Deceased People in Family Tree. . . . . . . . . . . . . . . . . 103
How the Exact Check Boxes Affect Search Results. . . . . . . . . . . . . . . . . . . . . . . . . . . . . . . . . 106
How the Exact Check Box Affects Finding Names . . . . . . . . . . . . . . . . . . . . . . . . . . . 108
vFamilySearch Family Tree (18 October 2013)
How the Exact Check Box Affects Finding Dates. . . . . . . . . . . . . . . . . . . . . . . . . . . . 109
How the Exact Check Box Affects Finding Places. . . . . . . . . . . . . . . . . . . . . . . . . . . . 109
Chapter 7: Printing Information. . . . . . . . . . . . . . . . . . . . . . . . . . . . . . . . . . 111
Using Certified Third-Party Computer Programs to Print Information. . . . . . . . . . . . . . . . . 111
Chapter 8: Attaching Sources to People and Relationships. . . . . . . . . . . 113
Adding Sources to Your Source Box. . . . . . . . . . . . . . . . . . . . . . . . . . . . . . . . . . . . . . . . . . . . 116
Your Source Box. . . . . . . . . . . . . . . . . . . . . . . . . . . . . . . . . . . . . . . . . . . . . . . . . . . . . 116
Typing a New Source into Your Source Box. . . . . . . . . . . . . . . . . . . . . . . . . . . . . . . . 117
What to Enter in Source Fields. . . . . . . . . . . . . . . . . . . . . . . . . . . . . . . . . . . . . . . . . . 118
Copying a Source. . . . . . . . . . . . . . . . . . . . . . . . . . . . . . . . . . . . . . . . . . . . . . . . . . . . . 121
Adding a Record from FamilySearch.org to Your Source Box. . . . . . . . . . . . . . . . . . . 122
Adding a Source That Is Already Created into Your Source Box. . . . . . . . . . . . . . . . 123
Adding, Changing, and Removing Tags from Sources. . . . . . . . . . . . . . . . . . . . . . . . . . . . . . 124
Correcting and Improving Sources. . . . . . . . . . . . . . . . . . . . . . . . . . . . . . . . . . . . . . . . . . . . . 126
Editing Sources. . . . . . . . . . . . . . . . . . . . . . . . . . . . . . . . . . . . . . . . . . . . . . . . . . . . . . 126
Detaching Sources from People and Relationships. . . . . . . . . . . . . . . . . . . . . . . . . . . 128
Seeing and Undoing the Changes Made to a Source. . . . . . . . . . . . . . . . . . . . . . . . . 129
Managing Your Source Box. . . . . . . . . . . . . . . . . . . . . . . . . . . . . . . . . . . . . . . . . . . . . . . . . . . 131
Using Folders to Organize Your Source Box. . . . . . . . . . . . . . . . . . . . . . . . . . . . . . . . 131
Renaming Folders in Your Source Box. . . . . . . . . . . . . . . . . . . . . . . . . . . . . . . . . . . . 132
Deleting Unneeded Folders from Your Source Box. . . . . . . . . . . . . . . . . . . . . . . . . . 133
Removing Sources from Your Source Box. . . . . . . . . . . . . . . . . . . . . . . . . . . . . . . . . . 134
Deleting Sources from Family Tree. . . . . . . . . . . . . . . . . . . . . . . . . . . . . . . . . . . . . . . 135
Seeing a List of the People a Source Is Attached To. . . . . . . . . . . . . . . . . . . . . . . . . . . . . . . . 136
Reporting Abuse in Sources. . . . . . . . . . . . . . . . . . . . . . . . . . . . . . . . . . . . . . . . . . . . . . . . . . 138
Why Sources Are Valuable. . . . . . . . . . . . . . . . . . . . . . . . . . . . . . . . . . . . . . . . . . . . . . . . . . . 139
Sources in Family Tree. . . . . . . . . . . . . . . . . . . . . . . . . . . . . . . . . . . . . . . . . . . . . . . . . . . . . . 140
Source Icons. . . . . . . . . . . . . . . . . . . . . . . . . . . . . . . . . . . . . . . . . . . . . . . . . . . . . . . . . . . . . . 140
Chapter 9: Merging Duplicate Records. . . . . . . . . . . . . . . . . . . . . . . . . . . . . 141
Resolving Common Merge Situations. . . . . . . . . . . . . . . . . . . . . . . . . . . . . . . . . . . . . . . . . . 144
Records That Cannot Be Merged. . . . . . . . . . . . . . . . . . . . . . . . . . . . . . . . . . . . . . . . . . . . . . 146
Undoing a Merge. . . . . . . . . . . . . . . . . . . . . . . . . . . . . . . . . . . . . . . . . . . . . . . . . . . . . . . . . . 147
Restoring a Record That Was Deleted after a Merge. . . . . . . . . . . . . . . . . . . . . . . . . . . . . . . . 149
Indicating Two Records Are Not a Match. . . . . . . . . . . . . . . . . . . . . . . . . . . . . . . . . . . . . . . . 152
Removing a Record from the Not a Match List. . . . . . . . . . . . . . . . . . . . . . . . . . . . . . . . . . . 152
Fixing Incorrectly Combined Records from new.FamilySearch.org. . . . . . . . . . . . . . . . . . . . 154
FamilySearch Family Tree (18 October 2013)vi
Chapter 10: Working with Other Users. . . . . . . . . . . . . . . . . . . . . . . . . . . . . 155
Appropriate Use of Contact Information and Discussions. . . . . . . . . . . . . . . . . . . . . . . . . . 155
Seeing Contributor Information. . . . . . . . . . . . . . . . . . . . . . . . . . . . . . . . . . . . . . . . . . . . . . . 155
Participating in Discussions. . . . . . . . . . . . . . . . . . . . . . . . . . . . . . . . . . . . . . . . . . . . . . . . . . 157
Editing Your Discussions and Comments. . . . . . . . . . . . . . . . . . . . . . . . . . . . . . . . . . 158
Deleting Your Discussions and Comments. . . . . . . . . . . . . . . . . . . . . . . . . . . . . . . . . 158
What Causes Discussions to Disappear. . . . . . . . . . . . . . . . . . . . . . . . . . . . . . . . . . . . 159
Reporting Inappropriate Discussions and Comments. . . . . . . . . . . . . . . . . . . . . . . . 159
Watching and “Unwatching” Information. . . . . . . . . . . . . . . . . . . . . . . . . . . . . . . . . . . . . . 161
Watching and “Unwatching” Records about People in Family Tree. . . . . . . . . . . . . 161
Watching and “Unwatching” Sources in Family Tree. . . . . . . . . . . . . . . . . . . . . . . . 162
Using Your Watch List. . . . . . . . . . . . . . . . . . . . . . . . . . . . . . . . . . . . . . . . . . . . . . . . 163
Glossary. . . . . . . . . . . . . . . . . . . . . . . . . . . . . . . . . . . . . . . . . . . . . . . . . . . . . . . . . 165
viiFamilySearch Family Tree (18 October 2013)

Chapter 1
Getting to Family Tree
Family Tree is an updated approach to organizing and preserving your genealogy online.
Family Tree is free, available to everyone, and provides an easy way to share information,
compare research, and go further faster by working together.
In Family Tree you can:
• See what the system already contains about your ancestors.
• Work with others to fill in missing information and correct errors.
• Add sources and explanations to show that information is accurate.
• Find and merge records that are about the same person.
• Add photos and stories of your ancestors.
1. Go to familysearch.org.
2. Click Family Tree.
3. If you are not signed in, sign in.
Tip: If you click Stay signed in for 2 weeks, each time you go to FamilySearch.org
and click Family Tree, the system automatically signs you in. At the end of two weeks,
you can select the option again. Do not use the Stay signed in for 2 weeks option
if you are on a shared computer.
9FamilySearch Family Tree (18 October 2013)

Chapter 2
Seeing Ancestors on a Pedigree
Chart or Fan Chart
In Family Tree, you can display your ancestors on different types of views. The pedigree
view makes it easy to focus on one part of your ancestry. The fan chart view makes it easy
to see several generations of your ancestors at one time and identify the places where more
research is needed.
The fan chart does not currently work on Internet Explorer 8. Use Internet Explorer 9 or
an equivalent version of Firefox or Chrome. If the computer has Windows XP, which does
not support Internet Explorer 9, download Firefox or Chrome.
1. On the FamilySearch.org home page, click Family Tree or Fan Chart.
2. To switch to a different view, use the links in the upper-left corner of the screen:
• To switch to the fan chart, click Fan Chart.
• To switch to the pedigree view, click Pedigree.
3. To move a different person to the main position of the chart, click the person’s name,
and click Tree.
4. To see all of the person’s details, click the person’s name, and click Person. To return
to the pedigree chart or fan chart, click the Tree link that is next to the person’s name
at the top of the page.
The next time you use Family Tree, you will see whichever view was displayed when you
ended your previous session.
A Person’s Summary Card
The summary card is a useful navigation tool that you can use in many places throughout
Family Tree. It lists basic facts about a person. You can also use it to put a person in the
main position of the tree and view the person’s details page.
You can display a person’s summary card from your Family Tree, from the details page
of a family member, and from the Find results. To display it, click a person’s name.
What It Looks Like
A person’s summary card appears as a pop-up on top of whatever else is shown on the
screen:
11FamilySearch Family Tree (18 October 2013)

What You Can Do
On a summary card, you can do the following:
• See the person’s portrait photo if one has been uploaded.
• See the number of sources, discussions, photos, and stories that are attached to this
person.
• See the person’s name and basic events.
• See the ID number (formerly called the person identifier). This number identifies each
person in the system. It appears beneath the name.
• To display this person in the main position on Family Tree, click Tree.
• To display the person’s details page, click Person.
• To display the person’s sources, click Sources.
• To display the person’s discussions, click Discussions.
• To display the person’s photos, click Photos.
• To display the person’s stories, click Stories.
•
To watch the person, click Watch. To unwatch the person, click Unwatch.
A Person’s Details Page
A person’s details page shows all of the information about him or her. From the details
page, you can also add information about a person, correct information, attach sources,
and participate in discussions.
You can display the details page from almost anywhere in Family Tree. To display it,
click the person’s name. Then click Person.
Tip: If you want to have a details page open for more than one person, you need to
open the details page in another tab or window of your browser. In many browsers, you
can do this by doing a right-click on the Person link. Then select the option to open
the link in a new tab or window. Check your browser’s help system for specific
instructions.
FamilySearch Family Tree (18 October 2013)12
Seeing Ancestors on a Pedigree Chart or Fan Chart

What It Looks Like
A person’s details page is a long page that contains all of the information about him or
her. It is divided into sections. To get to each section, you can click the Vitals, Other,
Family, Sources, and Discussions links in the header. You can also scroll down the
page to see all of the information. The screen is too big to effectively show here, but the
top part looks like this:
What You Can Do
On a person’s details page, you can do the following:
• See, add, edit, and delete the person’s name, gender, events, and other details.
• See the ID number (formerly called the person identifier). This number identifies each
person in the system. It appears directly beneath the name.
• See the person’s family members. You can also:
- Click the name of any person in the family to display his or her summary card.
- Add new spouses, children, parents, and siblings.
- See, edit, and delete information about couple and parent-child relationships.
• See, attach, detach, and edit sources about the person.
• Search for the person in the historical records on FamilySearch.org.
• Participate in discussions.
• Watch the person so that you can receive notifications when information about him
or her changes.
• See a history of the changes that were made to the person’s information.
• See how many discussions have been added and when the last activity occurred.
• Return to one of the last 50 people whose information you viewed previously.
13FamilySearch Family Tree (18 October 2013)
Seeing Ancestors on a Pedigree Chart or Fan Chart

• See and merge duplicate records.
• Print a pedigree chart and family group record.
• Delete the person from Family Tree.
Navigating the Pedigree View
When you see your family information on a pedigree, you can display more generations,
resize the tree, move families to different places on the screen, and change to different
spouses or parents if a person had more than one.
On the pedigree view, click the appropriate option for what you want to do:
ResultOption to Click
Switch between viewing the tree on
the pedigree view and on the fan
chart view.
Display the person’s summary card
that shows more information about
the person.
A person’s name
• To move this person to the main
position of Family Tree, click
Tree.
• To see the person’s details page
(which contains all of the
available information), click the
Person link.
Display a screen that you can use to
add a person’s husband or wife. By
Add Husband or Add Wife
default, the system shows the screen
where you can find a person who is
already in the system. If you want
to enter a new person instead, click
Add Person.
Move the tree around on the screen.
(The background of the pedigree
view, when the cursor shows as a
four-headed arrow)
See two more generations of
ancestors for the line.
Note: This icon appears next to the last
generation of ancestors that are
displayed in a line.
Display the children of the couple
in the main position.
Close an opened line of descendants
for the couple in the main position.
FamilySearch Family Tree (18 October 2013)14
Seeing Ancestors on a Pedigree Chart or Fan Chart

ResultOption to Click
Close an opened line of ancestors.
Display a couple’s children.
Tip: To see this option, hover your
mouse cursor over a couple’s box on
the tree.
See a list of the other husbands or
wives that a person is linked to, and
choose a different one to display.
Tip: To see this option, hover your
mouse cursor over a couple’s box on
the tree.
See a list of the other parents that a
person is linked to, and choose a
different one to display.
Tip: To see this option, hover your
mouse cursor over a couple’s box on
the tree.
Increase or decrease the size of the
FamilySearch Family Tree.
Tip: In many browsers, you can also
press Ctrl plus + and Ctrl plus - to
increase and decrease the font size.
If this does not work in your
browser, see your browser’s help
system.
Move the tree to the left, right,
down, or up. To recenter the tree
after moving it, click the center
circle.
Note: You can also move the tree
by clicking your mouse on the
screen and dragging it until you can
see the information you want to see.
Print a four-generation pedigree
chart.
Return to your Family Tree from
another screen in Family Tree.
Tree
Display the details page of the last
person you displayed. If you have
Person Tree
not yet displayed a person’s details
page, your own details page appears.
15FamilySearch Family Tree (18 October 2013)
Seeing Ancestors on a Pedigree Chart or Fan Chart

ResultOption to Click
Return to the details page of an
ancestor you viewed previously.
Tip: Click the arrow at the end of
the icon to see the list of ancestors
you viewed previously. Then click
the ancestor you need.
Find an ancestor by name or ID
number (person identifier).
Find
See a list of all of the people that you
are watching.
Watch List
Return to an ancestor who was
previously in the main position.
Tip: Click the arrow at the end of
the icon to see the list of ancestors
you viewed previously. Then click
the ancestor you need.
Sign in to use Family Tree on behalf
of someone else.
Note: The following requirements
must be met before you can help
someone else:
• The person who is helping must
be a member of The Church of
Jesus Christ of Latter-day Saints.
• The person being helped must
have an account on
FamilySearch.org.
• You must know the contact name
of the person being helped.
• You must know the helper
number of the person being
helped.
Displaying More Generations of Ancestors on the Pedigree View
When you first display a person on the pedigree view, you may not see all of the
information that the system contains about that family line. You can display more
generations if the system contains them.
The fan chart displays four generations of a person’s ancestors. It cannot be expanded
to show more generations.
1. Find the last person that is currently displayed in the family line that you want to
see more of.
2. Click the appropriate icon:
FamilySearch Family Tree (18 October 2013)16
Seeing Ancestors on a Pedigree Chart or Fan Chart

To display two more generations of the person’s tree, click Expand Tree,
which appears to the right of the person’s name.
•
You may need to wait for a few seconds while the information appears.
You can extend one line of ancestors at a time. For example, if you click to expand
the tree for one set of your grandparents, you can keep expanding one line of that
tree back until the system has no more information about that line. If you then click
to expand the tree for your other set of grandparents, the lines for your first set
of grandparents close, and the lines for your second set of grandparents appear.
If you do not see the arrow icon, the system either does not contain any more
information, or it cannot display the information because the people may still be
living.
If nothing happens when you click the arrow, it means that the same person is already
shown on the tree. This could be the result of these situations:
• The same person is in more than one line in the tree. For example, if your
great-grandparents were first cousins, then two of your lines connect to the same
people. If the tree already displays this line, the system cannot display it again.
The tree can display the shared line once.
• The person is part of a looping pedigree. A looping pedigree is a tree in which
people are incorrectly linked back to themselves in future or previous generations.
For example, a person may be mistakenly combined with a father or grandfather
of the same name. Consequently, he is linked to himself as his own father or
grandfather.
Displaying a Person’s Children and Descendants on the Pedigree View
You can display a person’s children and grandchildren on the pedigree view.
1. To display a couple’s children, follow these steps:
a. Pause your cursor anywhere over the box that contains the names of the father
and mother.
An option to display the children appears beneath the box.
b. Click Children.
The Children option appears if the system contains information about the
couple’s children and if you are authorized to see the information.
You can display the children of one couple at a time.
c. When you no longer want to see the children on the tree, click Children again.
17FamilySearch Family Tree (18 October 2013)
Seeing Ancestors on a Pedigree Chart or Fan Chart

2. When a couple is in the main position on the tree, you can display their descendants
on the left side of the tree:
a. If the couple is not in the main position, click the name of one of the parents,
and click Tree.
The couple moves to the main position on the family tree.
b. Click Expand Tree, which appears to the left of the couple.
The icon appears if the system contains the couple’s children and if you are
authorized to see the information.
The couple’s children appear.
c. To see another generation of descendants, repeat the previous step.
You can extend one line of descendants at a time. For example, if you click
to see a couple’s children, you can keep clicking to display more generations
in that line. If you then click to display the descendants of a different child,
the descendant lines that you previously opened then close.
d. To close a generation of descendants, click the icon of the children that you
no longer want to display.
Closing Generations on the Pedigree View
If the pedigree view contains too many generations of ancestors or descendants, you
can close some to make navigation easier.
1. On the pedigree view, find the line that you want to close.
2. Click the appropriate icon:
• If you are viewing a tree and want to close one generation of ancestors, click ,
which appears to the right of the couple’s names.
• If a couple’s descendants appear on the tree and you want to close that generation,
click , which appears to the left of the couple’s names.
If you do not see the arrow icon, you cannot close the line any farther.
Moving the Pedigree View Horizontally and Vertically
The fastest way to move the pedigree view around on the screen is to click your mouse
anyplace on the screen except a person’s name, and drag your mouse until the pedigree
appears where you want it. With the click and drag method, you can move the screen
diagonally, up, down, to the left, and to the right.
If you prefer to not use click and drag, you can use the move icon:
To move the pedigree view, use the icon:
FamilySearch Family Tree (18 October 2013)18
Seeing Ancestors on a Pedigree Chart or Fan Chart

To move up, click .•
• To move down, click .
• To move left, click .
• To move right, click .
• To move the pedigree view to its original position, click the small circle in the
center ( ).
Moving a Person to the Main Position of the Fan Chart or Pedigree
View
You can move a person and his or her spouse to the main position on the pedigree view
or fan chart.
The main position shows the person or couple that the rest of the view is based on. For
example, if you are in the main position, the tree shows your children, parents,
grandparents, and so forth.
You can move a person to the main position from either the tree or the person’s details
page.
Display the person that you want to move to the main position. You can do either
of the following:
• Click the person’s name, then Tree.
• Display the person’s details page, then View Tree. This link appears at the top
of the page, next to the person’s ID number.
Displaying Correct Spouses and Parents on the Pedigree View
A person can be linked to more than one spouse and more than one set of parents. If
the fan chart or pedigree view does not show the parents or spouse that you want, you
can display a different one.
Tip: When you display a different spouse or parent on the pedigree view, that person
remains selected until you choose someone else. This selection remains from one time
you use Family Tree to the next.
• If the tree displays the wrong set of parents and ancestors for a person, follow the
process that displays a different set of parents. Do this even if one parent is displayed
correctly and the other is not.
• If the tree displays a person’s wrong spouse and descendants, follow the process to
display a different spouse.
1. Display the family on the pedigree view.
2. Pause your cursor over the box that lists the person whose other spouses or parents
you want to display.
If one of the people in the box is linked to other spouses or parents, the options to
display those other spouses or parents appear.
19FamilySearch Family Tree (18 October 2013)
Seeing Ancestors on a Pedigree Chart or Fan Chart

The links to display Other Husbands or Other Wives appear next to the name of the
currently displayed husband or wife. For example, the Other Husbands link appears
next to the husband’s name. This does not mean that the husband is linked to other
husbands. Rather, it means that there are other husbands who could appear in that
spot on the pedigree view.
3. To display a different set of parents, click the names of the parents that you want.
a. Click All Parents.
This option appears to the right of the couple’s box.
A list of the other parents appears.
b. Click the parents that you want to be displayed on the pedigree view.
The parents that you selected appear on the pedigree view.
4. To display a different husband or wife, follow these steps:
a. Click All Husbands or All Wives.
These links appear to the left of the couple’s box.
A list of the husbands or wives appears.
b. Click the husband or wife that you want to display.
The person’s summary card appears.
c. Click Tree to display that spouse.
That couple now appears in the main position of the pedigree view.
Note: Currently, there is no way to display a different spouse on the pedigree view
without moving that couple to the main position.
The selected spouse or parents remain on the pedigree view until you switch to a different
spouse or parent.
Resizing the Pedigree View
If you open many generations of ancestors or descendants on the pedigree view, it can
be difficult to see all of the information. Resizing the view allows you to alternate between
seeing the entire pedigree at once and being able to read the names of the people shown.
FamilySearch Family Tree (18 October 2013)20
Seeing Ancestors on a Pedigree Chart or Fan Chart

To resize the pedigree view, use the icon:
• To make the view larger, click +.
• To make the view smaller, click –.
Tip: You can resize both the fan chart and the pedigree view with your browser. In
most browsers, this option is on the View menu. See your browser’s help system for
more information. This option also works to resize the font on a person’s details page.
In many browsers, you can press Ctrl plus + and Ctrl plus - to increase and decrease
the font size.
Navigating the Fan Chart View
When you view your family information on a fan chart, you can easily see where you
could identify more generations of ancestors. You can print the fan chart. You can also
change the person who is at the center. This lets you see the person’s children and more
generations of ancestors for that person.
1. If you are not already in Family Tree, go to it:
a. Go to www.familysearch.org, and sign in.
b. Click the Family Tree link.
c. Click Fan Chart.
By default, you appear in the main position.
2. On the fan chart view, click the appropriate option for what you want to do:
ResultOption to Click
Switch between viewing the tree on
the pedigree view and on the fan
chart view.
Display the person’s summary card
that shows more information about
the person.
A person’s name
• To move this person to the main
position of the fan chart, click
Tree.
• To see the person’s details page
(which contains all of the
available information), click the
Person link.
See more children. If there are more
than 5 children in the family, these
arrows appear to let you move
between the children.
See another spouse. If there is more
than one spouse, these arrows appear
to let you move between the
spouses.
21FamilySearch Family Tree (18 October 2013)
Seeing Ancestors on a Pedigree Chart or Fan Chart

ResultOption to Click
Print the fan chart.
On a person's summary card, move
that person to the main position on
the fan chart.
Tip: To see a person’s summary
card, click the name.
Tree
On a person's summary card, go to
the person’s details page.
Tip: To see a person’s summary
card, click the name.
Person
Return to an ancestor you had
viewed previously.
Tip: Click the arrow at the end of
the icon to see the list of ancestors
you viewed previously. Then click
the ancestor you need.
Return to the details page of an
ancestor you viewed previously.
Tip: Click the arrow at the end of
the icon to see the list of ancestors
you viewed previously. Then click
the ancestor you need.
Find an ancestor by name or ID
number (person identifier).
Find
See a list of all of the people that you
are watching.
Watch List
Sign in to use Family Tree on behalf
of someone else.
Note: The following requirements
must be met before you can help
someone else:
• The person who is helping must
be a member of The Church of
Jesus Christ of Latter-day Saints.
• The person being helped must
have an account on
FamilySearch.org.
• You must know the contact name
of the person being helped.
• You must know the helper
number of the person being
helped.
FamilySearch Family Tree (18 October 2013)22
Seeing Ancestors on a Pedigree Chart or Fan Chart

Returning to a Previously Viewed Person
You can easily return to people that you previously viewed in Family Tree. Family Tree
saves a list of the last 50 people you viewed. To return to a person, you click the name
in the list.
You can either go to the tree view or to the details page of the person.
The first 10 people appear in the drop-down list, and you can scroll to see the remaining
40. The people that you most recently worked with appear at the top of the list.
The system saves this list of previously viewed people from one session to the next. This
means if you quit using Family Tree, this list will be available the next time you use
Family Tree.
1. Decide whether you want to go to the tree view or to the details page for the person.
• To go to the person in the tree, near the top of the screen, click the triangle at
the end of Tree.
• To go to the person’s details page, near the top of the screen, click the triangle
at the end of Person.
A list of the people you previously viewed appears.
2. If the person is not among the first 10 people in the list, scroll down the list.
3. Click the person that you want.
23FamilySearch Family Tree (18 October 2013)
Seeing Ancestors on a Pedigree Chart or Fan Chart

Chapter 3
Seeing Details about People
In Family Tree, you can see details about a person in two ways: On a person’s summary
card and on a details page.
The person’s summary card lists the most important pieces of information about the person.
To see all of the information, you need to display the person’s details page.
1. Open the person’s details page.
a. On the pedigree view or fan chart view, click the person’s name.
b. On the person’s summary card, click Person.
2. (Optional) To see all of the information about each field in the Vital Information or
Other Information sections, click that section’s Open Details link. To close all of the
details, click Close Details.
The reason field and the Modified field appear. The Modified field identifies the date
when this field was last changed and who made the change.
3. (Optional) To hide an entire section of the details, such as the Vital Information section,
click its Close button. To reopen it, click Open.
The sections that you close remain closed on every details page that you display
afterward. For example, if you close the Vital Information and Other Information
sections on one person’s details page, the same sections remain closed on every details
page that you view until you open them again. This is helpful, for example, if you are
working with sources and want to reduce the amount of scrolling that you have to do
to see the Sources section of each details page that you display.
4. (Optional) to see, edit, or delete all of the information about one piece of the
information, click the information. To close it, click Close.
5. To see photos or stories about this person, click Photos or Stories. To switch back to
the details, click Details.
Viewing an Ancestor’s Photos and Stories in Family Tree
You can see the photos and stories that have been attached to a person in Family Tree.
1. On the fan chart or pedigree view, click the person’s name.
2. Display the photos or stories, using either of the following methods:
• On the summary card, click Photos or Stories.
• On the summary card, click Person. Then, on the person’s details page, click the
Photos or Stories link in the header.
3. From the Photos page, you can do the following:
• To add a new photo, click Add Photo.
• To choose a different portrait, click the current portrait photo by the person’s
name. The system shows the photos for the person. At the bottom of the photo
25FamilySearch Family Tree (18 October 2013)

you want to use for the portrait, click the circle to select the photo. Click Set
Portrait.
If you added the photo, you can also do the following:
• If the portrait photo is off center or shows the wrong part of the photo, click the
portrait photo. On the right of the next screen, in the list of people in the photo,
click the one whose tag you want to edit. Click Edit Tag. Adjust the size or
position of the circle, and click Save.
• If the portrait photo contains more than one person, click the photo, and adjust
the tag. Then add new tags for the other people in the photo.
• To remove this photo from this person without deleting it from the system, you
need to remove the tag that links this photo to this person. Click the photo. On
the right of the next screen, in the list of people in the photo, click the name
whose tag you want to delete. Click Remove Tag.
• To delete a photo from the system, click it. Then click Details, and then Delete
Photo.
4. From the Stories page, you can do the following:
• To add a new story, click Add Story.
• If the story lists more than one person, click the story, and in the Who is in this
story field, add the names of the other people.
If you added the story, you can also do the following:
• To edit the text of the story or to add, change, or delete the story’s photo, click it.
Then, on the left near the top, click Edit Story.
• To remove this story from this person without deleting it from the system, you
need to remove the tag that links this story to this person. Click the story. On the
right of the next screen, in the list of people in the story, click the name whose
tag you want to remove. Click Remove Tag.
• To delete a story from the system, click it. Then click Delete.
Viewing a Person’s Family Members on the Details Page
A person’s details page shows a person’s families, including the person as a child with
his or her parents and the person as a spouse with his or her children.
From the Family Members section of a person’s details page, you can do the following:
• See, add, edit, and delete a couple’s marriage information.
• Add missing spouses, parents, or children. You can also remove incorrect family
members.
Spouses are listed in chronological order, based on the earliest marriage event date. If
the spouses are listed in the wrong chronological order, you can edit the marriage events.
If all of the marriage events are correct, you can choose which spouse is displayed by
default.
1. Open the person’s details page.
2. Scroll down to the Family Members section.
The person is shown with spouses and children on the left side, and with parents
and siblings on the right side.
FamilySearch Family Tree (18 October 2013)26
Seeing Details about People

3. (Optional) Determine what you want to do next:
• To display the children in a specific family, click Children. To hide them,
click Children.
• To display all of the children in all of the families, click Show All. To hide them,
click Hide All.
• To display the couple’s marriage information, click the Edit Couple link that is
in the couple’s box. From there, you can also edit or add marriage events. The
available marriage events are marriage, annulment, common law, and divorce.
• To display a child’s parent-child relationship, hover your mouse cursor over the
child’s name. Click the Edit Relationship link that appears. From there, you
can fix incorrect parents and indicate the relationship type between each parent
27FamilySearch Family Tree (18 October 2013)
Seeing Details about People

and the child. The available relationship types are biological, adopted, guardianship,
step, and other.
• To add a new person or link in a missing person, click the appropriate link: Add
Spouse (located at the top of the Spouses and Children section), Add Parent
(located at the top of the Parents and Siblings section), or Add Child (located at
the bottom of the box listing a couple’s children).
• If the person had a child and you do not know the other parent, click Add Child
with an Unknown Father or Add Child with an Unknown Mother. This
link is located at the bottom left of the Family Members section, beneath any other
spouses and children that are already listed.
Viewing a Couple’s Relationship Information, Including
Marriage and Divorce Information
From a person’s details page, you can display a couple’s marriage information, such as
the marriage date and place. From there, you can add and correct information about
the couple.
1. Open the details page of either the husband or wife.
2. Scroll down to the Family Members section.
The marriage date and place appears in the box that shows the names of each couple.
3. If you want to see more information about the marriage, click the Edit Couple link
that appears in the box that shows the couple and their marriage information.
The Couple Relationship page appears.
4. (Optional) Determine what you want to do next:
FamilySearch Family Tree (18 October 2013)28
Seeing Details about People

To add or edit the reason statement that explains how you know each person is
part of this couple, click the person’s name. Then click the appropriate link.
•
• If one of the spouses is incorrect, click the spouse’s name, and then click Change.
• If these two people were never a couple, click Delete Relationship.
• To edit or delete a marriage event, click the marriage event. A box opens up so
that you can review the existing information. If you still want to make the change,
click the Edit or Delete links.
• To add a new marriage event, click Add an Event. A box opens up in which you
can enter the event information. Click the drop-down lists to select the type of
marriage event. The available marriage events are marriage, annulment, common
law, and divorce.
• To enter a new a source about this couple’s relationship, click Create a New
Source. You can select a source that is already in your source box or create a new
source.
• To attach a source that is already in your source box, click Go to Source Box.
• To see a history of the changes made to this couple’s relationship, click the Show
All link that is in the Latest Changes box.
5. To display the details of a person in this relationship, use the Go to links that are
located beneath the FamilySearch tree logo.
Viewing Child-Parent Relationships
From a person’s details page, you can display information about his or her parent-child
relationships. This information includes the relationship type, which indicates whether
the relationship was biological, step, adopted, and so forth.
1. Open the details page of the child, father, or mother.
2. Scroll down to the Family Members section.
3. Hover your mouse over the name of the child whose parent-child relationship you
want to see.
A Edit Relationship link appears.
29FamilySearch Family Tree (18 October 2013)
Seeing Details about People

4. Click the Edit Relationship link.
The Parent-Child Relationship page appears.
FamilySearch Family Tree (18 October 2013)30
Seeing Details about People

5. (Optional) Determine what you want to do next:
• To add a reason explaining why this parent-child relationship is correct, click the
child’s name, and then click Edit.
• If one of the parents is incorrect and you know the correct parent, click the
incorrect parent’s name, and then click Change. From there, you can either add
the person to the Family Tree or link in a person who is already in the Family Tree.
• If one of the parents is incorrect and you do not know the correct parent, click
the incorrect parent’s name, and then click Remove.
• If this child should be unlinked from both parents, click Delete Relationship.
This link is located in the Tools box.
• To change an existing relationship type or explain why the existing relationship
type is correct, click the relationship type, and then click Edit.
• To delete a relationship type, click the relationship type, and then click Delete.
• To add a new relationship type, click Add. The available relationship types are
biological, adopted, guardianship, step, and other.
• To enter a new a source about this relationship, click Create a New Source. You
can select a source that is already in your source box or create a new source.
• To attach a source that is already in your source box, click Go to Source Box.
• To see a history of the changes made to this parent-child relationship, click the
Show All link that is in the Latest Changes box.
6. To display the details of a person in this relationship, use the Go to links that are
located beneath the FamilySearch tree logo.
31FamilySearch Family Tree (18 October 2013)
Seeing Details about People

Viewing Sources
You can see what sources have been attached to the people, couple relationships, and
parent-child relationships in Family Tree.
1. On the fan chart or pedigree view, click the person’s name.
2. To display the sources that are attached to the person, do one of the following:
• On the summary card, click Sources.
• On the summary card, click Person. Then, on the person’s details page, click the
Sources link in the header. (You can also scroll down to the Sources section.)
3. To display the sources that are attached to a relationship that this person is in, follow
these steps:
a. On the summary card, click Person.
b. Scroll down to the Family Members section.
c. To view the sources to a couple relationship, click the Edit Couple link that is
in the box that shows the husband and wife. When the Couple Relationship page
appears, scroll down to the Sources section.
d. To view the source to a parent-child relationship, hover your mouse cursor over
the child’s name. Click the Edit Relationship link that appears. When the
Parent-Child Relationship page appears, scroll down to the Sources section.
4. View the details of the sources:
• To see the details about one of the sources, click its title. To close the details, click
Close.
• To see all the details about all of the sources, click Open Details. To close all of
the details, click Close Details.
FamilySearch Family Tree (18 October 2013)32
Seeing Details about People

5. If you want to change the order in which the sources are listed, click the source’s
title, and drag it to a new position in the list.
Seeing Contributor Information
Family Tree keeps track of who adds, changes, and deletes information. You can quickly
display that contributor’s contact information if he or she allows it to be displayed.
You can contact other users under these circumstances:
• The contributor is a current user of the system.
• The contributor allows the system to display contact information. FamilySearch
Support cannot give you contact information when a user chooses not to display it.
Note: To change how much contact information Family Tree displays about you,
click your username in the upper-right corner of the screen. Click Settings, and
scroll down to the Contact section. Click the Public option for each piece of
information that you want displayed with your contact information.
If someone entered the information in behalf of someone else, you see both a contributor
and a submitter. The contributor is the person who provided the information. The
submitter is the person who entered it for the contributor.
1. To display the contributor’s contact card, click his or her contact name.
You can display the contact card from a person’s details page, a change history, the
search results, or any other screen on which the contributor’s name is displayed.
2. Use the contact information.
• If the contributor provided an email address, click it. Your computer’s default
email program opens, and you can write your message.
Note: On most personal computers with Windows, the default email program is
Microsoft Outlook. If you use an online e-mail service, such as MSN or Google,
you will need to go to your email account online, create a new email, and copy
the contributor’s email address into the To field.
33FamilySearch Family Tree (18 October 2013)
Seeing Details about People

• If you prefer to communicate by other means, either print the contact information,
or write it down so you can use it to call or write a letter.
Tip: The printout does not contain any information that reminds you what
information this contributor provided. You may want to also print the information
in question or keep notes that help you remember what you wanted to discuss.
• If a contributor chooses not to display contact information, try starting a discussion.
That user may choose to respond through the discussion board. If not, please
respect the privacy of users who choose not to display contact information.
FamilySearch Support cannot give you contact information when a user chooses
not to display it.
3. When you are finished, click on the screen somewhere outside of the contact card.
The contact card closes.
In your communications with other contributors, it is helpful if you do the following:
• Explain how you got the other person’s contact information.
• List the person or family line of interest to you. It is especially helpful if you can
include ID numbers (formerly called person identifiers) so the other person can quickly
find the information of interest to you.
• Remember that other users might not see exactly the same information as you when
they look at their family line. For example, they may not see the same living people.
Or they may see a different family line because they descend through a different
spouse.
Seeing Information about Living Relatives
To protect the privacy rights of living people, the system limits the amount of information
that you can see about living relatives. In Family Tree, the word “Living” is displayed
with the person’s information.
To see your living relatives on your pedigree in Family Tree, you need to enter their
information. Only you will be able to see these records.
• Since you cannot use the Search feature to find living relatives, use these options to
find a living person whose information you have the rights to see:
- Display the tree, and navigate to the person.
- Search for a close relative who has birth or death information, and display the
tree. Then navigate to the person that you want to find.
How Family Tree Displays Living People
You can identify people who may be living because the word “Living” appears beneath
their names instead of a death year.
• In the tree, the word “Living” appears beneath the names instead of a death year.
• On the person’s summary card and details page, the word “Living” appears beneath
the name instead of a death year.
• On a person’s details page, the word “Living” appears in the header instead of a death
year. In the Vital Information section, the word “Living” appears instead of a date in
the Death field.
FamilySearch Family Tree (18 October 2013)34
Seeing Details about People

Rules Used to Determine If a Person May Still Be Living
The system uses rules to determine whether a person may still be living.
The system considers that a person may be living if both of the following situations
apply:
• He or she was born 110 or fewer years ago, married 95 or fewer years ago, or had a
child born 95 or fewer years ago.
• The record contains no death information.
Note: Any text in the fields for death and burial causes the system to determine that
the person is deceased.
35FamilySearch Family Tree (18 October 2013)
Seeing Details about People

Chapter 4
Adding and Correcting
Information about People and
Relationships
In Family Tree, you add and correct information about people and the relationships that
connect them into families.
As you add or edit information, you follow a general process in which you review the
information that has already been entered, including the sources and reason statements
that have already been added. If you have more accurate information, you can enter it,
explain how you arrived at this conclusion, and attach the sources that you used.
Tip: Before you add, edit, or delete information in Family Tree, you should make sure that
your user profile is set to display your contact information, at least an e-mail address. To
set your contact information, click your username in the upper-right corner of the screen.
Click Settings, and scroll down to the Contact section. Click the Public option for each
piece of information that you want displayed with your contact information.
1. Open the details page of the person whose information you need to add, edit, or delete.
a. On the pedigree view or fan chart view, click the person’s name.
b. On the person’s summary card, click Person.
2. Make the changes.
Tip: Click the Open Details link to see all of the available links for making corrections
to the information in a section
The following chart lists the types of changes that you can make and provides the first
few clicks.
DescriptionOption
Add the person’s gender,
birth, christening,
1. Scroll to the Vital Information section.
2. Click the Add link that appears beneath the name
of the field.
Important: Be sure to select the correct template if
you need to enter names in Spanish, Portuguese,
Cyrillic, or an Asian language.
death, or burial
information.
3. Enter the information, and click Save.
Add a new piece of
information to the
1. Scroll to the Other Information section.
2. Click the Add link that appears beneath the Other
Information heading.
Other Information
section.
3. Click the type of information that you want to add.
37FamilySearch Family Tree (18 October 2013)

DescriptionOption
4. Enter the information, and click Save.
Edit or delete
information that has
1. Scroll to where the information is displayed in either
the Vital Information or Other Information section.
already been added to
2. Click the information that you want to edit or delete.
For example, to edit the birth date, click the birth date.
the Vital Information
and Other Information
sections.
3. To replace the information that is already there with
more correct information, click Edit. To remove the
information, click Delete.
Note: Sometimes, Family Tree does not allow you to edit
a person’s gender. In these cases, create a new person
with the correct gender, and add him or her to the family.
You can then remove the person with the incorrect
gender from the family.
• Add a spouse.
1. Scroll to the Family Members section. Spouses and
children are listed on the left side of this section.
• Add a child.
2. Click the correct option:
• To add a new spouse, click Add Spouse.
• To add a new child, click the Add Child option
that appears at the bottom of the box that lists the
couple’s children.
• To add a child to that person when you do not
know the other parent, click the Add Child
with an Unknown Father or Add Child
with an Unknown Mother option. This option
appears beneath all of the person’s spouses and
children.
3. By default, the system shows the screen where you
can find a person who is already in the system. If you
want to enter a new person instead, click Add Person.
• Add a parent.
1. Scroll to the Family Members section. Parents and
siblings are listed on the right side of this section.
• Add a sibling.
2. Click the correct option:
• To add a new parent, click Add Parent.
• To add a new sibling, click the Add Child
option that appears at the bottom of the box that
lists the couple’s children.
3. By default, the system shows the screen where you
can find a person who is already in the system. If you
want to enter a new person instead, click Add Person.
FamilySearch Family Tree (18 October 2013)38
Adding and Correcting Information about People and Relationships

DescriptionOption
• Add, edit, or delete a
couple’s marriage
date or place.
1. Scroll to the Family Members section, and find the
box containing the names of the husband and wife.
2. Click the Edit Couple link that is in the box.
• Unlink a couple.
3. Make your change:
• Indicate that a couple
had a common-law
marriage.
• If these two people should not be connected as
spouses, click Delete Relationship.
• If one of the spouses is incorrect, click the incorrect
spouse’s name, and click Change.
• Indicate that a couple
divorced.
• To correct or delete an existing marriage event, click
the incorrect marriage event. Then click Edit or
Delete.
• Replace an incorrect
spouse with a correct
one.
• To add a new event about the marriage, click
Add an Event. You can add marriage, divorce,
annulment, and common law.
• Add, edit, or delete a
relationship type to
1. Scroll to the Family Members section, and find the
box containing names of the father and mother.
indicate that the
2. If the couple’s children do not show up, click the
Children option that is beneath their box.
relationship was
biological, adopted,
3. Hover your mouse cursor over the name of the child
whose relationship information you want to see.
foster, guardianship,
or other.
4. Click the Edit Relationship link that appears.
• Unlink a child from
the parents.
5. Make your change:
• Remove an incorrect
parent.
• If this child should not be connected to either
parent, click Delete Relationship.
• Replace an incorrect
parent with the
correct one.
• If one of the parents is incorrect, click that parent’s
name. If you know the correct parent, click
Change. If you do not, click Remove.
• To correct the relationship type, click the incorrect
relationship type.
• To add a new relationship type, click the Add
option that appears for the father or mother.
3. As you enter changes, be sure that you do the following:
• Review the information that has already been entered, especially the reason statements
and the sources. Make changes only when you have more accurate information.
• In the reason field, enter a good explanation for the change.
4. If you have a source, attach it to show that the information is correct.
Family Tree saves your changes, identifies you as the contributor, and updates the change
history.
39FamilySearch Family Tree (18 October 2013)
Adding and Correcting Information about People and Relationships

Why Others Can Change Your Information and How to
Prevent Improper Changes
In Family Tree, any user can change almost any piece of information, regardless of
whether he or she originally added it. You may be concerned that other people may
change your carefully researched and documented information to something less correct.
Family Tree is intended to become a genealogical record that is correct, that contains
sources to prove its accuracy, and that endures longer than any of the people that add
information to it.
Most contributors do their best to ensure that their information is correct. However,
sometimes the records required to prove something are not available. It is possible that
future researchers will have access to better records than we do now. We need to allow
future researchers the ability to correct and add better information as it becomes available.
It is not always easy to collaborate with other researchers. Evidence may be contradictory.
Incorrect family legends are common. Disagreement can arise. Family Tree has several
features that are intended to encourage people to provide accurate information and to
prevent improper changes:
• The watch feature tells you when changes are made to people. You can then go to
that person’s record to see the change and analyze the evidence for it.
• The change history feature keeps track of all changes made. You can restore a previous
version of information when needed.
• The ability to attach the sources can prove that information is correct.
• Every screen where you can add, edit, or delete information contains a field where
you can enter a reason for your change. In this field, you should enter the reasons
why you think the information is correct, perhaps in spite of family legend or
contradictory source records.
In the future, additional features will be added to increase your ability to track and
monitor the changes and resolve any disagreements that may arise about a particular
piece of information.
Reason Statements for Adding, Editing, and Deleting
Information
Whenever you add, edit, or delete information about a person in the tree, you should
explain the reasons for your change. This reasoning is intended to prevent improper
changes and to direct other interested researchers to the sources that prove the
information.
In your explanation, include the following types of information, as appropriate to the
situation:
• Write clearly. Use complete sentences.
• Avoid using “I” statements (such as “I found that…” or “My research indicates...”).
Write in third person (such as “The census shows that…”). This keeps the tone
professional and neutral. It also focuses the explanation on the ancestor whose data
is being recorded and the sources used to find the information.
• Indicate what information is clearly supported by sources and which is not. For
example, if the birth month and year came from a census, say so.
• Identify the sources you used. If possible, you should also attach those sources to the
person, and tag the sources so that they appear with the information that they show.
FamilySearch Family Tree (18 October 2013)40
Adding and Correcting Information about People and Relationships

• If the records contain contradictory or incorrect information, explain why you think
the version that you added is the most correct in spite of the evidence provided by
other records.
• Explain why the information contradicts family stories.
• Explain why the information is correct, even though it may seem illogical.
• If you derived or estimated the information, explain how you reached your conclusion.
• If you are deleting information, explain why the information you are deleting is not
correct and why it should be deleted instead of corrected.
• Point out relevant discussions.
• If you are unsure, ask someone to read what you have written to make sure that you
communicated your reasons clearly.
The reason fields are not the place to hold a dialog or debate with other users. Do not
use them to post questions or requests for information. If an issue needs to be discussed
or if you need to request additional information, use the Discussions feature rather than
a reason field.
Restricted Records
In Family Tree, a restricted record is one that cannot be edited or deleted or have
relationships added to it.
The most common reason a record is restricted is to protect the privacy of people who
are or might be living. Basically, people are considered to be living unless there is death
information in the record or else 110 years have passed since their birth. Other records
are restricted because all changes must be made only through authorized processes.
If you notice these problems, you may be working with a restricted record:
• The changes you make to a record cannot be saved. You may notice this when you
try to edit, delete, or add information.
• In the change history, the latest changes to a record are not available.
• You cannot attach sources to a person or the relationships that he or she is part of.
• A record cannot be merged with a duplicate.
Building Your Tree
Starting with a Blank Family Tree
If your tree has fewer than two generations of ancestors (you, your parents, and your
grandparents), Family Tree can guide you through the process of entering that
information.
1. Sign in to FamilySearch.org, and click Family Tree.
2. From the pedigree view, click Start Here.
A box appears for your father. If he is not already in Family Tree, there are fields in
which you can enter information about him. If he is already in Family Tree, you see
the information it contains about him.
3. Enter the requested information for the person indicated on the screen.
If you do not know some of the information, leave the fields blank. If you do not
know any of the information, leave all the fields blank.
41FamilySearch Family Tree (18 October 2013)
Adding and Correcting Information about People and Relationships

If you indicate that a person is living, only you will be able to see that information
in Family Tree. This helps protect the privacy of living people.
4. To enter information about the next person, click Next.
When you have entered or reviewed all of the information for your parents and
grandparents, the pedigree view appears and displays the newly entered information.
Adding a New Person to Your Existing Tree
If you find that a person is missing from the tree, you can add him or her. Although
Family Tree is primarily a tool for recording information about deceased ancestors, you
sometimes also need to add living people to Family Tree.
Tip: Before you add, edit, or delete information in Family Tree, you should make sure
that your user profile is set to display your contact information, at least an e-mail address.
To set your contact information, click your username in the upper-right corner of the
screen. Click Settings, and scroll down to the Contact section. Click the Public option
for each piece of information that you want displayed with your contact information.
Mostly you should add deceased ancestors to Family Tree. Adding living people is useful
when you need to do these types of tasks:
• Connect yourself to your deceased ancestors. If your tree is blank or nearly blank,
you probably need to add some living people before you can link yourself to your
deceased ancestors. For example, you may need to add your parents so that you can
connect to your deceased grandparents.
• Print information to share with living family.
Tip: These instructions explain how to add a new person, starting from a family member’s
details page. You can also add a new person by clicking Tree, and then find the place
where that person should appear. An Add… link appears on the tree instead of the name.
To add the missing person, click the Add… link, and start with step 4.
1. Open the details page of someone in the person’s family.
a. On the pedigree view or fan chart view, click the person’s name.
b. On the person’s summary card, click Person.
2. Scroll down to the Family Members section.
3. Click the appropriate link to add the person:
• To add a spouse or another spouse, click Add Spouse (located at the top of the
Spouses and Children section).
• To add a child with another, unknown parent, click Add Child with an
Unknown Parent. This link is located beneath all of the person’s spouses and
children. You may need to scroll down to see it.
• To add a parent, click Add Parent (located at the top of the Parents and Siblings
section).
• To add the person’s child, click the Add Child link that is located in the box that
appears beneath the person and his or her spouse.
Tip: The Add Child links appear at the bottom of the box that lists a couple’s
children. If the list of children is not displayed, click Children.
• To add the person’s sibling, click the Add Child link that appears beneath the
person’s parents.
The Add or Find Person page appears.
FamilySearch Family Tree (18 October 2013)42
Adding and Correcting Information about People and Relationships

Note: By default the screen to find a person who is already in Family Tree appears.
4. Click Add Person.
Fields appear in which you can enter the person’s name, gender, birth, and death
information.
Note: Add as much information as you know. More information helps distinguish
this person from others who have similar names or who lived at the same time or in
the same place.
5. (Required) Enter the person’s name.
43FamilySearch Family Tree (18 October 2013)
Adding and Correcting Information about People and Relationships

Enter the person’s main name. This is generally the complete name that he or she
was given at birth. You can add other versions of the name, such as nicknames or
married names, later as alternative names.
Templates allow you to enter the person’s name
a. If the template that you want to use is not already showing, click the Template
drop-down list, and select the template that you need to use.
Use the standard template unless you need to enter names in Spanish, Portuguese,
Cyrillic, or an Asian language.
b. (Optional) In the Title field, enter the person’s title if he or she had one.
Titles include titles used for nobility, clergy, military ranks, professional affiliations,
and scholastic achievements. Examples include duke, bishop, captain, or Dr.
c. Enter the first, middle, and last names in the appropriate fields.
For a married woman, enter her maiden name if you know it.
d. (Optional) In the Suffix field, enter terms like junior, senior, or other words that
appear after the name.
You must enter at least a first or last name.
• If you do not know a mother’s or wife’s name, enter the husband’s last name. Do
not enter a first name. Do not enter “Miss” or “Mrs” in any of the name fields.
• For a husband with an unknown name or a child who died without receiving a
name, enter only the father’s last name. Do not enter a first name. Do not enter
Mr., Miss, son, or daughter. Be sure that the gender is correctly entered as male or
female if you know it.
6. (Required) Select the gender.
The gender is preselected if you are entering a person whose gender is assumed based
on his or her relationship to others. For example, Male is preselected when you enter
a person’s father.
7. Enter the birth date and place-name.
If you do not know an exact date, you can enter one of the following words along
with the date:
About
Before
After
8. (Required) Indicate whether the person is living or deceased.
If you select Living, only you will be able to see this person in Family Tree.
9. If the person is deceased, enter the death date and place.
If you need to add other information about the person, finish entering the person’s
information on this page. After you have finished adding the person, display his or
her details page, where you can add more information:
• In the Vital Information section, you can add dates and places of christening and
burial.
• In the Other Information section, you can add many types of information, such
as occupation, religious affiliation, and so forth. This is also where you can enter
information that indicates a child was stillborn.
10. Click Continue.
You are returned to the details page of the person that you started from. If you started
from the tree instead of a details page, you are returned to the tree.
FamilySearch Family Tree (18 October 2013)44
Adding and Correcting Information about People and Relationships

11. If you have a source, attach it to show that the information is correct.
The person is added to the tree. If you entered a living person, remember the following
items:
• Only you can see the living person’s information. Not even the person the record is
about can see it.
• You cannot use the Family Tree search feature to find living people.
Finding a Person Who Is Already in the Tree and Linking Him or Her
into Your Family Line
You may find that a person is missing from your family line. If that person is already in
the tree somewhere, you can link that existing person into your family line rather than
having to reenter the information.
Tip: Before you add, edit, or delete information in Family Tree, you should make sure
that your user profile is set to display your contact information, at least an e-mail address.
To set your contact information, click your username in the upper-right corner of the
screen. Click Settings, and scroll down to the Contact section. Click the Public option
for each piece of information that you want displayed with your contact information.
Tip: These instructions explain how to link in a new person, starting from a person’s
details page. You can also link in a new person by clicking Tree, and finding the place
where that person should appear. An Add… link appears on the tree instead of the name.
To link in the missing person, click the Add… link, and start with step 4, below.
1. Open the details page of the person whose family member is missing.
2. Scroll down to the Family Members section.
3. Click the appropriate link to add the person:
• To add a spouse or another spouse, click Add Spouse.
• To add a child with another, unknown parent, click Add Child with an
Unknown Parent. This link appears beneath all of the person’s spouses and
children. You may need to scroll down to see it.
• To add a parent, click Add Parent.
• To add the person’s child, click the Add Child link that appears in the box that
appears beneath the person and his or her spouse.
Tip: The Add Child links appear at the bottom of the box that lists a couple’s
children. If the list of children is not displayed, click Children.
• To add the person’s sibling, click the Add Child link that appears beneath the
person’s parents.
4. Find the person:
• If you know the name and other information, click Find Person, and enter what
you know.
• If you know the ID number, click Find by ID Number, and enter the number.
5. Click Search.
6. If the right person appears on the search results, click Select.
Tip: If you are unsure, click the name to see the ancestor card.
7. If the right person does not appear on the search results, you can add him or her:
45FamilySearch Family Tree (18 October 2013)
Adding and Correcting Information about People and Relationships

Click Add.
The information that you entered onto the search screen appears in the fields.
a.
b. If needed, add to or change the information that is in the fields.
c. Click Continue.
8. If you have a source, attach it to show that the information is correct.
You are returned to the details page of the person that you started from. If you started
from the tree instead of a details page, you are returned to the tree. The person is linked
into the tree.
Entering Standardized Dates and Places
When you enter dates and place-names, Family Tree helps you select a standardized
place. Using standardized dates and places helps clarify the information that you enter.
It also helps the system locate people with the Find feature.
You can enter place-names in your native language. However, the database that
standardizes place-names is not yet complete. If the system does not have a standardized
place-name for the place that you enter, select as specific a standardized place as you
can, even if it is only the district, province, or country name. The standards will improve
over time.
Tip: If you type dates as all numbers, it is very important that you select a standardized
date. For example, 6/7/1890 can mean 6 July 1890 or 7 June 1890, depending on where
you live in the world. If you do not select a standard, the system shows both possible
dates. You can avoid this confusion by either selecting a standard or by typing out the
name of the month instead of using numbers.
1. Begin typing the date or place.
If Family Tree cannot identify the date or place that you mean, a drop-down list of
standardized dates and places appears.
2. Select the correct option:
• If you want the system to use only the standardized date or place, click the standard
date or place in the drop-down list. The standard replaces what you entered.
• If you want the system to keep exactly what you entered, select None of the
Above. This option appears at the bottom of the list of standard dates or places.
The standardized date and place appears beneath the field. If the Family Tree can
apply a standard, it does so, even if you did not choose an option from the drop-down
list.
FamilySearch Family Tree (18 October 2013)46
Adding and Correcting Information about People and Relationships

3. If you want to include extra information that does not appear in the standardized
place, such as the name of a hospital, cemetery, or church where the event took place,
do the following:
a. Begin typing the place as you want it to appear.
As you type, the system displays the closest matches in the drop-down list of
standardized places.
b. Type the final part of the place as it appears in the standardized place.
The system now displays the place you typed and the standardized place.
c. Instead of clicking the standardized place, click somewhere else on the screen.
The system leaves the place as you typed it but connects the place with the
standardized place.
Tip: Connecting with the standardized place makes it easier for other people who
use the Find feature to find this person. If they look for a name and a place, the system
can match the place they enter with the standardized place.
Entering Characters from the World’s Languages
If your computer and keyboard are set up to enter the characters that you need, enter
them as you normally would. If they are not, then you will have to use the Character
Map feature of your operating system.
47FamilySearch Family Tree (18 October 2013)
Adding and Correcting Information about People and Relationships

You can add diacritics and special characters such as í, ü, ç, ß, and æ that are used in
languages that use the Roman alphabet, such as Spanish, German, Swedish, and other
European languages. You can also enter the characters used in Chinese, Japanese, Korean,
Greek, Russian, and other languages.
Note: These instructions work on a Windows operating system. If you are using a different
operating system, please check the instructions that came with your operating system.
1. Click the Windows Start button.
2. Select Programs, then Accessories, then System Tools, and then Character
Map.
3. Click the character that you want to add. If you do not see the character, select a
different font, such as Andale or Tahoma.
4. Click Select.
5. Click Copy.
The character is copied into the Windows clipboard.
6. Place the cursor in the field where the character should go.
7. In your browser, select Edit, and then Paste.
The character is entered into the field.
Searching for Records from a Person’s Details Page
On a person’s details page, you can search for historical records (like census records or
birth records) for that person with one click. The system uses the person’s name and
information to search all the records and user submitted genealogies on FamilySearch,
and then displays all the records it finds. The records can help you find more information
and people to add to your tree.
1. Go to a person’s details page.
a. On the pedigree or fan chart view, click the person’s name.
b. Click Person.
2. On the right side, under Research Help, click Search Records.
FamilySearch searches and displays all the records it finds.
3. To see the information in a record, click the person’s name.
Use the information to determine if the record is about your ancestor. Read the record
to see if it has more people or information that you can add to your tree.
You can use the links on the page to do several things:
• If the record is for your ancestor, to attach the record to Family Tree, click Attach
to My Family Tree.
• To add the source to your source box, click Add to My Source Box.
• To share the record through social media, click Share.
• If an image is available online, to view the digital image, click the View Image
button on the right side of the page.
• To download the image to your computer, click Save image.
• To view the other search results, click Back to Search Results.
4. On the Search Results page, to find User Submitted Genealogies for the person, scroll
to the bottom of the page.
FamilySearch Family Tree (18 October 2013)48
Adding and Correcting Information about People and Relationships

5. If you want to search for more records, on the left side of the Search Results page,
change the information for the person, and click Search.
Tip: Searching with different information can help you find more records. For
example, searching for a woman's maiden name may find records that were made
before she was married. Searching for her married name may find records that were
made after she was married.
Correcting, Adding to, and Deleting Information about
People Who Are Already in Family Tree
Correcting Information about a Person
You can correct information that is in a person’s Vital Information and Other Information
sections.
You can edit the information of any person in Family Tree. Family Tree keeps track of
all of the changes made to a person in a change history. If someone makes a change that
you do not agree with, you can use this list to restore a previous version of the
information. You can undo changes made to any person, regardless of whether you
entered the information or made the change.
• If possible, attach a source that shows your information is correct.
• Every time you make a change, you can enter a detailed reason that explains why
you believe the information that you entered is correct.
You can edit a person’s gender if he or she is not linked into a relationship that implies
a gender. For example, if the person is linked to another person as a mother, you cannot
change the gender to male.
Note: If you need to correct a person’s gender, and Family Tree prevents you from
making the correction, create a new person with the correct gender and add him or her
to the family.
1. Open the person’s details page.
2. Click the information that you want to change.
A box with more details about this information appears.
3. Review the existing information, especially the field containing the reasoning.
49FamilySearch Family Tree (18 October 2013)
Adding and Correcting Information about People and Relationships
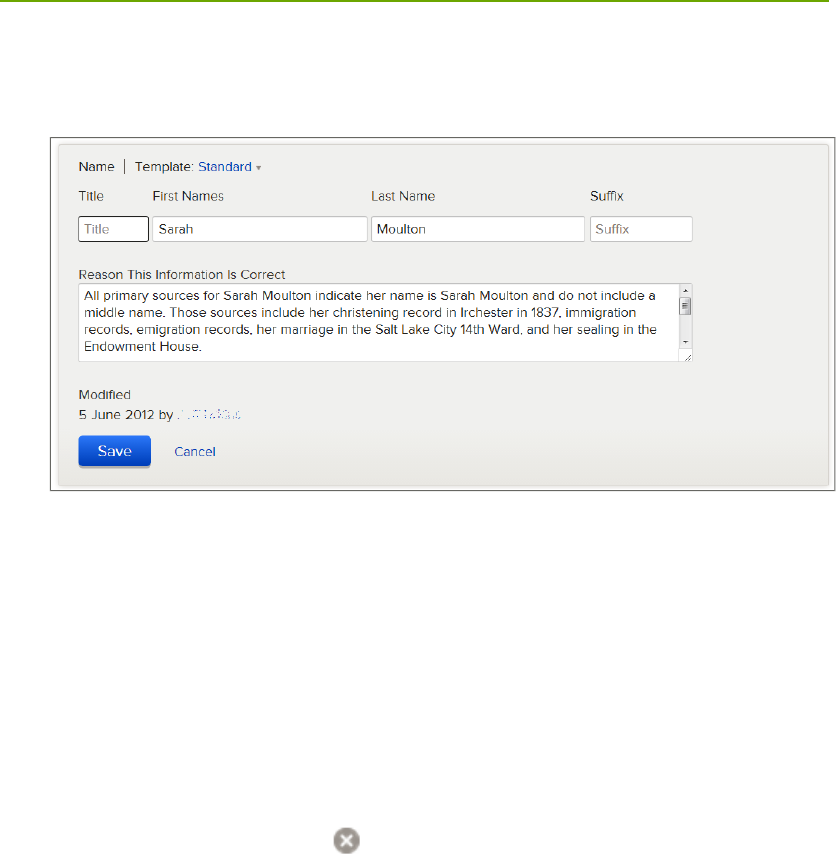
4. If you still want to make a change, click Edit.
The fields appear.
Note: If the person’s name has been entered using multiple templates, such as with
both Russian and Thai templates, you see all of the fields from all of the templates
that were used. To delete one of the languages, delete the characters from the
appropriate field, and save the change. For example, if the name was entered in
Russian, Roman, and Thai, and the Russian is not needed, you would delete all of the
text from the Russian fields, and save the name.
5. Make your changes, including a reason to explain why this information is correct.
Tip: If the existing reasoning is applicable, leave the existing explanation, and add
your own comments to it.
6. When you are finished, click Save.
7. To close the details box, click .
8. If you have a source, attach it to show that the information is correct.
Changing a Person’s Living or Deceased Status
To change a person’s status as living or deceased, you edit the person’s death information.
If you are changing the status from deceased to living, a system administrator must
review and approve the change.
1. Open the person’s details page.
2. In the Vital Information section, click the person’s death information.
3. Click Edit.
FamilySearch Family Tree (18 October 2013)50
Adding and Correcting Information about People and Relationships

4. To change a person’s status from living to deceased, follow these steps:
a. Click Deceased.
b. Enter the death date and place, if you know them.
c. Enter a reason explaining how you know that the person is deceased.
d. Click Save.
e. (Recommended) Scroll down to the Sources section, and attach a source that
validates the death information that you entered.
5. To change a person’s status from deceased to living, follow these steps:
a. Click Living.
b. Enter a reason explaining how you know that the person is living.
Include the person’s current address if you know it.
c. Click Save.
A message appears in which you can add an explanation for the system
administrator, who will review and approve this change.
51FamilySearch Family Tree (18 October 2013)
Adding and Correcting Information about People and Relationships

d. Enter the explanation.
e. Click Submit.
A screen appears that lists the case number of your request.
f. Write down the case number and any pertinent details that you will need later to
remember the case.
If you want to check on the status of your request, click the Feedback link in the
footer of FamilySearch.org. Then click My Cases.
A change request is sent to the FamilySearch system administrators. If a person’s
record is changed from deceased to living, the FamilySearch Privacy Policy may
prevent you from seeing the person’s record in Family Tree. If you want the person
to show on your pedigree, add the person back into the tree.
Adding More Information about a Person Who Is Already in Family
Tree
In Family Tree, you can add the person’s name, gender, birth and christening information,
and death and burial information. You can also enrich the record by adding information
such as alternate versions of the person’s name or the person’s occupation, naturalization,
military service, titles of nobility, and so forth.
1. Open the person’s details page.
2. If you want to add a new event to the Vital Information section, follow these steps:
a. Click the Add… link for the information.
Fields appear where you can add the information.
3. If you want to add new information to the Other Information section, follow these
steps:
a. In the Other Information section, click Add.
FamilySearch Family Tree (18 October 2013)52
Adding and Correcting Information about People and Relationships

b. Click the event that you want.
The fields in which you enter information appear.
4. Enter the information, including a reason to explain why this information is correct.
If you are adding an alternate name, you can select the type of name that you are
entering.
5. When you are finished, click Save.
6. If you have a source, attach it to show that the information is correct.
Adding a Custom Event or Fact to a Person
If Family Tree does not provide a field for the type of information that you want to add,
you can add your own custom fields for it.
53FamilySearch Family Tree (18 October 2013)
Adding and Correcting Information about People and Relationships

Custom events are especially helpful if they meet the following criteria:
• The information is significant.
• The information helps distinguish the person from other people with similar names.
• The information is helpful for identifying the person in records.
You can add custom events and custom facts for deceased people.
1. Open the person’s details page.
2. Scroll down to the Other Information section.
3. Beneath the Other Information heading, click Add.
4. From the list of options, click the appropriate option:
• Click Custom Event if you need date and place fields.
• Click Custom Fact if you do not need date and place fields.
You may need to scroll down to see these options.
The fields in which you enter information appears.
FamilySearch Family Tree (18 October 2013)54
Adding and Correcting Information about People and Relationships

5. Enter the information, including your analysis about why this information is correct.
In the Title field, enter a label for the field. For example, if you are entering
information about a person’s missionary service, you might enter the word Mission
in the Title field.
6. When you are finished, click Save.
7. If you have a source, attach it to show that the information is correct.
Types of Information That You Can Add about a Person
A person’s details page can contain many different types of information, or “fields,” in
which you can enter information about him or her. For some types of information, a
person’s details page can contain only one version of this information. For other types
of information, a person’s details page can contain multiple versions of that information.
Vital Information Section
Are Multiple Versions
Allowed?
PurposeField
NoThe name given to this person at his or
her birth, or the main name that the
person used throughout his or her life.
Important: Be sure to select the correct
template if you need to enter names in
Name
Spanish, Portuguese, Cyrillic, or an Asian
language.
55FamilySearch Family Tree (18 October 2013)
Adding and Correcting Information about People and Relationships

Are Multiple Versions
Allowed?
PurposeField
NoMale, female, or unknownGender
NoThe date and place that the person was
born.
Birth
NoThe date and place that the person was
baptized as an infant.
Christening
NoThe date and place that the person died.Death
NoThe date when and place where the per
son was buried. If a person was not
buried, you can do one of the following:
Burial
• Add a Cremation event to the Other
Information section.
• Add a custom event for burial at sea
and other types of interment.
Other Information Section
To add one of these events or facts to a person’s record, click the Add link that
appears beneath the Other Information heading.
Are Multiple Versions
Allowed?
PurposeField
YesOther names by which this person was
known, such as a nickname.
Alternate
Name
NoThe date and place that an infant was
born dead.
Stillborn
NoThe date and place where a Jewish boy
had his bar mitzvah ceremony.
Bar Mitzvah
NoThe date and place where a Jewish girl
had her bat mitzvah ceremony.
Bat Mitzvah
YesThe details of a person’s service in a
country’s armed forces.
Military Ser
vice
YesThe details about where and when a per
son became a citizen of a different coun
try.
Naturalization
YesThe dates and address where a person
lived.
Residence
YesThe date and place that a person was af
filiated with a secular organization.
Affiliation
YesThe date and place that a person was a
member of a religious organization.
Religious Affili
ation
YesA word that describes the person’s posi
tion within the noble class of a country.
Title of Nobili
ty
FamilySearch Family Tree (18 October 2013)56
Adding and Correcting Information about People and Relationships

Are Multiple Versions
Allowed?
PurposeField
YesHow a person earned a living.Occupation
NoThe date and place that a person’s body
was burned after his or her death.
Cremation
YesThe date and place that something hap
pened to the person that Family Tree does
not provide a field for.
Note: You can add custom events for
deceased people.
Custom Event
YesThe name of the caste that the person
belonged to.
Caste Name
YesThe name of the clan that the person
belonged to.
Clan Name
YesThe number used to identify a person for
government purposes. In the United
National Identi
fication
States, this might be a Social Security
Number.
NoThe country where this person was born.National Ori
gin
NoWhat the person looked like.Physical De
scription
NoA person’s ethnic group.Race
YesThe name of the tribe that the person
belonged to.
Tribal Name
YesInformation about the person that the
Family Tree does not provide a field for.
Note: You can add custom facts for de
ceased people.
Custom Fact
Deleting Information about a Person
If a person’s details page contains an event or fact that should not be there, you can
delete it. You can delete information, regardless of whether you added it.
You cannot delete the following types of information about a person:
• The name. You can, however, delete alternate names.
• The gender.
• Birth information.
• The indicator for living or deceased. You can, however, delete the death date and
place.
1. Open the person’s details page.
2. Click the information that you want to delete.
A box that contains the information and its reasoning appears.
57FamilySearch Family Tree (18 October 2013)
Adding and Correcting Information about People and Relationships

3. Review the existing information, especially the field containing the reasoning.
4. If you still want to delete the information, click the Delete link that is in the box.
If the box does not contain a Delete link, it means that the information cannot be
deleted.
5. In the field for the reason, explain why you are deleting the information.
6. Click Delete.
7. If you have a source, attach it to show that the information is correct.
Correcting, Adding to, and Deleting Relationship
Information
Relationships
In Family Tree, relationships connect people into families. There are two types of
relationships: couple relationships and parent-child relationships.
Couple Relationships
Couple relationships connect a man and woman as husband and wife.
The couple relationship contains the following information:
• The identities of the man and woman in the relationship.
• The marriage date and place.
• The date and place of a couple’s divorce or annulment.
• Whether the marriage was a common-law marriage.
• Sources that provide evidence about the creation or ending of the relationship.
FamilySearch Family Tree (18 October 2013)58
Adding and Correcting Information about People and Relationships

Parent-Child Relationships
Parent-child relationships connect children to parents. A child has a parent-child
relationship to the mother and a separate relationship to the father.
The parent-child relationship contains the following information:
• The identities of the child and all of the parents that he or she is connected to.
• The relationship type. The “relationship type” specifies how a child and parent are
related. By default, the system uses “Biological” as the relationship type. You can
change that relationship type to adopted, step, guardianship, or other.
A child has a relationship type for the relationship to the father and a relationship
type for the relationship to the mother. This lets you indicate, for example, that a
child had a step relationship to the father and a biological relationship to the mother.
Each parent-child relationship can have more than one relationship type. This lets
you indicate, for example, that a child first had a step relationship to a parent and
was then adopted later on.
• Sources that provide evidence about the creation of the relationship.
59FamilySearch Family Tree (18 October 2013)
Adding and Correcting Information about People and Relationships

Brother and Sister Relationships
In Family Tree, brothers and sisters do not have a specific relationship. Instead, they are
known to be related because they all have parent-child relationships to the same parents.
Adding, Editing, and Deleting a Couple’s Marriage Information,
Including Divorce Information
You can add the date and place of a couple’s marriage. You can also indicate that the
couple had a common-law marriage, that they divorced, or that the marriage was
annulled. If a couple’s marriage information is wrong, you can edit it or delete it.
Tip: Before you add, edit, or delete information in Family Tree, you should make sure
that your user profile is set to display your contact information, at least an e-mail address.
To set your contact information, click your username in the upper-right corner of the
screen. Click Settings, and scroll down to the Contact section. Click the Public option
for each piece of information that you want displayed with your contact information.
1. Open the person’s details page.
2. Scroll down to the Family Members section.
The marriage date and place appears in the box that shows the names of each couple.
FamilySearch Family Tree (18 October 2013)60
Adding and Correcting Information about People and Relationships

3. Click the Edit Couple link that appears in the box that contains the couple’s name
and marriage information.
The Couple Relationship page appears.
61FamilySearch Family Tree (18 October 2013)
Adding and Correcting Information about People and Relationships

4. If you want to edit or delete a marriage event that is already on the record, follow
these steps:
a. Click the event.
A box that contains the information and its reasoning appears.
b. Review the existing information, especially the field containing the reasoning.
c. If you want to delete the information, click Delete. In the box that appears, enter
the reason why you are deleting the information, and click Save. Skip the
remaining steps.
d. If you want to edit the information, click Edit, and continue with step 6.
5. If you want to add a new marriage event, click Add New Event.
Fields appear where you can enter the information.
FamilySearch Family Tree (18 October 2013)62
Adding and Correcting Information about People and Relationships

6. In the drop-down list, select the type of marriage event.
• Select Marriage if the couple participated in a ceremony or ordinance in which
a man and woman are united as husband and wife.
• Select Common Law if the couple’s marriage was created by mutual consent and
public behavior (such as living together as husband and wife) rather than with a
formal ceremony.
• Select Divorce to record the date and place when a couple’s marriage ended
legally.
• Select Annulment if the couple’s marriage was canceled with a decree that states
that the marriage was never valid.
A couple can have more than one marriage event (such as Common Law and Marriage
and Divorce) and more than one marriage event of the same type (such as more than
one Marriage).
7. Enter the date and place.
8. Enter a reason that explains how you know that the information is correct.
Tip: When you edit an existing event, if the existing reasoning is applicable, leave
the existing explanation, and add your own comments to it.
9. When you are finished, click Save.
10. To display the details of a person in this relationship, use the Go to links that are
located beneath the FamilySearch tree logo.
11. If you have a source, attach it to show that the information is correct.
63FamilySearch Family Tree (18 October 2013)
Adding and Correcting Information about People and Relationships

Adding, Changing, and Deleting Relationship Types between Parents
and Children
The “relationship type” specifies how a child and parent are related. By default, the
system uses “Biological” as the relationship type. You can change that relationship type
to adopted, step, guardianship, or other. You can also add more than one relationship
type and delete relationship types.
Tip: Before you add, edit, or delete information in Family Tree, you should make sure
that your user profile is set to display your contact information, at least an e-mail address.
To set your contact information, click your username in the upper-right corner of the
screen. Click Settings, and scroll down to the Contact section. Click the Public option
for each piece of information that you want displayed with your contact information.
1. Open the details page of the child, father, or mother.
2. Scroll down to the Family Members section.
The marriage date and place appear in the box that shows the names of each couple.
3. Hover your mouse cursor over the child whose parent-child relationship you want
to see.
An Edit Relationship link appears.
FamilySearch Family Tree (18 October 2013)64
Adding and Correcting Information about People and Relationships

4. Click the child’s Edit Relationship link.
The Parent-Child Relationship page appears.
5. If you want to edit or delete a relationship type that is already listed, follow these
steps:
a. Click the relationship type.
For example, click Biological.
A box appears that contains the information and the contributor’s reasoning for
why it is accurate.
b. Review the existing information, especially the field containing the reasoning.
c. If you want to delete the relationship, click Delete. In the box that appears, enter
the reason why you are deleting the relationship, and click Save. Skip the
remaining steps.
d. If you want to edit the relationship type, click Edit, and skip to step 7.
A box in which you can enter the information appears.
6. If you want to add a new relationship type, click Add New Relationship Type,
and continue with the next step.
A box in which you can enter the information appears.
7. From the drop-down list, select the type of relationship:
• Select Adopted if the parent legally adopted the child.
• Select Biological if the relationship is biological.
• Select Guardianship if the relationship was created through fostering or other
arrangements made for a child’s care when the biological parents could or would
not care for the child.
• Select Step if the relationship was created when the child’s biological parent
married someone other than the other biological parent.
8. (Optional) Enter the date when the relationship was established.
You can enter a date for all relationship types except biological. It is assumed that a
biological relationship was created at the child’s birth.
For example, for an adoption, you could enter the date when the adoption was
finalized. For a step relationship, you could enter the date when the child’s biological
parent married the step-parent.
65FamilySearch Family Tree (18 October 2013)
Adding and Correcting Information about People and Relationships

9. Enter a reason that explains how you know that the information is correct.
Tip: When you edit an existing event, if the existing reasoning is applicable, leave
the existing explanation, and add your own comments to it.
10. When you are finished, click Save.
11. To display the details of a person in this relationship, use the Go to links that are
located beneath the FamilySearch tree logo.
12. If you have a source, attach it to show that the information is correct.
Removing a Person from a Family (Deleting Relationships)
When the wrong person appears in a family, do not delete the person. Just delete the
person’s relationship to the family.
Tip: Before you add, edit, or delete information in Family Tree, you should make sure
that your user profile is set to display your contact information, at least an e-mail address.
To set your contact information, click your username in the upper-right corner of the
screen. Click Settings, and scroll down to the Contact section. Click the Public option
for each piece of information that you want displayed with your contact information.
When you delete a relationship between people, the people stay in the Family Tree
database, but they are no longer connected to each other.
Tip: If you need to remove a person from one family and add him or her into another
family, write down the person’s ID number. After you remove the person from the wrong
family, you can use the ID number to quickly find the person when you add him or her
to the right family.
1. Open the details page of a person who is in the family:
• To delete a couple relationship, open the details page of either the husband or
wife.
• To delete a child-parent relationship, open the details page of the child, mother,
or father.
2. Scroll down to the Family Members section.
3. Click the Edit... link of the relationship that you want to delete.
• To delete the couple relationship between the parents, click the Edit Couple link
that appears in the box that shows the parents and their marriage date and place.
• To delete the relationship between a child and his or her father or mother, hover
your mouse cursor over the child’s name, and click the Edit Relationship link
that appears.
FamilySearch Family Tree (18 October 2013)66
Adding and Correcting Information about People and Relationships

• To delete the couple relationship between one of the children and his or her
spouse, click the child’s name, and click Person. This takes you to the child's
details page. Scroll down to the Family Member’s section, and repeat this step.
The relationship page appears.
4. Review the existing information, especially the sources.
5. To delete a parent-child relationship between a child and either the father or mother
(but not both), follow these steps:
a. Click the name of the parent whose relationship should be removed.
b. Review the existing information, especially the sources and the field containing
the reasoning.
c. If you still want to remove the relationship, click Remove.
6. To delete the couple relationship or the relationship between the child and both
parents, click Delete Relationship.
This link appears on the right side of the screen in the Tools box.
7. Enter a reason that explains how you know that the relationship should be deleted.
Tip: When you edit an existing event and if the existing reasoning is applicable,
leave the existing explanation, and add your own comments to it.
8. Click Delete.
9. To display the details of a person in this relationship, use the Go to links that are
located beneath the FamilySearch tree logo.
67FamilySearch Family Tree (18 October 2013)
Adding and Correcting Information about People and Relationships

10. If you have a source, attach it to show that the information is correct.
Replacing a Wrong Parent in a Family with the Correct One
Sometimes Family Tree lists the wrong person as a child’s father or mother. You can
easily replace the wrong parent with the right one.
Tip: Before you add, edit, or delete information in Family Tree, you should make sure
that your user profile is set to display your contact information, at least an e-mail address.
To set your contact information, click your username in the upper-right corner of the
screen. Click Settings, and scroll down to the Contact section. Click the Public option
for each piece of information that you want displayed with your contact information.
1. Open the details page of the child, father, or mother.
2. Scroll down to the Family Members section.
The marriage date and place appears in the box that shows the names of each couple.
3. Hover your mouse cursor over the name of the child.
A link appears.
4. Click the Edit Relationship link that appears.
The Parent-Child Relationship page appears.
FamilySearch Family Tree (18 October 2013)68
Adding and Correcting Information about People and Relationships

5. Click the name of the parent that does not belong in the family.
6. Review the existing information, especially the field containing the reasoning.
7. If you still want to replace the parent with someone else, click Change.
8. Find or add the correct parent:
DescriptionOption
The parent already exists
and you know the name
and other information
1. Click Find Individual.
2. Enter the name and other information about the
person.
3. Click Search.
4. On the list of search results, find the right
person.
Tip: If you are unsure, click the name to see the
person’s summary card.
5. Click Select.
The parent already exists
and you know the ID
number
1. Click Find by ID Number.
2. Enter the ID number.
3. Click Search.
4. On the list of search results, find the right
person.
Tip: If you are unsure, click the name to see the
person’s summary card.
5. Click Select.
The parent doesn't exist
and needs to be added
1. Click Add Individual.
2. Enter the person’s name and other information.
3. Click Continue.
9. Enter a reason that explains how you know that the information is correct.
Tip: When you edit an existing event, if the existing reasoning is applicable, leave
the existing explanation, and add your own comments to it.
10. Click Change.
69FamilySearch Family Tree (18 October 2013)
Adding and Correcting Information about People and Relationships

11. To display the details of a person in this relationship, use the Go to links that are
located beneath the FamilySearch tree logo.
12. If you have a source, attach it to show that the information is correct.
Adding Reason Statements to People and Relationships
If Family Tree already contains correct information about a person or relationship, you
can add a reason statement that explains how you know it is correct. This leaves valuable
information for yourself and other researchers about the accuracy of the information is
and whether further research is required.
Tip: Before you add, edit, or delete information in Family Tree, you should make sure
that your user profile is set to display your contact information, at least an e-mail address.
To set your contact information, click your username in the upper-right corner of the
screen. Click Settings, and scroll down to the Contact section. Click the Public option
for each piece of information that you want displayed with your contact information.
1. Open the person’s details page.
2. If you want to add a reason statement to information about the person, follow these
steps:
a. Click the information whose reason statement you want to add.
A box with more details about this information appears.
b. Click Edit.
The fields appear.
FamilySearch Family Tree (18 October 2013)70
Adding and Correcting Information about People and Relationships

3. If you want to add a reason statement about a relationship that the person is in,
follow these steps:
a. Scroll down to the Family Members section.
b. Click the Edit... link of the relationship that contains the information.
• To enter a reason about information on the couple relationship, click the Edit
Couple link that appears in the box that shows the couple and their marriage
date and place.
• To enter a reason about information on a parent-child relationship, hover your
mouse cursor over a child’s name, and click the Edit Relationship link that
appears.
c. Click the information whose reason statement you want to add.
• To enter a reason that explains why this person belongs in the relationship,
click the person’s name. If there is not a reason statement yet, click Add. If
there is an existing reason statement, click Edit.
• To enter a reason that explains why a marriage event on a couple relationship
is correct, click the marriage event, and then click Edit.
• To enter a reason that explains why a relationship type on a parent-child
relationship is correct, click the relationship type, and then click Edit.
4. Enter a reason that explains how you know that the information is correct.
Tip: When you edit an existing event, if the existing reasoning is applicable, leave
the existing explanation, and add your own comments to it.
5. When you are finished, click Save.
6. If you have a source, attach it to show that the information is correct.
Deleting a Person from the System
You can delete a person from the system. This also deletes the person’s relationships to
everyone in the tree. If you delete a person by mistake, you can restore that person.
Important: It is recommended that you delete a person only if the person never existed.
If you create a duplicate record by mistake, merge the two records rather than delete the
person. The merge process allows you to compare the records and choose which
71FamilySearch Family Tree (18 October 2013)
Adding and Correcting Information about People and Relationships

information to keep. If you later find that the merge was a mistake, you can undo the
merge and restore the deleted record. It is much harder to find and restore a person that
was deleted.
1. Open the person’s details page.
2. Review the person’s information carefully, especially the sources and reason
statements. If you still want to delete the person, follow these steps:
a. In the Tools box, click Delete Person.
A message appears that lists the information that will also be deleted when you
delete the person.
b. Read the message.
c. If you still want to delete the person, enter a clear reason to explain why.
d. Click Delete.
A screen that confirms the deletion appears.
3. If you delete a person by mistake, follow these steps to restore the person:
a. In Family Tree, go to a deceased spouse, parent, or child of the person you need
to restore, and click that person’s name.
You will use the change history of the spouse, parent, or child to restore the deleted
person.
b. In the Latest Changes box, click Show all.
The person’s change history appears.
c. In the change history, click the name of the person you want to restore. You will
see the deleted person’s summary card.
Tip: If you don’t see the entry you need, click the More link at the bottom of the
list. If the change history is long, scan the right side of the change history, and
look only at the entries that contain a Reference link. All deleted relationships
have a Reference link. This is often faster than looking at each entry individually.
You can also use your browser’s Find feature to search for the word “Deleted” or
for the name of the person that you want to restore. In most browsers, press Ctrl+F
to use the Find feature.
d. On the person’s summary card, click Person.
e. At the top of the screen, read the reason why the person was deleted.
f. If you still want to restore the person, click the Restore Person button.
g. Enter a reason that explains why the person and relationship should be restored.
h. Click Restore.
Restoring a Deleted Person
You can restore a person whose record has been deleted from the system.
1. Go to the details page of the father, mother, spouse, or child of the deleted person.
Important: The father, mother, spouse, or child must be deceased. To restore a
deleted person using a details page, you use the change history, and the change
history is not available for living people. You will use the change history for the
spouse, parent, or child to restore the deleted person.
2. In the Latest Changes box, click Show all.
The person’s change history appears.
FamilySearch Family Tree (18 October 2013)72
Adding and Correcting Information about People and Relationships

3. In the change history, click the name of the person you want to restore. You will see
the deleted person’s summary card.
Tip: If you don’t see the entry you need, click the More link at the bottom of the
list. If the change history is long, scan the right side of the change history, and look
only at the entries that contain a Reference link. All deleted relationships have a
Reference link. This is often faster than looking at each entry individually. You can
also use your browser’s Find feature to search for the word “Deleted” or for the name
of the person that you want to restore. In most browsers, press Ctrl+F to use the Find
feature.
4. On the person’s summary card, click Person.
5. At the top of the screen, read the reason why the person was deleted.
6. If you still want to restore the person, click the Restore Person button.
7. Enter a reason that explains why the person and relationship should be restored.
8. Click Restore.
Seeing the Change History and Undoing Changes
Seeing and Undoing the Changes Made to a Person or Relationship
Family Tree tracks all changes made to the information about a person and the
relationships that he or she is part of. If someone makes a change that you do not agree
with, you can use the change history to restore a previous version of the information.
You can undo changes regardless of whether you originally added the information or
made the change.
Tip: Before you add, edit, or delete information in Family Tree, you should make sure
that your user profile is set to display your contact information, at least an e-mail address.
To set your contact information, click your username in the upper-right corner of the
screen. Click Settings, and scroll down to the Contact section. Click the Public option
for each piece of information that you want displayed with your contact information.
1. Open the person’s details page.
2. Open the change history that you want to see:
DescriptionOption
In the box that lists recent changes made to this person,
click Show All. The box is located on the right side of
See all of the changes
about the person and
the person’s details page in the Vital Information
section.
the couple
relationships and
parent-child
relationships that he or
she is part of.
See the changes for
only one type of
1. To see the change history for one type of
information, click the information. (For example, to
information about the
person.
see the change history for just the death event, click
the person’s death information.)
2. Click History. This link is located above the name
of the user who last entered or changed the
information.
73FamilySearch Family Tree (18 October 2013)
Adding and Correcting Information about People and Relationships

DescriptionOption
Tip: The button near the top identifies the type of
information being displayed in the change history. In
the following example, the Death button indicates that
only changes made to the person’s death event are being
displayed in the change history.
To display this person’s entire change history, click the
X button that appears next to the information being
filtered (in this example, the X next to Death). The
system then displays the entire change history.
See all of the changes
made to a couple
relationship.
1. Scroll down to the Family Members section.
2. Click the Edit Couple link that appears for that
couple.
3. Click the Show All link that appears in the change
history box, which appears on the right side of the
couple relationship screen.
See all of the changes
made to a child-parent
relationship.
1. Scroll down to the Family Members section.
2. Hover your mouse cursor over the name of the child
whose parent-child relationship you want to see.
3. Click the Edit Relationship link that appears.
4. Click the Show All link in the change history box,
which appears on the right side of the screen.
The change history appears.
3. Find the change that shows the correct information.
On the change history for a relationship, you can click Show Relationship or Hide
Relationship to see more information.
If the change history contains more changes than can be shown on the list, click the
More link that is found at the bottom of the list.
4. Restore the correct information:
FamilySearch Family Tree (18 October 2013)74
Adding and Correcting Information about People and Relationships

If the entry has a Restore button, click it.
Note: If a change does not have a Restore button, then you cannot undo that
change. For example, the following types of entries do not have Restore buttons:
•
• Entries that identify the current information that is shown in Family Tree. You
do not need to restore what is already there.
• The entry that identifies when the information was first added to Family Tree.
You can recognize these because of a description that says something like,
“Name Created.”
• If the information has a Reference link, click it.
If restoring the information requires more review, a screen appears to let you do that
review.
5. If a screen appears to allow you to see more information about what you are restoring,
review the information.
6. If you want to restore the information, click Restore.
To return to previous screens, use the Go to links that are located beneath the
FamilySearch tree logo.
On the person’s details page, click the information that you just restored. Add to the
reason an explanation of why you restored the information.
Filtering a Person’s Change History
You can filter a person’s change history if you want to see the changes made to one type
of information.
This feature does not work for the change history of relationships.
You can use either of the following approaches:
• If you are already on the person’s change history, click the link that tells you what
type of change was made.
For example, click Name Created or Name Changed to see all the changes made
to a person’s name.
The list narrows to that type of information. A button appears at the top of the list
to show what type of filter has been used. Click this button to remove the filter and
redisplay the entire change history.
• If you are on a person’s details page, follow these steps:
a. Click the information whose change history you want to see.
b. Click History.
The change history for that information type appears. A button appears at the top
of the list to show what type of filter has been used. Click this button to remove the
filter and display the entire change history.
75FamilySearch Family Tree (18 October 2013)
Adding and Correcting Information about People and Relationships

Correcting Information Moved from
new.FamilySearch.org to Family Tree
Recommendations for Correcting Names Moved from
new.FamilySearch.org
Many records that were moved from new.FamilySearch.org have many name variations.
In Family Tree, these name variations can be kept or deleted.
How Names Get Moved from new.FamilySearch.org to Family Tree
In new.FamilySearch.org, a person’s record might contain many variations of the name.
On the Summary tab, one version of the name is selected as the correct one. In Family
Tree, this version of the name appears in the Vital Information section of the details
page.
In new.FamilySearch.org, the variations of the name appear on the Details tab. In Family
Tree, they are displayed as Alternate Names in the Other Information section.
What Name to Use in the Vital Information Section
The Name field in a person’s Vital Information section should contain the most official
or recognizable version of a person’s name. This is usually the name that the person was
given at birth. If a woman changed her name after marriage, you would use her maiden
name if you know it rather than her married name.
FamilySearch Family Tree (18 October 2013)76
Adding and Correcting Information about People and Relationships

However, there may be circumstances where it is appropriate to use a different version
of the name in the Vital Information section. If you do this, please enter a thorough
explanation for this choice in the reason field.
Alternate Names in the Other Information Section
In the Other Information section, keep the Alternate Names that will help other users
recognize the person in Family Tree and identify him or her in the historical records.
For example, keep the following:
• Spelling variations that were used on the records.
• Variations in the name form that were used on the records, such as a different middle
name.
• Nicknames.
• Names that the person used to identify himself or herself during his or her life.
• Name changes caused by adoption, divorce, or other legal actions.
• Names that the person used after moving to a new country.
• Names that a person used while hiding out, such as runaway slaves or people hiding
from the law.
• Names that were given to the person or adopted by the person at various stages of
life.
Delete the following types of alternate names:
• Names with capitalization differences, such as the last name in all capital letters.
• Names with punctuation differences, such as the lack of a period after an initial.
• Spelling errors.
• Names that are wrong, such as have a wrong middle name.
Note: You may choose to keep wrong versions of a name that keep getting
resubmitted. In this case, you would want to add a reason statement that explains
why this version of the name is incorrect, where the error appears to have originated,
and what sources have been used to disprove it.
Recommendations for Correcting Events and Other Information Moved
from new.FamilySearch.org
Many records that were moved from new.FamilySearch.org contain information that
gets displayed in the Other Information section of the details page.
How Vital Events Get Moved to Family Tree
A person’s vital events are the birth, christening, death, and burial.
In new.FamilySearch.org, a person’s record might contain many versions of these vital
events. On the Summary tab, one version of each can be selected as the correct version.
In Family Tree, this version of the name appears in the Vital Information section of the
details page.
In new.FamilySearch.org, the variations of the vital events appear on the person’s Details
tab. These variations do not get moved to Family Tree.
77FamilySearch Family Tree (18 October 2013)
Adding and Correcting Information about People and Relationships

How Other Events and Facts Get Moved to Family Tree
Nonvital events that appear on the Details tab show up in Family Tree in the Other
Information section of the person’s details page.
Information to Keep
In the Other Information section, keep information that is correct, appropriate for
publication, and genealogically useful. Delete everything else.
Recommendations for Correcting Relationships Moved from
new.FamilySearch.org
Family Tree should contain only relationships that are genealogically correct.
How Relationships Get Moved
All of a person’s couple and parent-child relationships get moved from
new.FamilySearch.org to Family Tree.
Couple Relationships
Keep couple relationships for which there is evidence that two people were a couple,
such as:
• Couples who married, even if that marriage later ended in annulment or divorce.
• Couples who lived together as husband and wife but never had a formal marriage
ceremony (“common-law” marriages).
Delete the following types of couple relationships:
• Incorrect relationships, in which the two people never were a couple.
• A couple who had children together but never married. You can create parent-child
relationships to show the two people as the parents of a child. You do not have to
link the parents together as spouses.
Parent-Child Relationships
Always link children to their biological parents if you know them. Link a child to
step-parents, foster parents, or guardians only when there is a compelling reason to do
so. The following are good reasons to link a person to other parents:
• A living person wants to be linked to nonbiological children or parents.
• The people had adopted, sealing, foster, and other parent-child relationships that
were created during their lifetimes, particularly when the child was young or the
people involved considered the relationship as meaningful or more meaningful than
their biological relationships.
• Nonbiological relationships that are helpful in understanding the historical records
about the child and parent.
• A person’s biological parent is not known but another parent is. Use the relationship
type and reason statements to clarify the situation.
• Records are unclear or provide contradictory evidence about a person’s parents.
You do not necessarily need to link a child to step-parents. Sometimes this is appropriate,
such as when a step-parent raises a child as his or her own. But sometimes, a child’s
FamilySearch Family Tree (18 October 2013)78
Adding and Correcting Information about People and Relationships

biological parent simply remarried. The child did not have a parental relationship with
the new spouse. In cases like this, you can simply enter the parent’s marriage to the
other spouse.
Delete parent-child relationships that are incorrect.
Uploading GEDCOM Files and Copying the Information
to Family Tree
All registered users of FamilySearch.org can upload GEDCOM files for inclusion in the
Pedigree Resource File. If you have access to Family Tree, you can also copy information
from an uploaded GEDCOM file into Family Tree.
GEDCOM (GEnealogical Data COMmunications) is a computer format that lets computer
users transfer genealogical data from one computer program to another. GEDCOM files
have the file extension .GED.
This GEDCOM upload process has many planned enhancements. Until they are complete,
please be aware of the following issues:
• You cannot currently add the notes, sources, and multimedia links that are in your
GEDCOM file to Family Tree.
• During the upload process, you compare what is in your GEDCOM file to what is
already in Family Tree. If you stop before you finish comparing, simply make a note
of which filter and person you left off on.
• You can include records of living people in your GEDCOM file. However, they are
not available for searching on FamilySearch.org. Nor can you add those records to
Family Tree.
The upload process has several parts:
1. Upload your GEDCOM file, and compare it to Family Tree.
2. View the results.
3. Review people who are potential matches. Determine whether they are matches.
4. Review people who can be added to Family Tree. Choose which ones to add.
5. Review people who are already in Family Tree. Determine whether your GEDCOM
file contains more accurate information than the information Family Tree already
contains.
Each of these steps is discussed in more detail below.
Part 1. Upload Your GEDCOM File, and Compare It to Family Tree
The first step is to upload your GEDCOM file and compare it to Family Tree. If you have
previously uploaded a GEDCOM file to Pedigree Resource File and if that file appears on
your list of uploaded files, you do not have to upload it again. Simply skip to step 3.
Your GEDCOM file can be up to 100 MB.
To upload a GEDCOM file, you must be signed in to FamilySearch.org. Uploading your
GEDCOM file makes it available for other FamilySearch users to search.
1. To begin, follow these steps:
a. In the header of FamilySearch.org, click Search.
79FamilySearch Family Tree (18 October 2013)
Adding and Correcting Information about People and Relationships

b. Click the Genealogies link.
The GEDCOM upload feature is located beneath the fields used for searching
Ancestral File and Pedigree Resource File data.
c. Scroll down past the search fields.
a. Click Submit Tree.
2. If you have not already uploaded this GEDCOM file, upload it:
a. Click Add GEDCOM.
b. Click Choose File, and find the GEDCOM file that you want to upload.
c. Enter a name and description for your GEDCOM file.
d. Click Upload.
The name of the GEDCOM file is added to a list of your uploaded files. In the
Status column of that list, the word “Uploading...” appears until the file is uploaded.
The larger your GEDCOM file, the longer this upload process takes. When it is
finished, the word “Uploaded” appears, and the Compare button is now available
to click.
Your GEDCOM file uploads and is processed for inclusion in the Pedigree Resource
File. When your file is finished processing, the information about the deceased
individuals in your file is immediately available for searching in the Pedigree
Resource File. Information about people who might still be living is not published.
3. Compare your file to what is in Family Tree:
FamilySearch Family Tree (18 October 2013)80
Adding and Correcting Information about People and Relationships

Click Compare.
In the Status column of that list, the word “Comparing...” appears until the
comparison is done. Instead of a Compare button, you see a View button. You
cannot click the View button until the comparison is finished.
a.
b. Wait while the system compares your GEDCOM file to Family Tree.
The larger your GEDCOM file, the longer this compare process takes.
When the system finishes comparing your GEDCOM file, the word “Ready” appears as
the Status, and the View button becomes active.
Part 2. View the Results
After the system has compared your GEDCOM file to Family Tree, you can see the results.
1. On the list of GEDCOM files that you added, click View for the file containg the
results you want to see.
A summary appears. The summary identifies how many people in your GEDCOM
file are already in Family Tree:
• Potential Matches. This number tells you how many people in your GEDCOM
file might already be in Family Tree. The records are close but not identical. You
compare the records and decide whether they are matches.
• Add to Family Tree. This number tells you how many people in your GEDCOM
file are not in Family Tree. You can review each person and decide whether to add
him or her to Family Tree.
• Already in Family Tree. This number tells you how many people in your
GEDCOM file are in Family Tree. However, your GEDCOM file may have different
details about the person. You can decide which details to move from your GEDCOM
file into Family Tree.
• Invalid and Living. This number tells you how many people in your GEDCOM
file the system identified as living. The record may also be corrupted or invalid in
some other way. You cannot add these people to Family Tree.
81FamilySearch Family Tree (18 October 2013)
Adding and Correcting Information about People and Relationships

Each of these categories becomes a filter that you can use to see the people in your
GEDCOM file. For example, you can see all of the potential matches in one list. You
can also use an All Individuals filter to see an alphabetical list of all of the people in
your GEDCOM file.
2. To see the detailed results and begin transferring information to Family Tree, click
Review Results.
The first potential match appears. If the file contains no potential matches, then you
see the individual from the All Individuals list.
The rest of this process explains how to work through your GEDCOM file by using the
filters. If you want to look at an alphabetical list of the people in your GEDCOM file
instead, click All Individuals. In the list of individuals, look at the icon to the left of
the person’s name. That tells you which process to use to move information into Family
Tree.
Part 3. Review People Who Are Potential Matches
Potential matches are people in your GEDCOM file who might already have a record in
Family Tree. The record in your GEDCOM file is different enough that you need to review
the information and confirm the match.
Potential matches are marked with a triangle icon ( ).
1. If the list of potential matches is not already shown, click Potential Matches, which
is located in the Filter box.
The filter box is in the upper-left part of the screen. The list of names that is beneath
the Filter box contains all of the people from your GEDCOM file who are potential
matches.
The first potential match appears. The person from your GEDCOM file is on the left.
The person from Family Tree is on the right.
2. Compare the person from your GEDCOM file with the person in Family Tree.
FamilySearch Family Tree (18 October 2013)82
Adding and Correcting Information about People and Relationships

3. Decide if the person is a match.
DescriptionOption
The person is
a match
1. Click Yes.
The system adds this person to the Already in Family Tree group.
If the record from your GEDCOM file contains information that
is different from what is in Family Tree, that information
appears in a blue box.
2. Review each piece of information that is displayed in a blue
box.
3. If the information in your GEDCOM file is more correct than
the information Family Tree already has, click Replace. The
blue box moves to the Family Tree record, and Save and Cancel
buttons appear in the upper-right corner. If you change your
mind and decide that Family Tree contains more accurate and
complete data, click Undo.
4. Click Save. Your changes are also saved when you simply click
the name of the next person on the list.
83FamilySearch Family Tree (18 October 2013)
Adding and Correcting Information about People and Relationships

DescriptionOption
The person is
not a match.
1. Click Not a Match.
2. If you want to add this person to the Family Tree, click Add,
or simply move to the next record.
Note: The system does not currently have a way to prevent this
record from being added to Family Tree.
4. (Optional) If the system found more than one possible match for the person in your
GEDCOM file, click Other Possible Matches to see the rest of them.
a. Click the first name on the list.
The person’s information appears.
b. Indicate whether the person is or is not a match
c. Repeat this process for every person on the list of other possible matches.
5. To go to the next person in this filter, click the name of a specific person on the list.
The list displays ten people at a time. If a filter contains more than ten people, use
the Next and Prev (Previous) buttons to move through the list 10 people at a time.
Part 4. Review People Who Can Be Added to Family Tree
If your GEDCOM file contains people who are not in Family Tree, you can easily add
them to Family Tree.
Records that can be added to Family Tree are marked with a plus icon ( ).
Caution: When you use the Add to Family Tree filter, each person that you display is
automatically added to Family Tree. The system does not yet have an option that lets
you prevent information from being added to Family Tree. Therefore, if your GEDCOM
file contains a person that you do not want to add to Family Tree, do not click that
person’s name.
1. In the Filter box, click Add to Family Tree.
FamilySearch Family Tree (18 October 2013)84
Adding and Correcting Information about People and Relationships

The filter box is in the upper-left part of the screen.
The list changes to display only the people who are not in Family Tree. The record
of the first person on the list is displayed.
2. Review the person’s information.
3. To add this person to Family Tree, click Add. The person is also added to Family Tree
when you display the next person
The Add button is located in the upper-right corner of the screen.
Note: The system does not currently have a way to prevent this record from being
added to Family Tree. If you do not want to add any more people from your GEDCOM
file to Family Tree, click a different filter.
4. To go to the next person in this filter, click the name of a specific person on the list.
The list displays ten people at a time. If a filter contains more than ten people, use
the Next and Prev (Previous) buttons to move through the list ten people at a time.
85FamilySearch Family Tree (18 October 2013)
Adding and Correcting Information about People and Relationships

Part 5. Review People Who Are Already in Family Tree
Some people in your GEDCOM file may already be in Family Tree. However, your
GEDCOM file and Family Tree may have different details about them. You can review
the differences and decide whether to replace what is in Family Tree with what is in your
GEDCOM file.
Records that are already in Family Tree are marked with a check mark icon ( ).
1. In the Filter box, click Already in Family Tree.
The filter box is in the upper-left part of the screen.
The list changes to display only the people who are already in Family Tree. The record
of the first person on the list is displayed. The person on the left is from your GEDCOM
file. The person in the right is from Family Tree.
2. Compare each detail of the person from your GEDCOM file with the details of the
person in Family Tree.
If your GEDCOM file contains information that is different from the information
about this same person in Family Tree, that information appears in a blue box.
FamilySearch Family Tree (18 October 2013)86
Adding and Correcting Information about People and Relationships

3. Review each piece of information that is displayed in a blue box. If the information
in your GEDCOM file is more correct than the information that Family Tree already
has, follow these steps:
a. Click Replace.
The box moves over to the right side, and the Save and Cancel buttons appear in
the upper-right corner. A field in which you can enter the reason for your change
also appears.
b. In the reason field, enter a statement that explains how you know that the
information from your GEDCOM file is more accurate than the information that
Family Tree already has.
You can enter only one reason for all of the information that you replace. If you
need to add a different reason for different pieces of information, make a note of
the ID number of the Family Tree record. When you are finished with your
GEDCOM file, you can go into Family Tree and update your reason statements
there.
If you change your mind and decide that Family Tree contains more accurate and
complete data, click Undo.
c. To save the Family Tree record with the changes from your GEDCOM file, click
Save. The changes are also saved if you simply move to the next person in the
list.
4. To go to the next person in this filter, click the name of a specific person on the list.
The list displays ten people at a time. If a filter contains more than ten people, use
the Next and Prev (Previous) buttons to move through the list ten people at a time.
87FamilySearch Family Tree (18 October 2013)
Adding and Correcting Information about People and Relationships

When you copy information from your GEDCOM file to Family Tree, your entire
GEDCOM file is still available for searching on FamilySearch.org.
If you delete the GEDCOM file from FamilySearch.org, the information is no longer
searchable on FamilySearch.org. However, any information that you copied into Family
Tree remains in Family Tree.
Transferring Information between Family Tree and a
Personal Genealogical Database
Some personal genealogical databases exchange information with Family Tree.
1. For a current list of certified programs, see https://www.familysearch.org/products.
2. Look for programs with a check mark. These are certified to work with Family Tree.
FamilySearch Family Tree (18 October 2013)88
Adding and Correcting Information about People and Relationships

Chapter 5
Adding Photos and Stories to
Your Ancestors in Family Tree
Adding photos and stories to your ancestors in Family Tree lets you preserve and share
your precious family memories.
You can add photos and stories either from Family Tree or from the Photos section of
FamilySearch. It doesn’t matter which option you choose; the photos or stories will appear
with the ancestor’s record in Family Tree:
• Family Tree. When you go to an ancestor’s record in Family Tree to add photos and
stories, the system automatically tags and connects the photos and stories to that person
in the tree. You don’t have to tag or make connections unless there are multiple people
in the photo or story. However, on photos, you may occasionally choose to adjust the
tag to a better position.
• Photos. When you use the Photos section in FamilySearch, you need to manually add
tags and connect the photos and stories to the tree. After you add a photo or story and
create a tag for a person, you can use the tag over and over again. When the tag is reused,
it automatically connects the photo or story to that person in the tree. The Photos
section makes it easier to place the tag where you want it on photos. The Photos section
may also be a little easier to use if you have multiple people in a photo or story.
These instructions focus on using Family Tree. To add photos and stories to your ancestors
using Family Tree, you follow three general steps:
1. On the fan chart or pedigree view, click the person’s name.
2. Display the pictures or stories, using either of the following methods:
• On the summary card, click Photos or Stories.
• On the summary card, click Person. Then, on the person’s details page, click the
Photos or Stories link in the header.
3. From the Photos page, you can do the following:
• To add a new photo, click Add Photo.
• To choose a different portrait, click the current portrait photo by the person’s name.
The system shows the portrait photos available for the person. Click the photo you
want to see as the portrait.
• If a portrait photo contains more than one person, click the photo, and add a new
tag for each person in the photo. If the photos is one you added, you can adjust the
original tag and then create tags for the rest of the people in the photo.
If you added the photo, you can also do the following:
• If the portrait photo is off center or shows the wrong part of the photo, click the
portrait photo. On the right of the next screen, in the list of people in the photo,
click the one whose tag you want to edit. Click Edit Tag. Adjust the size or position
of the circle, and click Save.
89FamilySearch Family Tree (18 October 2013)

• To remove this photo from this person without deleting it from the system, remove
the tag that links this photo to this person. Click the photo. On the right of the
screen, in the list of people in the photo, click the name whose tag you want to
delete. Click Remove Tag.
• To delete a photo from the system, click it. Then click Details, and then Delete
Photo.
4. From the Stories page, you can do the following:
• To add a new story, click Add Story.
• If the story lists more than one person, click the story, and in the Who is in this
story field, add the names of the other people.
If you added the story, you can also do the following:
• To edit the text of the story or to add, change, or delete the story’s photo, click the
story. Then, on the left near the top, click Edit Story.
• To remove this story from this person without deleting it from the system, remove
the tag that links this story to this person. Click the story. On the right of the screen,
in the list of people in the story, click the name whose tag you want to remove. Click
Remove Tag.
• To delete a story from the system, click it. Then click Delete.
Guidelines for Using Photos and Stories
There are a few guidelines for adding photos and stories of your deceased ancestors to
Family Tree.
• Privacy and Permission. Currently, the photos and stories can be viewed by
anyone, so you are strongly encouraged to add items only for deceased ancestors. If
you add any photo or story that includes living people, you must first get permission
from each living person in the photo or story.
• Appropriateness. Content in photos and stories must be consistent with
FamilySearch.org standards. Photos are viewed and screened before they are published.
• What Others Can Do with the Photos You Add. Others can view your photos,
add tags to help identify people in the photo, add stories to the photo, and add the
photos to their albums. They cannot change or delete your photos. If you don’t want
the tags that were added by others, you can delete them.
• What Others Can Do with the Stories You Add. Others can read your stories,
add the stories to an album, and add comments. They cannot edit or delete your
story.
Photo Requirements
To add a photo, you need a digital copy. The digital files must be 5 MB or smaller. That
should let you create copies at a higher resolution. The content must be consistent with
FamilySearch.org standards.
Many people make copies with a scanner or with a phone that takes photos at high
resolution. Because adding a photo to Family Tree is a way to preserve and share the
photo, providing the best copy you reasonably can is important.
Photos must meet these requirements:
• They must be in a digital format. Currently the system accepts PNG and JPG files.
FamilySearch Family Tree (18 October 2013)90
Adding Photos and Stories to Your Ancestors in Family Tree...

• The digital files must be 5 MB in size or smaller.
• The photo content must meet the upload guidelines and submission agreement.
Using Photos
Adding a Photo Using Family Tree
From a person’s record in Family Tree, you can upload a photo. The system tags the
photo for you, and then, with a couple of clicks, you connect the photo to the person
in the tree.
You do 2 tasks when you add a photo using Family Tree.
• Upload a digital copy of the photo.
• Connect the photo to the person’s Photos page in Family Tree.
1. Upload the digital copy of the photo.
a. In Family Tree, go to the person you want to add the photo to.
b. Click the person’s name.
The person’s summary card appears.
c. On the summary card, click Photos.
d. Click Add Photo.
Important: The first time you add a photo or story, a message appears about the
FamilySearch submission agreement. Indicate that you will comply with the
FamilySearch submission agreement.
e. Click Upload.
f. Click the green upload area that has a white plus sign.
g. Browse to the photo on your computer, click the photo file, and click Open.
A message that the photo has been uploaded appears.
h. Refresh the screen.
Tip: For most browsers, press F5 to refresh the screen.
A box appears for the photo you just added.
2. To connect the photo to the person’s Photos page in Family Tree, click the Attach
Photos button.
The photo is now connected to the person’s Photos page in Family Tree.
Tip: To adjust a tag, add tags for other people in the photo, add a title for the photo,
or add a description, go to the page where you edit tags. (To go to the page, on the
person’s Photos page, click the photo.)
Changing a Preferred Portrait
In Family Tree, the preferred portrait is the face of your ancestor that appears next to
the ancestor’s name. You can select the preferred portrait that you want to use; it does
not affect what others see. You can choose any photo that has been uploaded for an
ancestor, even if you did not upload it.
Tip: If you do not select a preferred portrait for an ancestor, the system chooses one of
the currently uploaded photos as the preferred portrait.
91FamilySearch Family Tree (18 October 2013)
Adding Photos and Stories to Your Ancestors in Family Tree...
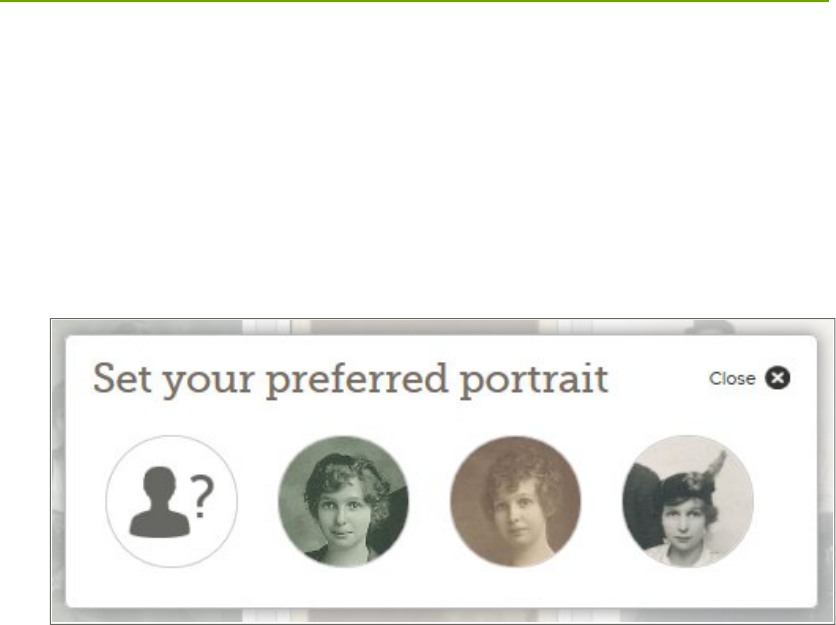
1. Go to either the Photos section of FamilySearch.org or to Family Tree:
• To change a preferred portrait photo of a person using Family Tree, click Family
Tree. On the fan chart or pedigree view, click the person’s name. On the summary
card, click Photos.
• To change a preferred portrait using the Photos section, click Photos, and then
click People. Then click the person that you want.
2. Click the current preferred portrait.
A pop-up with the possible preferred portraits for the person appears.
3. Click the preferred portrait that you want to use.
Tip: When a photo is added through Family Tree, the system puts the tag around
the entire photo. For a photo that you uploaded, you can resize and reposition the
tag. If someone else uploaded the photo, you can add another tag just around the
person’s face. Go to the person’s Photos page, click the photo, and fix or add the tag.
The area in the tag then appears in the preferred portraits that can be selected.
Wait and then refresh the screen. The new preferred portrait appears.
Tip: For most browsers, pressing F5 on the keyboard refreshes the screen. If the new
preferred portrait doesn’t appear when you press F5, wait a little longer, and try again.
Attaching an Uploaded Photo to a Person in Family Tree
If you are working on a person in Family Tree and know that you have already uploaded
one or more photos of him or her, you can attach the photos without leaving Family
Tree.
1. Click Family Tree.
2. On the fan chart or pedigree view, click the person’s name.
3. Click Photos.
4. Click Add Photo.
The photos that you previously uploaded and that are not already attached to this
person appear.
5. Click the check box of each photo that you want to attach.
6. Click Attach Photos.
FamilySearch Family Tree (18 October 2013)92
Adding Photos and Stories to Your Ancestors in Family Tree...

Tagging a Photo
Tags let you add the names of people to a photo, and they help keep all the photos for
an ancestor together (similar to keeping the ancestor’s photos in one album).
Tags are added to a photo in two ways:
• You can add the tags yourself from the Photos section of FamilySearch.org.
• You can add tags to a photo that is already connected to a person in Family Tree.
When a photo is attached to a person in Family Tree, the system creates a tag. If the
photo contains more than one person, you might need to add tags for each person
in the photo.
These instructions explain how to add the tags yourself.
1. Go to either the Photos section of FamilySearch.org or to Family Tree:
• To tag a person’s photos using the Photos section, click Photos, and then click
My Photos.
• If you want to add another tag to a photo you added using Family Tree, click
Family Tree. On the fan chart or pedigree view, click the name of the person
you already added the photo to. Click Photos.
Note: You would typically add other tags if more than one person is in the photo.
2. Click the photo that you want to tag.
3. Click the head of a person in the photo.
A circle and box appear. (You will fit the circle around the person’s head and type
the name into the box.)
93FamilySearch Family Tree (18 October 2013)
Adding Photos and Stories to Your Ancestors in Family Tree...

4. Fit the circle around the head.
• To move the circle, click the center of the circle, and drag it to where you want it.
• To make the circle larger or smaller, click one of the white corner boxes. A
double-sided arrow appears. Click and drag the arrow to make the circle larger or
smaller.
5. Click in the box, and type the person’s name.
As you type, tags that you created for similar names appear in a drop-down list. If
you have already created a tag for this person, click the tag in the list instead of typing
the name.
Important: Click a name in the drop-down list only if you are adding another photo
for that person. When you click in the list, the new photo is linked to the ancestor
that you have already tagged.
Tips:
FamilySearch Family Tree (18 October 2013)94
Adding Photos and Stories to Your Ancestors in Family Tree...

• Before you create the tag, you could decide how you want to list the ancestor’s
name. You will reuse the tag if you add other photos for that ancestor.
• You might find it helpful to use a woman’s maiden name in the tag. The name
matches her name in Family Tree and is appropriate, even if the woman married
more than once and had different married surnames.
• If you have ancestors with similar names (for example, Marc Henri Lefevre and
Marc Philippe Lefevre), you might want to use the entire name in the tag. That
way you can tell which ancestor the tag is for.
6. If there are other people in the photo, tag each person.
a. Click the head of another person in the photo, and fit the new circle around the
person’s head.
b. Type the person’s name into the box.
c. Continue until you have tagged all the people you can.
The name of each person you tag appears in a list on the right side of the screen.
7. To add a title for the photo, on the right side of the screen, click Click to edit title.
Tip: The title appears with just this photo. It does not affect the tags for the people
in the photo. You can also use the title to share a little information about the photo
(for example, Ferdinand Schmidt in 1920 or Wedding Photo of Carl and Augusta
Becker Schultz).
8. To add a description of the photo, click Details, and type in the description.
Tip: You can use the description to give more information about the phot. For
example, you can explain where or when or why the photo was taken.
Resizing and Repositioning Tags
If a tag is not sized and positioned correctly, the photo may not display correctly in
Family Tree. For example, in the portrait photo, you may see the wrong part of the
photo, or the person may be off center. You can change the size of the circle around a
person’s head or move the circle on the photos you have added.
Important: When you use Family Tree to add a photo, the system automatically creates
a tag, but it places the tag around the entire photo. You can change the tag so that it
fits around one person’s face. This is especially useful if you want to use the photo as
the portrait photo or if you need to tag more than one person in the photo.
1. Go to either the Photos section of FamilySearch.org or to Family Tree:
• To use the Photos section of FamilySearch.org, click Photos, and then click My
Photos.
• To use Family Tree, click Family Tree. On the fan chart or pedigree view, click
the person’s name. On the summary card, click Photos.
2. Click the photo that has the tag you want to edit.
3. In the list of people in the photo, click the name of the person whose tag you want
to edit.
A list of icons appears beneath the tag.
4. Click Edit Tag.
5. Adjust the size or position of the circle, and click Save.
95FamilySearch Family Tree (18 October 2013)
Adding Photos and Stories to Your Ancestors in Family Tree...

Important: If you corrected a tag to improve a portrait photo, the system will correct
the original photo, but it does not automatically correct the portrait photo. To fix the
portrait, you also need to go through the steps for changing a portrait photo:
1. In the Photos section, click People.
2. Click the person whose portrait you want changed.
3. Click the current portrait photo (the photo in a circle that appears with the name
near the top of the screen). A pop-up with all of the photos uploaded for the person
appears.
4. Click the photo with the corrected tag.
5. Wait and then refresh the screen. The corrected portrait appears.
Tip: For most browsers, pressing F5 on the keyboard refreshes the screen. If the new
portrait doesn't appear when you press F5, wait a little longer, and try again.
Removing Tags
You can remove tags from photos you have added.
If you remove the tag from a photo that is linked to a person in Family Tree, the photo
is removed from that person’s Photos page. The photo remains in your collection of
photos.
1. Go to either the Photos section of FamilySearch.org or to Family Tree:
• To remove a tag using the Photos section, click Photos, and then click My Photos.
• To remove the tag from a photo using Family Tree, click Family Tree. On the
fan chart or pedigree view, click the person’s name. On the summary card, click
Photos.
2. Click the photo that has the tag you want to remove.
3. On the right, in the list of people in the photo, click the name whose tag you want
to remove.
A list of icons appears beneath the tag.
4. Click Remove Tag.
5. If needed, create a new tag to replace the one that you removed.
Deleting a Photo
You can delete only the photos you added to Family Tree.
Caution: If you delete a photo, the photo is deleted from all the Photos pages and
albums where you added it. If you just want to remove the photo from one person’s
Photos page, remove that person’s tag from the photo.
1. Go to either the Photos section of FamilySearch.org or to Family Tree:
• To delete a photo using the Photos section, click Photos, and then click My
Photos.
• To delete a photo using Family Tree, click Family Tree. On the fan chart or
pedigree view, click the person’s name. On the summary card, click Photos.
2. Click the photo you want to delete.
3. Click Details.
FamilySearch Family Tree (18 October 2013)96
Adding Photos and Stories to Your Ancestors in Family Tree...

4. Click Delete This Photo.
The system asks if you are sure you want to delete the photo.
5. Click Delete.
Note: If you don’t want to delete the photo, click Cancel.
The system displays a message that says the photo has been successfully deleted.
Identifying the Contributor of a Photo
You might be able to identify the contributor of a photo, if the person has chosen to let
his or her name be displayed in FamilySearch.
1. Go to the photo.
• In Family tree, on the fan chart or pedigree view, click the person’s name. On the
summary card, click Photos. Click the specific photo.
• In the Photos section of FamilySearch, click People. Click the person. Then click
the specific photo.
The system displays the photo on the page where tags are added.
2. Click Details.
The system displays information about the photo, including the name of the
contributor.
Adding Stories
Adding a Story
You can add stories about your ancestors to Family Tree. You can link the story so that
it appears on the Stories pages of everyone in the story. If you add a story, you can attach
a photo, edit the story, or delete the story. And you can add comments to stories others
have written.
Tip: If you want, you can write your story in a word processing program. You can then
copy and paste the story into FamilySearch.org.
You do 2 tasks when you add a story.
• Add the story.
• Connect the story to the Stories pages in Family Tree.
1. Go to either the Photos section of FamilySearch.org or to Family Tree:
• If you want to add a story using the Photos section, click Photos, and then click
Stories. Then click Add New Story.
• If you want to add a story using Family Tree, click Family Tree. On the fan chart
or pedigree view, click the person’s name. On the summary card, click Stories,
and click the green plus sign above Add New Story.
2. Add the story.
a. In the Title box, type a title for the story.
b. In the larger box, type or paste in the story.
c. If you want to add a photo to the story, follow these steps:
97FamilySearch Family Tree (18 October 2013)
Adding Photos and Stories to Your Ancestors in Family Tree...

Click Attach Photo.
The system displays small thumbnails of all the photos you have uploaded.
•
• To select a photo, click the little circle at the bottom of the thumbnail.
The circle fills in to show that the photo was selected.
• Click Save.
d. Click Add.
A screen appears that lets you indicate who is in the story and lets you connect the
story to their Stories pages in Family Tree.
3. Connect the story to the Stories pages in Family Tree.
a. Under Who Is in This Story, click the down arrow.
A list of people you have tagged appears.
b. If the name of the person in the story is in the list, click the name.
Tip: When you click a name in the list, the system automatically connects the
story to that person’s Stories page. You can use the drop-down list several times
to select all the people in the story.
c. If someone in the story does not appear on the drop-down list, add the person.
• Click in the blank box, and type the person’s name. The system displays the
name as a link.
• Click the link for the person’s name. The name appears in the list of people in
the story.
• Click the name in the list of people in the story.
• Click Link to Family Tree.
• Search for the person in Family Tree.
Tip: If the name does not appear in the search results, go to Family Tree, copy
the person’s ID number, and search using the ID number.
• When the name appears in the search results, click the Select button for the
name.
The story is now connected to that person in Family Tree.
In Family Tree, the story now appears on the Stories page of each person in the story.
Attaching a Previously Written Story to a Person in Family Tree
If you are working on a person in Family Tree and know that you have already entered
a story about him or her, you can attach them without leaving Family Tree.
1. Click Family Tree.
2. On the fan chart or pedigree view, click the person’s name.
3. Click Stories.
4. Click Add Story.
The stories that you have written appear.
5. Click the check box of each story that you want to attach.
6. Click Attach Story.
FamilySearch Family Tree (18 October 2013)98
Adding Photos and Stories to Your Ancestors in Family Tree...

Tagging a Story
Tagging lets you add the names of the people in the story. The tags also help to link the
people in the story to the same people in Family Tree.
Tags are added to a story in two ways:
• You can add the tags yourself.
• If you add a story from within Family Tree, the photo is tagged and linked
automatically to the person whose record you started from. If the story mentions
more than one person, you need to tag the additional people yourself.
These instructions explain how to add the tags yourself.
1. Go to either the Photos section of FamilySearch.org or to Family Tree:
• If you want to tag a story using the Photos section, click Photos, and then click
Stories.
• If you want to tag a story using Family Tree, click Family Tree. On the fan chart
or pedigree view, click the person’s name. On the summary card, click Stories.
2. Click the story that you want to tag.
3. Click in the Who Is in This Story? box.
A drop-down list of the people you have tagged in other stories and photos appears
in the box.
4. If a person you need is in the drop-down list, click the name.
If you have already linked the person to Family Tree, the story is linked to that ancestor
in Family Tree.
Tip: To see if a person needs to be linked to Family Tree, click People, and look
under People not connected to Family Tree.
5. If the person you need is not in the drop-down list, type the name in the Who Is in
This Story box, and press Enter.
This creates a tag for the person.
6. Keep clicking and adding names until you have listed all the people in the story.
Editing a Story and Its Photo
You can change or correct stories that you have added. You can also add a photo to a
story or remove a photo from a story that you have added.
1. Go to either the Photos section of FamilySearch.org or to Family Tree:
• To edit a story using the Photos section, click Photos, and then click Stories.
• To edit a story using Family Tree, click Family Tree. On the fan chart or pedigree
view, click the person’s name. On the summary card, click Stories.
2. Click the story you want to edit or add a photo to.
3. In the upper-right corner, click Edit Story.
The text and title appear in boxes where you make changes.
Note: If the story has a photo, you need to scroll down to see the boxes where you
can edit the text.
4. If you want to change the text of the title or story, type your changes.
99FamilySearch Family Tree (18 October 2013)
Adding Photos and Stories to Your Ancestors in Family Tree...

5. If you want to add a photo to this story, follow these steps:
a. Click the Attach Photo button.
The system displays small thumbnails of all the photos you have uploaded.
b. To select a photo, click the little circle at the bottom of the thumbnail.
The circle will fill in to show that the photo was selected.
c. Click Add.
6. If you want to remove the photo that is attached to this story, click the Remove
Photo button.
7. Click Save Story.
Removing a Story
If you add a story to the wrong person, you can remove the story. This does not delete
the story; it only removes the story from that specific person’s Stories page.
1. Go to the story from Family Tree or from the Photos section of FamilySearch.
• In Family Tree, go to the person you want to remove the story from. Click the
name. Click Stories. Click the story you want to remove.
• In the Photos section of FamilySearch, click Stories. Click the story you want to
remove.
The system opens the story on the page where you can remove tags.
2. Under People in This Story, click the name of the person.
A list of options appears.
3. Click Remove Tag.
The story is removed from the Stories page for that person.
Deleting a Story
You can delete a story that you have added.
Caution: If you delete a story, the story is deleted from all the Stories pages and albums
where you added it. If you want to remove the story from one person’s page, remove
that person from the list of people in the story.
1. Go to either the Photos section of FamilySearch.org or to Family Tree:
• To delete a story using the Photos section, click Photos, and then click Stories.
• To delete a story using Family Tree, click Family Tree. On the fan chart or pedigree
view, click the person’s name. On the summary card, click Stories.
2. Click the story you want to delete.
3. Click Delete.
The system asks if you are sure you want to delete the photo.
4. Click Delete.
Note: If you don't want to delete the photo, click Cancel.
The system displays a message that says the story has been successfully deleted.
FamilySearch Family Tree (18 October 2013)100
Adding Photos and Stories to Your Ancestors in Family Tree...

Adding Comments
You can add a comment to a photo or a story. Typically, you add a comment to provide
more information about a photo or story added by someone else.
1. Go to either the Photos section of FamilySearch.org or to Family Tree:
• If you want to add a comment to a photo or story using the Photos section, click
Photos. Then, click either People or Stories.
• If you want to add a comment using Family Tree, click Family Tree. On the fan
chart or pedigree view, click the person’s name. On the summary card, click either
Photos or Stories.
2. Click the photo or story that you want to add a comment to.
3. Click the link that lets you add a comment.
• For a photo, click the Comments icon , and click the Add
Comment link.
• For a story, click Add Comment.
4. Type your comment in the box.
5. Click the Add Comment button.
Using Social Media or Email to Share A Specific Photo
or Story
You can use social media or email to share a specific photo or story that has been added
to Family Tree.
1. Go to either the Photos section of FamilySearch.org or to Family Tree:
• To use Family Tree to share a photo, click Family Tree. On the fan chart or
pedigree view, click the person’s name. On the summary card, click Photos.
• To use Family Tree to share a story, click Family Tree. On the fan chart or pedigree
view, click the person’s name. On the summary card, click Stories.
• To use the Photos section to share a photo, click Photos, click People , and then
click the person.
• To use the Photos section to share a story, click Photos, and then click Stories.
2. Click the photo or story that you want to share.
3. Select how you want to share the photo or story.
• To use social media, click the icon for the social media you want to use.
• To send a link to the photo or story in an email, click Share Photo or Share
Story, and click E-mail.
101FamilySearch Family Tree (18 October 2013)
Adding Photos and Stories to Your Ancestors in Family Tree...

Reporting Questionable Material
If a photo, story, or comment added by someone else does not seem appropriate, you
can notify FamilySearch.org.
1. Go to either the Photos section of FamilySearch.org or to Family Tree:
• If you want to report the material using the Photos section, click Photos. Then
click People.
• If you want to report the material using Family Tree, click Family Tree. On the
fan chart or pedigree view, click the person’s name. On the summary card, click
either Photos or Stories.
2. Click the specific photo or story that you want to report.
3. Click Report Abuse.
4. Type in the reason you are reporting the material.
5. Click the Report Abuse button.
FamilySearch Family Tree (18 October 2013)102
Adding Photos and Stories to Your Ancestors in Family Tree...

Chapter 6
Finding Deceased People in
Family Tree
You can use the Find feature to find out whether a deceased person is in the system. You
cannot use the Find feature to look for living people.
Before you can look for a deceased person, you must know one of the following:
• At least part of the name of the deceased person or his or her father or mother. You can
add more information if you have it.
• ID number (person identifier). This unique number is assigned to every person in the
system. An example is KW3B-FN1. It appears on the person’s summary card and details
page.
Note: ID numbers are generated randomly to help the system keep track of a person.
You cannot use them to determine specific information about the person or the source
of the information.
Note: In Family Tree, you cannot use Ancestral File numbers (AFNs) to find people.
Tip: As you enter information about the person you want to find, remember these tips:
• Entering more information results in fewer results.
• Entering less information results in more results.
• Using the Exact check boxes results in fewer results.
1. From within Family Tree, click the Find link.
Important: You can use the Find feature to look for deceased people only. You cannot
use it to look for living people.
103FamilySearch Family Tree (18 October 2013)

2. (Optional) If you know the person’s Person Identifier, use this shortcut:
a. Click ID Number.
b. Enter the number.
Tip: You can enter the ID number in lowercase letters. You can also omit the hyphen.
c. Click Find.
The system finds the person whose number matches what you entered and displays
him or her on the search results. If the record has been merged with another record,
the system tells you what happened and which record you should now use.
d. Skip to step 8.
3. In the name fields, enter at least part of the name of the deceased person that you want
to find, or enter at least part of the father’s name or mother’s name.
FamilySearch Family Tree (18 October 2013)104
Finding Deceased People in Family Tree

4. (Optional) Enter any additional information that you want to use to make your search
more precise.
Important: If you enter dates or places, the system displays a drop-down list of the
standardized dates or places that match what you are typing. In the standardized list,
if you see the date or place you need, click the date or place to select it. Using
standardized dates and places helps clarify the information that you enter. The system
also uses the standardized dates and places to find individuals more accurately.
5. (Optional) If you want the system to find only records that contain exactly what you
enter in a field, follow these steps:
a. Click Advanced Search.
b. Click the Exact check box of each field for which you want an exact search.
For example, if you know a person died in 1850, search using a death event. Enter 1850
in the Date field, and click the Exact check box beneath the Date field. The system
finds only records of people who died sometime in 1850.
6. Click Search.
The system looks for people who match what you entered and displays the first 25
matches on the Search Results page. The people whose records most closely match your
search are listed first. People who match less closely are listed after. If the system found
more than 25 matching records, to see more records, click the numbered links that are
located at the bottom of the list.
Boxes appear at the top of the search results. Each box contains a piece of information
that you included in your search. You can use these boxes to change your search criteria.
7. On the list of search results, see if the person is listed.
8. If you see the person that you want, follow these steps:
a. Click the name to see the person’s summary card.
b. Indicate whether you want to go to the person’s family tree or details page.
• To see the person on the tree, click Tree.
• To see the person’s details page, click Person.
9. If you did not find the person that you want, use the options at the top of the Find
page to modify your search:
• To go back to a blank Find screen, click New.
• To remove a piece of information, click the X that appears next to it. The system
performs the search again using the remaining information.
105FamilySearch Family Tree (18 October 2013)
Finding Deceased People in Family Tree

• To go back to the Find screen and see the fields as you previously filled them out,
click Refine.
As you refine searches, consider these strategies:
Why It May WorkStrategy
The person’s record may be in the system, but it may not contain
all of the information that you know. Entering less information
Provide less in
formation.
may help your search criteria match the person’s record more
closely and increase the likelihood that it will appear near the
top of your search results. For example, try these strategies:
• If the name is not common, use only the name.
• Leave the main name fields blank, and enter only the parents’
names or only the spouse’s name.
• Try using only the name and one event, such as a birth date
or death date.
If the person’s record is in the system and has a lot of information,
adding more information may help your search criteria more
closely match the record.
Provide more in
formation or dif
ferent informa
tion.
Using exact searches on dates and places is especially helpful,
since it limits the search results to people who lived in a specific
place and time.
Conduct an ex
act search.
You might not be able to find the record for several reasons, such
as the following:
Look for a close
relative instead.
• The record may not have a lot of information that the system
can use for matching.
• The record may contain information that is very different than
what you are looking for.
• The person might be alive. You cannot use the Find feature to
find the records of living people.
• The person might be deceased, but the record might lack the
death information that would let the system publish the record.
In cases like these, look for the record of a close relative instead.
Then navigate to the person that you want to find.
If the person was from a country that does not use the roman al
phabet, such as China, Japan, Korea, or Russia, try looking for the
name in the native writing system and in the roman alphabet.
Use other alpha
bets or writing
systems.
How the Exact Check Boxes Affect Search Results
The exact search option limits the variations in names, dates, and places that the system
considers close enough to include in the search results. It also specifies that the records
in your search results must contain the information.
To see the Exact check boxes, click Advanced Search. The check boxes appear in each
search field where an exact search is allowed:
FamilySearch Family Tree (18 October 2013)106
Finding Deceased People in Family Tree

The following example compares what records are found when you click the Exact
check box for different fields. In your search, you enter the following information:
First name: Thomas William
Last name: Brand
Birth date: 23 June 1896
The results you get depend on which Exact check boxes you click:
Which Records the System FindsWhich Exact
Check Boxes You
Click
All records with variations of the names Thomas, William, and
Brand, regardless of the birth date, and all records with birth dates
None
within a few years of 23 June 1896, regardless of the name, as in
these examples:
Thomas William Brand, born 23 June 1896
Thomas William Frederick Brand, born 23 June 1896
Thomas William Brand-Jones, born 23 June 1896
Thos. William Brand, born 23 June 1896
Thomas W. Brand, born about 1896
Tom Bill Brannd, born 6 June 1896
107FamilySearch Family Tree (18 October 2013)
Finding Deceased People in Family Tree

Which Records the System FindsWhich Exact
Check Boxes You
Click
Tom William Brannd, no birth date given
Thomas Wm. Brandt, no birth date given
Thomas Brandson, no birth date given
John Wm. Brand, born 23 June 1896
Mathew Dixon Brand, born 23 June 1896
Records that match the name and birth date most closely appear
higher on the search results. They also have more stars.
Only records that contain exactly Thomas and William in the
first name, exactly Brand in the last name, and exactly the birth
date 23 June 1896, as in these examples:
First name, last
name, and birth
date
Thomas William Brand, born 23 June 1896
Thomas William Frederick Brand, born 23 June 1896
Thomas William Brand-Jones, born 23 June 1896
All records with variations of the names Thomas, William, and
Brand and exactly the birth date 23 June 1896, as in these exam
ples
Birth date
Thomas William Brand, born 23 June 1896
Thos. William Brand, born 23 June 1896
Thomas William Frederick Brand, born 23 June 1986
Thomas William Brand-Jones, born 23 June 1896
All records with variations of the first names Thomas and William,
and the exact last name Brand and exactly the birth date 23 June
1896, as in these examples:
Last name and birth
date
Thomas William Brand, born 23 June 1896
Thos. William Brand, born 23 June 1896
Tom Wm. Brand, born 23 June 1896
Thomas Brand, born 23 June 1896
How the Exact Check Box Affects Finding Names
If you click the Exact check box for a name, the system finds records that contain that
exact name somewhere in the name field.
For example, if you enter Carl in the first name field and click the Exact check box,
the system finds first names like these:
Carl
Carl Matthew
Ivan Carl
FamilySearch Family Tree (18 October 2013)108
Finding Deceased People in Family Tree

How the Exact Check Box Affects Finding Dates
If you click the Exact check box for a date, the system finds records that contain that
date or a date that is contained within that date’s range.
For example, if you enter 1900 and click the Exact check box, the system finds dates
like these:
1900
About 1900
April 1900
24 April 1900
This is helpful, for example, when you know that someone died in 1900 but do not
know the exact month and day.
Doing an exact search for April 1900 finds any day in April 1900. Doing an exact search
for 1900–1905 finds all dates between 1 January 1900 and 31 December 1905 and dates
like About 1903 and 1900–1901.
Important: As you enter a date, the system displays a list of standard dates. If the date
you need is in the list, check the date to select it. Using the standard date improves your
search results.
How the Exact Check Box Affects Finding Places
When you click the Exact check box for a place, the system finds records from anywhere
within that place’s boundaries. For example, if you enter England and click the Exact
check box, the system finds records from anywhere in England.
If you search for Lincoln County, Wyoming and click the Exact check box, the
system finds places like these:
Lincoln, Wyoming, United States
Thayne, Lincoln, Wyoming, United States
Afton, Lincoln, Wyoming, United States
Important: As you type a place, the system displays a list of standard places. If the
place you need is in the list, click the place to select it. Using the standard place improves
your search results.
109FamilySearch Family Tree (18 October 2013)
Finding Deceased People in Family Tree

Chapter 7
Printing Information
In Family Tree, you can print four-generation pedigree charts, family group records, fan
charts, and the content that is displayed on a page.
1. Click Tree, and display the person whose information you want to print.
2. To print a fan chart, stay on the tree. If the fan chart is not already displayed, click Fan
Chart. Then use your browser’s print feature to print it.
3. To print a four-generation pedigree chart or a family group record, display the details
page of the person that you want.
a. On the pedigree view or fan chart view, click the person’s name.
b. On the person’s summary card, click Person.
4. Select the item that you want to print:
• To print a four-generation pedigree chart with this person in the main position, on
the right side under Print, click Tree.
• To print a family group record with this person listed as a parent, on the right side
under Print, click Family.
• To print a family group record with this person listed as a child, scroll down to the
Family Members section, click one of the parents’ names, and click View Person.
The parent’s details page appears. On the right side under Print, click Family.
A new tab opens in your browser. The requested form is a PDF file, which you can either
print directly from your browser or save as a file to your computer.
Tip: The printed pedigree chart has boxes for ordinances and a box next to an “F” (for
“family group record”). The bottom of the pedigree chart has a list of the ordinance
abbreviations and instructions for using the box.
The box next to the “F” helps you connect the pedigree chart to family group records.
When you print a family group record for a person, there is a box at the top where you
can assign a number or some identifier to the family group record. On the pedigree
chart, write that number or identifier in the box next to the “F.”
Using Certified Third-Party Computer Programs to Print
Information
You can use certified third-party computer and web programs to print information from
Family Tree.
These programs offer wider variety of printing options than the system itself. For example,
you can print more generations or different types of charts.
1. For a current list of certified programs, see https://www.familysearch.org/products.
2. Look for programs with a check mark. These are certified to work with Family Tree.
111FamilySearch Family Tree (18 October 2013)

Chapter 8
Attaching Sources to People and
Relationships
You can use online records to add richness to the tree. Seeing your ancestor’s name on a
record can increase your awareness that your ancestors were real people and that you really
are connected to them. Adding sources also proves the accuracy of the information in the
tree. In Family Tree, you can attach sources to people, couple relationships, and parent-child
relationships.
Before you can attach a source to a person or relationship, that source must be in your
source box. Your source box stores the sources that you are working with.
You can get a source into your source box in these ways:
• You can enter the source by typing in a title, the web page where it is located online, a
citation that shows where the record can be found offline, and a description or other
notes about the record.
• You can find a record on familysearch.org, and add it to your source box. When you
add a source this way, FamilySearch.org does all of the hard work for you. It creates the
source title, web page address, and citation. All you have to do is describe the record or
enter any notes that you want. If FamilySearch.org improves any of the information
about this source, it makes the changes in Family Tree for you.
• You can find a source that is attached to someone in the tree and add it to your source
box for use on your own ancestors.
Note: You cannot currently upload an image from your computer for use as a source to
FamilySearch. If the source is available online, use the online version. If it is not available
online, you can upload the image to a photo sharing site and link to it there. Many products
are certified to host images and sources for Family Tree. To see a current list of certified
products, go to FamilySearch.org/products, and look for applications that are certified for
“Connect.”
If you choose to link to websites outside of FamilySearch and its certified products, be
aware of the following:
• You may have to submit a link to one of these sites for approval before you can use it
in Family Tree.
• Some of these websites may be filtered at locations where computers or Internet
connections are available for public use.
Each person, couple relationship, and parent-child relationship can have up to 1,000
sources.
1. On the fan chart or pedigree view, click the person to whom you want to attach the
source.
The person’s summary card appears.
2. To attach to source to the person, on the summary card, click Sources.
Or to attach the source to a relationship that this person is in, follow these steps to
display the relationship:
113FamilySearch Family Tree (18 October 2013)

a. On the summary card, click Person.
The person’s details page appears.
b. On the person’s details page, click the Family link in the header. (Or scroll down
to the Family Members section.)
c. If the source is attached to a couple relationship, click the Edit Couple link that is
in the box that shows the husband and wife.
Or if the source is attached to a parent-child relationship, hover your mouse cursor
over the child’s name. Click the Edit Relationship link that appears.
d. Scroll down to the Sources section of the relationship.
The Sources section appears.
3. In the Sources section, click Go to Source Box.
Your source box appears.
The source box opens to the Home section, which contains the sources that have not
yet been assigned to a folder and that have not yet been attached to an ancestor.
4. If needed, open another section of your source box:
• To see the sources in a folder, click the folder’s name.
• To see all of the sources in your source box, click All.
5. Attach the source:
• If the source is already in your source box, find the source in your source box, and
click the Attach link that is to the right of the source’s title. You can also click the
source’s title, and then click the Attach link.
• If the source is not in your source box, click Create Source, enter the source’s title
and other information, and click Save and Attach.
Note: The websites (URLs) that you link to are reviewed to make sure they contain
content that is appropriate for inclusion in Family Tree:
• If you enter a website that is already approved for use in Family Tree, you can
save the source and proceed as normal.
• If you enter a website that is not approved by FamilySearch, the system prompts
you to submit the URL for review. When the URL is approved, you will be notified
by e-mail. You will then need to come back into Family Tree and re-create the
source. This typically happens when you link to a personal blog, a photo sharing
site, Google documents, or another site where posted content is not monitored.
• If you enter a website that has already been determined to be inappropriate, you
cannot save the source.
FamilySearch Family Tree (18 October 2013)114
Attaching Sources to People and Relationships

6. Enter a reason that indicates what this source proves and why it is being attached.
Focus your reason on the facts that the source proves. Be polite and factual. This field
is not the place for lengthy discussions or debates. If the facts require debate or
discussion, use the discussion feature instead.
7. Click Attach.
If you want to save this source but do not want to attach it, click Cancel. The source
is saved in your source box and will be available for your use from now on.
8. (Optional) If you are attaching the source to a person and want to tag the source as
pertaining to the person’s name, gender, birth, christening, death, or burial, follow
these steps:
a. Click the source’s title.
b. Click Tag.
c. Click the check box of each tag that you want to select or deselect.
d. Click the Tag button that is located at the bottom of the drop-down list.
9. To close the details box, click .
The source is saved. If you attached it to the person, the title appears in the Sources section
of the person’s details page. If you attached it to a relationship, the title shows in the
Sources section of that relationship.
If you tagged the source to the person’s name or other vital information, the source’s title
appears with that information. For example, if you tagged the source to a person’s name,
the source appears when you click the person’s name in the Vital Information section.
115FamilySearch Family Tree (18 October 2013)
Attaching Sources to People and Relationships

Adding Sources to Your Source Box
Your Source Box
Your source box contains the sources that you want to attach to your ancestors. It lets
you reuse sources instead of retyping a source each time you need to use it.
You can add up to 10,000 sources in your source box. However, most people find that
having too many sources makes it hard to find the one they need. Use these hints to
manage your source box effectively.
• In your source box, keep only the sources that you need for the ancestors that you
are currently working on. Your source box is not intended to be a place to permanently
store every source that you have ever created.
• After you attach a source to every ancestor that needs it, remove it from your source
box.
• Use folders to organize your sources into groups. For example, you could create a
folder for all of the sources about a specific family line. When you open that folder,
you can see a much smaller set of sources and more easily find the one that you want.
You can have up to 50 folders in your source box.
FamilySearch Family Tree (18 October 2013)116
Attaching Sources to People and Relationships

Typing a New Source into Your Source Box
You can add a source to your source box by typing in its title, web page, citation, and
notes.
1. On the fan chart or pedigree view, click the person to whom you want to attach the
source.
The person’s summary card appears.
2. To attach to source to the person, on the summary card, click Sources.
Or to attach the source to a relationship that this person is in, follow these steps to
display the relationship:
a. On the summary card, click Person.
The person’s details page appears.
b. On the person’s details page, click the Family link in the header. (Or scroll down
to the Family Members section.)
c. If the source is attached to a couple relationship, click the Edit Couple link that
is in the box that shows the husband and wife.
Or if the source is attached to a parent-child relationship, hover your mouse cursor
over the child’s name. Click the Edit Relationship link that appears.
d. Scroll down to the Sources section of the relationship.
The Sources section appears.
3. Click Create a New Source.
The fields where you enter information about the source appear:
117FamilySearch Family Tree (18 October 2013)
Attaching Sources to People and Relationships

4. Enter the information for the source.
The Source Title is required. When you put the cursor in a field, the example text
disappears, and you can enter your own text.
The citation and notes can contain up to 5K of text.
5. Click Save.
This source is saved to your source box and will be available for you to use until you
remove it from your source box.
6. Enter a reason that indicates what this source proves and why it is being attached.
Focus your reason on the facts that the source proves. Be polite and factual. This field
is not the place for lengthy discussions or debates. If the facts require debate or
discussion, use the discussion feature instead.
7. Click Attach.
If you want to save this source but do not want to attach it, click Cancel.
The source is saved in your source box and will be available for your use from now on.
What to Enter in Source Fields
When you enter your own sources into your source box, you enter important information
about that source. This information helps you and others understand what the source
FamilySearch Family Tree (18 October 2013)118
Attaching Sources to People and Relationships

is, where to find it, and how to understand its reliability. A source can either link to an
online record or simply be a citation that tells you where to find a copy of the record.
An example of a source with a link might look like this:
The websites (URLs) that you link to are reviewed to make sure they contain content
that is appropriate for inclusion in Family Tree:
• If you enter a website that is already approved for use in Family Tree, you can save
the source and proceed as normal.
• If you enter a website that is not approved by FamilySearch, the system prompts you
to submit the URL for review. When the URL is approved, you will be notified by
e-mail. You will then need to come back into Family Tree and re-create the source.
This typically happens when you link to a personal blog, a photo sharing site, Google
documents, or another site where posted content is not monitored.
• If you enter a website that has already been determined to be inappropriate, you
cannot save the source.
If a source is not online but you have a citation, you can leave the Web Page field blank
and enter information in the other fields.
Important: When you add a source, describe the one that you actually use. Whenever
possible, use the actual source and not an abstract or index. But if you do use an abstract
or index, cite it and not the actual record.
Guidelines for Entering a Source’s Title
Enter a title that will help you recognize this specific record later.
Example
"Utah Death Certificates, 1904-1956," Helen M. Richards (1909)
119FamilySearch Family Tree (18 October 2013)
Attaching Sources to People and Relationships

Guidelines
Source titles are often the only information that you see about a source. You usually
have to click to see the citation and other details. Good titles accurately identify sources
and help you recognize the one you want in your source box. The following guidelines
will help you write good, useful source titles:
• The source title is required.
• The source title must have between 5 and 100 characters.
• Include details that distinguish this specific record from other records that are about
the same people or that are from the same collection of records. The following types
of information are especially helpful:
- The type of record.
- The names of people or families named in the record.
- Dates, places, and other information that identify this record.
• Include the official name of the collection of records that the source came from. If
you are using an unpublished source that has no official title, create a descriptive
title.
• If the record contains information about many different members of a family, create
a title that lets you reuse the source. You want to find a balance between making a
source specific enough to be meaningful and general enough to be reusable.
Order of Details in a Source Title
In Family Tree, source title is the first piece of information that you see a about a source,
so it should clearly communicate what the record is. Clarity is much more important
than the order of the words in a title.
The word order matters more to people who record their genealogical information in
an offline database. In an offline database, the sources must remain in the database. As
a result, many users have long, alphabetical list of sources. To help themselves manage
their lists of sources, many users adopt a naming pattern for source titles, such as entering
the year or the last name and first name first. This helps them find a specific source
within that long, alphabetical list.
In Family Tree, by contrast, your list of sources should remain relatively short. After you
attach a source to all of the people and relationships where it is needed, you should
remove it from your source box. The sources remain attached to the people in the tree
regardless of whether that source is still in your source box.
Guidelines for Entering Information into a Source’s “Where the Record Is Found
(Citation)” Field
Enter information that will help people find this source again, even if the website where
it now is goes down.
Example
"Utah Death Certificates, 1904-1956," index and images, FamilySearch
(http://FamilySearch.org : accessed 15 April 2012), Helen M. Richards,
1909; citing Utah State Department of Health; FHL microfilm 2,229,322.
FamilySearch Family Tree (18 October 2013)120
Attaching Sources to People and Relationships

Guidelines
• Enter as much information as you can. You will never regret adding too much
information. The following are useful types of information to include:
- The name of the book or collection that the record is part of
- The name of the person or institution that created the record
- Who published the record
- Where the collection is located
• Many different style guides explain how to cite sources. Use one if you find it helpful.
In English, a comprehensive style guide for how to cite sources for family history is:
Mills, Elizabeth Shown. Evidence Explained: Citing History Sources from Artifacts to
Cyberspace. Revised edition. Baltimore: Genealogical Publishing Co., 2009.
• If you do not have a style guide, simply enter what you know in the best way that
you can.
• You can copy citations from the index entries in FamilySearch.org, the Family History
Library Catalog, and the FamilySearch Research Wiki.
Guidelines for Entering Information into a Source’s “Describe the Record” Field
Enter any other information that will help others understand or find the information
in this record.
Example
Certificate number 1759; Family History Library microfilm number
2229322
Guidelines
In notes, it is often useful to include the following types of information:
• Fees required to access the record.
• A transcription of the record, particularly if the image is located on a site that requires
a fee or subscription for access.
• A translation if the information is in a language that your relatives may not read.
Copying a Source
If you need a source that is similar to one that you have already created, you can copy
a source that is in your source box, and then change the copy.
Copying a source is also useful if you want to change the title or citation of a source that
you obtained from FamilySearch.org. You cannot change the title, URL, or citation of
the FamilySearch source, but you can change the copy.
1. If your source box is not already open, open it:
a. On the Family Tree, click a person’s name.
b. On the person’s summary card, click Sources.
c. Click Go to Source Box.
2. Click the title of the source that you want to copy.
3. Click Copy.
121FamilySearch Family Tree (18 October 2013)
Attaching Sources to People and Relationships

The source’s details appear in fields where you can edit them.
4. Make the needed changes.
If you do not change the title yourself, the system adds the words “Copy of” to the
title for you.
5. Save the copy:
• If you want to save the copy and attach it to the person that you started from,
click Save and Attach.
• If you want to save the copy in your source box without attaching it, click Save.
Your source box reappears. The source that you copied is now in the list.
If you are using folders, move the copied source into the folder where it belongs.
Adding a Record from FamilySearch.org to Your Source Box
When you find a record on FamilySearch.org, you can add it to your source box and
then attach it to people and relationships in Family Tree.
Citing records from FamilySearch.org has some important advantages:
• When you add a source from FamilySearch.org, FamilySearch.org does all of the hard
work for you. It creates the source title, URL, and citation. All you have to do is enter
any notes that you want.
• If FamilySearch.org improves any of the information about this source, it makes the
changes in Family Tree for you.
• On FamilySearch.org, the URL will persist. The URLs found on other websites often
change or become unavailable.
1. On FamilySearch.org, display the index page for the record that you want to add to
your source box.
FamilySearch Family Tree (18 October 2013)122
Attaching Sources to People and Relationships

2. Click Add to My Source Box.
The source is saved in your source box and will be available for your use from now on.
Adding a Source That Is Already Created into Your Source Box
When you review information in Family Tree, you may see a source that should also be
attached to other people in Family Tree. You can quickly add this source to your source
box so that you can attach it to the other people without having to retype it.
You can add any source in Family Tree to your source box, no matter who added it.
1. On the fan chart or pedigree view, click a person to whom the source is attached.
The person’s summary card appears.
2. If the source is attached to the person, on the summary card, click Sources.
Or if the source is attached to a relationship that this person is in, follow these steps
to display the relationship:
a. On the summary card, click Person.
The person’s details page appears.
b. On the person’s details page, click the Family link in the header. (Or scroll down
to the Family Members section.)
c. If the source is attached to a couple relationship, click the Edit Couple link that
is in the box that shows the husband and wife.
Or the source is attached to a parent-child relationship, hover your mouse cursor
over the child’s name. Click the Edit Relationship link that appears.
d. Scroll down to the Sources section of the relationship.
The Sources section appears.
3. Click the title of the source that you want to add to your source box.
The source’s details appear.
123FamilySearch Family Tree (18 October 2013)
Attaching Sources to People and Relationships

4. Click View.
The source’s details appear:
5. Click My Source Box.
6. Click Add to My Source Box.
7. Click OK.
The source is saved in your source box and will be available for your use from now on.
Adding, Changing, and Removing Tags from Sources
To associate a source to a specific piece of information about a person, you add tags to
the source. For example, you can add tags to a birth certificate to indicate that it provides
the person’s name, gender, and birth date and place. After tags have been added, you
can change and remove them.
Anyone can add tags to any source in Family Tree.
These tags let Family Tree display a particular source with the information that it proves.
For example, a source that is tagged to a birth event shows up with that birth event.
Tip: Instead of tagging a source for marriages and relationships, you should add those
types of sources directly to couple relationships (marriages) and parent-child relationships.
1. On the fan chart or pedigree view, click the person’s name.
2. On the summary card, click Sources.
FamilySearch Family Tree (18 October 2013)124
Attaching Sources to People and Relationships

3. Click the source’s title.
The source’s details appear.
4. Select the tags that you want to use:
a. Click Tag.
b. Click the checkbox of each tag that you want to select or deselect.
125FamilySearch Family Tree (18 October 2013)
Attaching Sources to People and Relationships

c. Click the Tag button that is located at the bottom of the drop-down list.
5. To close the details box, click .
The source’s title appears with the vital information that you tagged it to. For example,
if you tagged the source to a person’s name, the source appears when you click the
person’s name in the Vital Information section.
Correcting and Improving Sources
Editing Sources
If you can provide a more complete or correct description of a source, you can edit that
source, whether you originally entered it or not. You can also edit the source’s
justification.
The system keeps a history of all changes made to a source. If someone makes a change
that you do not agree with, you can restore a previous version of the source. If you want
to be notified if anyone changes a person’s sources, watch that person. (On the person’s
summary card, click Watch.) If you want to be notified when the source itself changes,
watch the source. (To watch a source, on the summary card, click Sources; click the
source title; click the View link below the title; click Tools; and click Watch.) The
same notification email lists changes to both people and sources.
Tip: You can also edit any source from your source box. With your source box open,
just click the title of the source that you want to edit. Click View, and start with step
6.
1. On the fan chart or pedigree view, click a person to whom the source is attached.
The person’s summary card appears.
2. If the source is attached to the person, on the summary card, click Sources.
Or if the source is attached to a relationship that this person is in, follow these steps
to display the relationship:
a. On the summary card, click Person.
The person’s details page appears.
FamilySearch Family Tree (18 October 2013)126
Attaching Sources to People and Relationships

b. On the person’s details page, click the Family link in the header. (Or scroll down
to the Family Members section.)
c. If the source is attached to a couple relationship, click the Edit Couple link that
is in the box that shows the husband and wife.
Or the source is attached to a parent-child relationship, hover your mouse cursor
over the child’s name. Click the Edit Relationship link that appears.
d. Scroll down to the Sources section of the relationship.
The Sources section appears.
3. Click the source’s title.
The source’s details appear.
4. Review the source’s details.
5. If you still want to make a change, click View.
The source’s edit page appears:
6. Depending on what you want to do next, click the appropriate items:
• To change information that was previously entered about the source, click the
information, review it, and then click its Edit link.
• To add information that the source currently lacks, click the Add… link that
appears where the missing information should go.
For some sources, you can edit only the Notes field. If you find a source like this, it
means that it was created when a user of FamilySearch.org found a record, added it
to his or her source box, and then attached it to a person in Family Tree. During this
process, FamilySearch.org automatically created the source’s title, web page, and
citation. When FamilySearch.org improves the titles, web page, and citations that it
creates, it will automatically make these same changes to the source in Family Tree.
7. Make your change or add the new information. Be sure to add a reason for your
changes.
127FamilySearch Family Tree (18 October 2013)
Attaching Sources to People and Relationships

The websites (URLs) that you link to are reviewed to make sure they contain content
that is appropriate for inclusion in Family Tree:
• If you enter a website that is already approved for use in Family Tree, you can save
the source and proceed as normal.
• If you enter a website that is not approved by FamilySearch, the system prompts
you to submit the URL for review. When the URL is approved, you will be notified
by e-mail. You will then need to come back into Family Tree and re-create the
source. This typically happens when you link to a personal blog, a photo sharing
site, Google documents, or other site where posted content is not monitored.
• If you enter a website that has already been determined to be inappropriate, you
cannot save the source.
8. Click Save.
9. To close the details box, click .
To return to previous screens, use the Go to links that are located beneath the
FamilySearch tree logo.
Detaching Sources from People and Relationships
If you find that a source should not be attached to a person, you can detach it. You can
detach any source, no matter who added it. You can also detach the same source from
more than one person without going to each person separately.
Detaching a source removes it from the person or relationship. If that source is attached
to other people, it remains attached to them. The source also remains in the source box
of the contributor who added the source unless that contributor has deleted it from his
or her source box.
If you want to be notified when a source changes, click the Watch option for a person
where the source is attached. The notification e-mail lists changes to sources.
1. On the fan chart or pedigree view, click a person to whom the source is attached.
The person’s summary card appears.
2. If the source is attached to the person, on the summary card, click Sources.
Or if the source is attached to a relationship that this person is in, follow these steps
to display the relationship:
a. On the summary card, click Person.
The person’s details page appears.
b. On the person’s details page, click the Family link in the header. (Or scroll down
to the Family Members section.)
c. If the source is attached to a couple relationship, click the Edit Couple link that
is in the box that shows the husband and wife.
Or the source is attached to a parent-child relationship, hover your mouse cursor
over the child’s name. Click the Edit Relationship link that appears.
d. Scroll down to the Sources section of the relationship.
The Sources section appears.
3. Click the source’s title.
The source’s details appear.
4. Detach the source:
FamilySearch Family Tree (18 October 2013)128
Attaching Sources to People and Relationships

DescriptionOption
Click Detach.You want to detach a source
from this person or relationship
only.
You want to detach the same
source from more than one
person or relationship.
1. Click View.
2. In the box that lists everyone that this
source is attached to, click Show All.
(This box is located on the left side of the
screen.)
3. Click the Detach button for each person
that you want to detach the source from.
5. When the system asks if you are sure, click Yes.
To return to previous screens, use the Go to links that are located beneath the
FamilySearch tree logo.
Seeing and Undoing the Changes Made to a Source
Family Tree tracks changes to a source’s title, web page (URL), citation, and notes. If
someone makes a change that you do not agree with, you can use the change history
list to restore a previous version of the source. You can undo changes made to any source,
regardless of whether you created the source or made the change.
1. On the fan chart or pedigree view, click a person to whom the source is attached.
The person’s summary card appears.
2. If the source is attached to the person, on the summary card, click Sources.
Or if the source is attached to a relationship that this person is in, follow these steps
to display the relationship:
a. On the summary card, click Person.
The person’s details page appears.
b. On the person’s details page, click the Family link in the header. (Or scroll down
to the Family Members section.)
c. If the source is attached to a couple relationship, click the Edit Couple link that
is in the box that shows the husband and wife.
Or the source is attached to a parent-child relationship, hover your mouse cursor
over the child’s name. Click the Edit Relationship link that appears.
d. Scroll down to the Sources section of the relationship.
The Sources section appears.
3. Click the source’s title.
The source’s details appear.
4. Click View.
The source’s edit page appears:
129FamilySearch Family Tree (18 October 2013)
Attaching Sources to People and Relationships

5. In the box that lists recent changes made to this source, click Show All.
The source’s change history appears.
6. Find the change that shows the correct information, and click its Restore button.
If a change does not have a Restore button, then you cannot undo that change. For
example, the following types of entries do not have Restore buttons:
• Entries that identify the current information that is shown in Family Tree. You
do not need to restore what is already there.
• The entry that identifies when the information was first added to Family Tree.
You can recognize these because of a description that says something like, “Source
Created.” If this source should not be attached to the person, you do not use the
change history to fix the problem. Instead, you detach the source.
7. When the system asks if you are sure, click Yes.
To return to previous screens, use the Go to links that are located beneath the
FamilySearch tree logo.
FamilySearch Family Tree (18 October 2013)130
Attaching Sources to People and Relationships

Managing Your Source Box
Using Folders to Organize Your Source Box
In your source box, sources are listed in the order that you created them. This can make
it hard to find the exact one that you want. Use folders to organize your sources into
meaningful groups, thus making it easy to find the exact source that you need.
You can have up to 50 folders in your source box. A source can be in only one folder at
a time. Choose folder names that will help you find a source when you need it. Here are
some ideas for types of folder names that you might want to use:
• The type of record. For example, you could have separate folders for census records
and birth certificates.
• The names of the ancestors that the source is about. If you need to distinguish between
ancestors with similar names, include birth years or other information.
• The name of the family line that the source pertains to.
• The name of the places where the record was created.
It may take some time to figure out the way that works best for you. But do not be afraid
of making a mistake. As you learn what works best for you, you can change folder names,
move sources to different folders, and delete folders that you no longer need.
1. If your source box is not already open, open it:
a. On the Family Tree, click a person’s name.
b. On the person’s summary card, click Sources.
c. Click Go to Source Box.
2. To create a new folder, follow these steps:
a. Click New Folder.
An empty field appears in the list of folders.
b. Enter a name for the folder.
c. Click .
Folders are listed in alphabetical order.
3. To move a source into a folder, click the source, and use your mouse to move it to
the folder. You can also follow these steps:
Tip: A source can be in only one folder at a time in your source box.
a. In the list of sources, click the check box that is next to the source’s title. To
select all of the sources at once, click the check box that is located above the list
of sources.
b. Click Move.
131FamilySearch Family Tree (18 October 2013)
Attaching Sources to People and Relationships

A list of your folders appears.
c. From the resulting list of options, click the name of the folder where you want
the sources to be moved to.
The number of sources in that folder appears in parentheses next to the folder’s name.
Renaming Folders in Your Source Box
If you think of a more useful name for the folder or need to correct a typing error, you
can rename a folder in your source box.
Tip: To quickly rename a folder, click the folder name twice, and skip to step 5.
1. If your source box is not already open, open it:
a. On the Family Tree, click a person’s name.
b. On the person’s summary card, click Sources.
c. Click Go to Source Box.
2. To select the folder that you want to rename, click its name once.
A triangle appears to the right of the folder name. The list of sources shows only the
sources in that folder.
3. Click the triangle that is next to the folder name.
A list of options appears.
4. From the resulting list of options, click Rename Folder.
FamilySearch Family Tree (18 October 2013)132
Attaching Sources to People and Relationships

The name of the folder appears within a field that you can now edit.
5. Enter a new name for the folder.
6. To save the new folder name, click .
Deleting Unneeded Folders from Your Source Box
When you no longer need a folder in your source box, you can delete it.
1. If your source box is not already open, open it:
a. On the Family Tree, click a person’s name.
b. On the person’s summary card, click Sources.
c. Click Go to Source Box.
2. If the folder that you want to delete still contains sources, either move the sources
to a different folder, or remove the sources from your source box. Follow these steps:
a. In the list of sources, click the check box that is next to the title of the source.
b. Click Move.
A list of options appears.
c. Select the option that you want:
• To keep the source and move it to a different folder, select that folder’s name.
• To keep the source but not put it into a folder, select All Sources.
• If you are finished using the source and want to remove it from your source
box, select Remove from Source Box.
133FamilySearch Family Tree (18 October 2013)
Attaching Sources to People and Relationships

3. When the folder is empty, follow these steps to delete it:
a. Click the folder’s name once.
A triangle appears to the right of the folder name.
b. Click the triangle.
A list of options appears.
c. Click Remove Folder.
The folder disappears from your source box.
Removing Sources from Your Source Box
After you attach a source to all of your ancestors that it mentions, remove it from your
source box. The source will stay attached to all of the people and relationships that you
attached it to. If you do not remove sources from your source box, your source box will
eventually become so large that you cannot find what you need in it.
If you find that you have been using a source that should not be attached to anyone
that you have attached it to, you should delete the source instead of removing it from
your source box.
Tip: If you remove a source from your source box and later discover that you need to
attach it to more people, you can add the source back into your source box without
retyping it. Simply find a person who already has that source, and click the source’s title,
and click View. Then click the My Source Box option, which is located in the upper
right part of your screen. Select Add to My Source Box.
1. If your source box is not already open, open it:
a. On the Family Tree, click a person’s name.
b. On the person’s summary card, click Sources.
c. Click Go to Source Box.
2. To remove just one source, follow these steps:
a. Click the title of the source that you want to remove.
b. Click Remove.
3. To remove more than one source at a time, follow these steps:
a. Click the check box of each source that you want to remove. To remove all of
the sources at once, click the check box that is located above the list of sources.
b. Click Move.
A list of your folders appears. The option to remove sources is at the bottom.
FamilySearch Family Tree (18 October 2013)134
Attaching Sources to People and Relationships

c. Click Remove from Source Box.
4. When the system asks if you are sure, click Yes.
Deleting Sources from Family Tree
When you delete a source, it is automatically deleted from your source box and from
every person and relationship that you attached it to.
You can delete a source only if you created it. If you find a source that is attached to the
wrong person or relationship but you did not actually create the source, you can detach
it instead. Whenever you detach a source, be sure to provide a clear explanation of your
reasons.
The system does not keep track of source deletions in its change history. If you delete a
source and then find that you need it back, you have to enter it again. You will then
have to reattach it to every person and relationship that needs it. Therefore, delete a
source only if you do not want it attached to any of your ancestors.
If you do not want to delete a source, you may find these features useful instead:
• If you attached a source to the wrong person or relationship, detach it. Do not delete
it.
• After you have attached a source to every person and relationship that needs it, remove
it from your source box. The source remains attached to the people and relationships,
but it no longer appears in your source box. Removing sources that you no longer
need makes it easier to manage the sources that you are currently using.
1. If your source box is not already open, open it:
a. On the Family Tree, click a person’s name.
b. On the person’s summary card, click Sources.
c. Click Go to Source Box.
2. Find the source that you want:
• If your source box contains just a few sources, read through your list until you
find it. If your list has more than one page, click the numbered links at the bottom
to see other pages.
• If you have organized your sources into folders, click the name of the folder where
the source is located.
3. Click the title of the source that you want to delete.
The source’s details appear.
4. Click the source’s View link.
The source’s edit page appears:
135FamilySearch Family Tree (18 October 2013)
Attaching Sources to People and Relationships

5. Click Delete Source.
This link appears only if you created the source.
6. When the system asks if you are sure, click Yes.
To return to previous screens, use the Go to links that are located beneath the
FamilySearch tree logo.
Seeing a List of the People a Source Is Attached To
One source sometimes contains information about many different people. Before you
change or delete a source, it can be helpful to see a list of the people it is attached to.
1. On the fan chart or pedigree view, click a person to whom the source is attached.
The person’s summary card appears.
2. If the source is attached to the person, on the summary card, click Sources.
Or if the source is attached to a relationship that this person is in, follow these steps
to display the relationship:
a. On the summary card, click Person.
The person’s details page appears.
b. On the person’s details page, click the Family link in the header. (Or scroll down
to the Family Members section.)
c. If the source is attached to a couple relationship, click the Edit Couple link that
is in the box that shows the husband and wife.
Or the source is attached to a parent-child relationship, hover your mouse cursor
over the child’s name. Click the Edit Relationship link that appears.
d. Scroll down to the Sources section of the relationship.
The Sources section appears.
FamilySearch Family Tree (18 October 2013)136
Attaching Sources to People and Relationships

3. Click the source’s title.
The source’s details appear.
4. Click View.
On the right side of the screen is a box that lists all of the people that the source is
attached to.
137FamilySearch Family Tree (18 October 2013)
Attaching Sources to People and Relationships

5. If the source is attached to more people than can be listed in the box, click Show
All to see the entire list.
Reporting Abuse in Sources
If a source contains content that you feel should not be included in the system, a system
administrator can review it. If it is found to be inappropriate, the administrator can then
delete it.
Types of inappropriate discussions or comments to report might include the following:
• Offensive or abusive language or content
• Information that might harm or embarrass living relatives
• Links to external web pages with inappropriate content
• Solicitations for business or research services
Important: Please use the Report Abuse link to notify FamilySearch Support about
inappropriate sources. Do not use it to report inaccurate sources. You can edit any source
that you feel is incomplete or incorrect. You can detach any source that does not contain
information about the person to whom it is attached.
1. On the fan chart or pedigree view, click a person to whom the source is attached.
The person’s summary card appears.
2. If the source is attached to the person, on the summary card, click Sources.
Or if the source is attached to a relationship that this person is in, follow these steps
to display the relationship:
a. On the summary card, click Person.
The person’s details page appears.
b. On the person’s details page, click the Family link in the header. (Or scroll down
to the Family Members section.)
c. If the source is attached to a couple relationship, click the Edit Couple link that
is in the box that shows the husband and wife.
Or the source is attached to a parent-child relationship, hover your mouse cursor
over the child’s name. Click the Edit Relationship link that appears.
d. Scroll down to the Sources section of the relationship.
The Sources section appears.
3. Click the source’s title.
The source’s details appear.
4. Click the item’s Report abuse link.
FamilySearch Family Tree (18 October 2013)138
Attaching Sources to People and Relationships
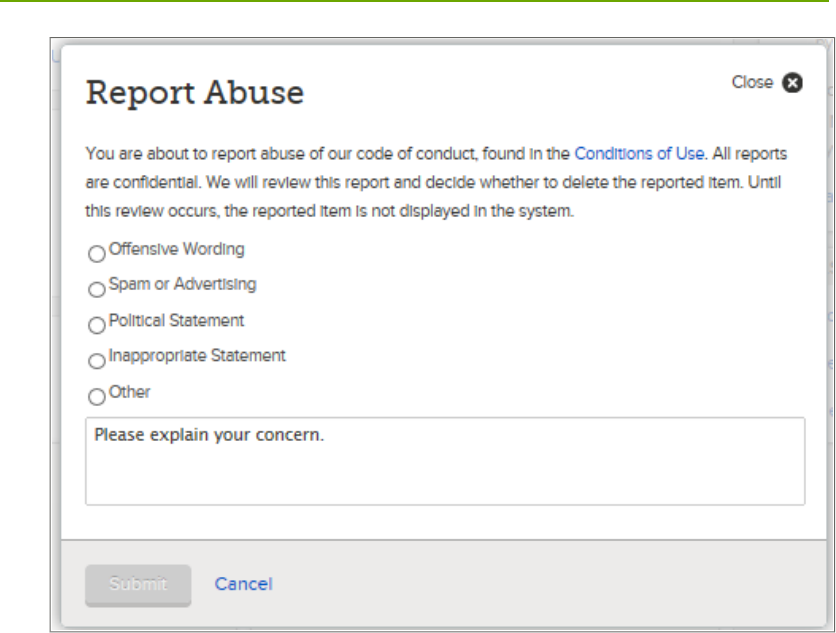
5. Click the reason that you feel the item is a problem.
If you click Other, please enter your specific concern.
6. Click OK.
The system indicates that FamilySearch Support has received your report. This message
also lists the email address to which a response will be sent.
7. To close the message, click OK.
A system administrator reviews your concerns. If your user profile contains an email
address, you will receive an email to explain what actions were taken.
Why Sources Are Valuable
Sources indicate where the information in the tree came from. They add richness and
credibility to the information in the tree.
Examples of sources include government and church records, cemeteries, your own
memory, the memory of others, and so forth. Sources provide you with the following
benefits:
• They increase your sense of connection to your ancestors and their place in history.
• They allow you to evaluate the reliability of your information. For example, an original
record created near the time when an event occurred is probably more reliable than
a biography written after the event. Knowing the source can help you identify
information that you want to verify with other types of records.
• They provide a history of the sources you have examined. You can then focus research
efforts on sources that have not yet been used.
139FamilySearch Family Tree (18 October 2013)
Attaching Sources to People and Relationships

• They help you evaluate conflicting information. When you find conflicting
information, such as two different birth dates for the same person, you can use your
sources to determine which one is the most likely to contain the correct information.
• They acknowledge work done by others.
Sources in Family Tree
A source is a historical record, such as a picture, journal, Bible, document, or other item
that contains evidence about your family history. A citation is a reference that describes
what the source is and how to find it. Sources are critical to the genealogical process for
documentation and discovery.
Like all information in Family Tree, all users can create sources, attach them to people
and relationships, edit, and detach them. This allows sources to be improved. Family
Tree provides features that can help prevent incorrect changes to sources:
• Changes made to sources are recorded in a change history. From there, the changes
can be undone if needed.
• You can also “watch” sources and receive e-mail notifications if they change.
In Family Tree, it is recommended that you create one source for each image or citation
that you use. For example, if you find three families in the 1910 U.S. census, and each
family is on a different image within the census, create one source for each image. It is
not possible to create one source for the entire 1910 census and add a different link for
each family that you find in that census.
Source Icons
Family Tree uses different icons to indicate whether a source is available on
familysearch.org or another website.
What It MeansIcon
The source links to a record that is on familysearch.org.
The source is either available on another website, or it does not contain a
web address (URL). It may contain a citation and other information to help
you find the source offline.
FamilySearch Family Tree (18 October 2013)140
Attaching Sources to People and Relationships

Chapter 9
Merging Duplicate Records
When you find duplicate records in Family Tree, you can merge them or indicate that they
are not matches. To see possible duplicates, display the person’s details page. The system
lists the possible duplicates that it found. If you know the ID number of a duplicate that
is not listed, you can also merge using the ID numbers.
During a merge, you do the following:
• See all of the information and relationships from both persons.
• Compare each piece of information and each relationship.
• Choose which information to keep and which to discard.
After you have identified the information to keep, Family Tree will do the following:
• Keep the original record.
• Add to the original record the information that you selected from the duplicate record.
• Remove and archive the duplicate record.
• Record these actions on the change history so that they can be undone if needed.
To prevent incorrect merges, Family Tree has a “not-a-match” feature. With this feature,
you indicate that two persons are not matches. You can enter a reason to explain how you
know. If you indicate that two persons are not a match, the system no longer suggests
them as possible matches. This will help prevent bad matches from occurring.
When you indicate that persons are not a match, they are placed on the person’s Not a
Match list. Later on, a person can be removed from the Not a Match list. The records can
also be re-examined and merged if needed.
• Before you merge records, consider doing the following:
- Review the reason statements, sources, and discussions on the person’s record. Know
what pieces of information are already well documented and explained.
- If possible, have a well-documented genealogical database, book, or other resource
that you can refer to.
Tip: You might find this information in the User-Submitted Genealogies section of
FamilySearch.org. To find out, open another tab in your browser. Go to
FamilySearch.org, click Search, click Genealogies, and search for the person. You
can have the Family Tree in one tab and the user-submitted genealogy in another.
• Have a piece of paper and pencil to keep notes on. After you do a merge, you may need
to make more corrections, enter reason statements, attach sources, start a discussion,
contact a previous contributor, or do more research.
• Click a piece of information to see its contributor and reason statements. For example,
to see reason statements for a person’s name, click the name.
To merge duplicate records, follow these steps:
1. Open the details page of the person whose record should be kept after the merge is
done.
a. On the tree, click the person’s name.
141FamilySearch Family Tree (18 October 2013)

The summary card appears.
b. On the person’s summary card, click Person.
The person’s details page appears.
2. Near the top right, under Tools, click Possible Duplicates.
A list of possible duplicates appears.
3. If you can easily tell that someone on the list is not a match, click its Not a Match
option.
4. To review a duplicate that is on the list, click its Review Merge button to compare
the information.
To merge a duplicate that is not on the list, follow these steps:
a. Click Merge by ID.
Tip: Some duplicate records cannot be merged. If the system has already identified
possible duplicates that cannot be merged, they are listed beneath the list of possible
duplicates. Before you merge by ID, check that list to make sure that the records you
plan to merge can be merged.
The ID number of the person you started from is automatically entered into the
Current Person ID field. This is the record that will be kept if you merge the records.
b. If you want to keep a different record, or if you want to merge records for a different
person, delete the number that is in the Current Person ID field, and enter the one
that you want. Use uppercase letters. Include the hyphen.
c. In the Possible Duplicate ID field, enter the ID number of the duplicate record that
should be deleted after the merge. Use uppercase letters. Include the hyphen.
FamilySearch Family Tree (18 October 2013)142
Merging Duplicate Records

d. Click Continue.
If you or another user has indicated that the possible duplicate is not a match for
the current person, you see a message stating that fact.
The merge screen appears.
Sometimes a message appears stating that the merge can be done only if you switch the
records. This happens if the record on the left has restrictions that would prevent it
from being deleted after the merge. Simply click the button that switches the records,
and continue the process as written.
5. Compare each piece of information on the left with the information on the right.
Indicate what to do with the information on the right.
DescriptionOption
Click Add to add the information from the record on the right to
the record on the left.
Add
Click Replace to replace the information on the left with the
information on the right. (This moves more complete or accurate
information to the record on the left.)
Replace
Click Reject if the information on the right is not correct or is less
complete than the information on the left.
Reject
Remember: When you are done, the person and the information on the left will be
kept in Family Tree. The information that is on the right will be deleted. You want to
make sure that the more complete and accurate information appears on the left so that
it will be kept.
143FamilySearch Family Tree (18 October 2013)
Merging Duplicate Records

Important: If the name, birth, or other information is the same on both records, click
them to display more information. They probably have different reason statements.
Keep the version with the best reason statement.
When considering whether to replace a spouse, child, or parent, if available, click More,
and look at the following information.
• A spouse includes the name, the marriage date and place, and any sources for the
marriage.
• A child includes the name, the relationship (biological, adopted, and so forth), and
any sources for the relationship.
• A parent includes the names of both parents, the relationship, and any sources for
the relationship.
You can either add all of the sources from the duplicate record or reject all of them. If
only some of the sources in the duplicate record are correct, keep them all. Then go
back to the record, and detach or edit the incorrect sources.
Discussions are not merged. Only the discussions from the record on the left are saved
with the record.
6. If the records are about the same person, at the bottom click Continue.
If the records are not about the same person, click Not a Match.
The merge confirmation appears.
7. Enter a reason why the merge is correct, and click Finish Merge.
The record will be updated with the information you chose to add or replace. The
duplicate record will be archived. A note will appear in the change history documenting
the merge so it can be undone if needed.
Resolving Common Merge Situations
As you merge records, you have to decide what information to keep and what to reject.
What to DoSituation
Click Add or Replace to move the infor
mation to the record being kept.
The duplicate record contains a more accu
rate or complete piece of information.
FamilySearch Family Tree (18 October 2013)144
Merging Duplicate Records

What to DoSituation
Do not move the information over to the
record being kept. Click Reject. Before you
The duplicate record contains information
that is not correct.
finish the merge, make sure that all incor
rect information remains on the right side
of the screen.
Write down the name from the duplicate
record. After you finish merging the record,
The duplicate record contains a nickname
or other name variation that should be
preserved. add the name as an Alternate name in the
person’s Other Information section.
One record contains an accurate date. The
other contains an accurate place. Neither
1. Click the information to see the contrib
utor and reason statement.
record contains both the correct date and
place.
2. Keep the version that is easiest to cor
rect. If one version has a good reason
statement, keep that version. It is often
easier to enter a date or place than it is
to write a clear reason statement.
3. Write down what corrections you need
to make after the merge is done.
Both records contain different versions of
a piece of information, but you do not
know which is accurate.
1. Keep the most reasonable version. Rea
sonable information fits with the time,
the place, and the family data that you
already know is accurate.
2. Keep notes so that you know what fur
ther research to conduct about this per
son after you complete the merge.
3. Enter your concerns in the reason
statement for the merge.
4. Enter your concerns in the person’s dis
cussions.
The duplicate record contains duplicate
spouses and children.
1. For each duplicate person, click Accept
or Add to move him or her to the
record that is being kept.
2. Finish the merge.
3. Go to the spouse's record, and merge
the duplicates.
4. Go to the records of each child, and
merge the duplicates.
The duplicate record contains duplicate
parents.
1. For each duplicate person, click Accept
or Add to move him or her to the
record that is being kept.
2. Finish the merge.
3. Go to the record of each parent, and
merge the duplicates.
145FamilySearch Family Tree (18 October 2013)
Merging Duplicate Records

What to DoSituation
Do not move the information over to the
record being kept.
The duplicate record contains spouses,
children, or parents that are not accurate.
Return to the person’s record. Delete the
relationships to the wrong spouses, chil
dren, or parents.
The record being kept contains spouses,
children, or parents that are not accurate.
One or both records contain inaccurate
sources.
1. Finish the merge.
2. Go back to the person’s details page.
3. Detach or edit incorrect sources.
The duplicate record appears to be about a
completely different person.
1. Scroll to the bottom.
2. Click Not a Match.
Records That Cannot Be Merged
Some records in Family Tree cannot be merged.
You cannot merge records in the following situations:
• The gender on one record is male, and the other is female.
• One record indicates the person is alive; the other is deceased.
• Both records come from the membership records of The Church of Jesus Christ of
Latter-day Saints.
• One of the records came from new.familysearch.org, where it has been combined
with too many other records.
• The duplicate record has already been deleted due to another merge.
• One of the records has restrictions that would prevent it from being changed.
If Family Tree has already identified possible duplicates that cannot be merged, they
appear beneath the list of possible duplicates:
FamilySearch Family Tree (18 October 2013)146
Merging Duplicate Records

Undoing a Merge
When records are merged, one record remains in Family Tree. The other is deleted and
stored in an archive for a period of time. If the merge needs to be undone, and if the
preserved record was not changed after the merge, then you can undo the merge. If the
record was changed, restore the archived person instead.
If the record has been deleted permanently, you cannot undo the merge.
1. Open the details page of the person whose record was merged:
a. On the tree, click the person’s name.
The summary card appears.
b. On the person’s summary card, click Person.
The person’s details page appears.
2. In the Latest Changes box, click Show all.
A list of all the changes appears. Changes that resulted from a merge are identified
with a gray bar along the left side of the list.
147FamilySearch Family Tree (18 October 2013)
Merging Duplicate Records

3. Find the name of the deleted person, and click Unmerge.
A screen appears on which you can see the records that were merged.
FamilySearch Family Tree (18 October 2013)148
Merging Duplicate Records

4. Enter a reason that explains why this merge should be undone.
5. Click Unmerge.
The record of the deleted person is restored.
If the two records are not about the same person, and if the records appear in the list of
possible duplicates, review the duplicates again. This time, select the Not a Match
option.
Restoring a Record That Was Deleted after a Merge
When records are merged, one record remains in Family Tree. The other is deleted and
then stored in an archive for a period of time. If the merge needs to be undone, and if
the preserved record was changed after the merge, then you have to restore the archived
record.
If the record has been deleted permanently, you cannot restore it.
1. Open the details page of the person whose record was merged:
149FamilySearch Family Tree (18 October 2013)
Merging Duplicate Records

On the tree, click the person’s name.
The summary card appears.
a.
b. On the person’s summary card, click Person.
The person’s details page appears.
2. In the Latest Changes box, click Show all.
A list of all the changes appears. A merge often causes multiple changes. All the
changes that resulted from the merge will be grouped in a box.
3. In the change history, click the name that is listed beneath Deleted Person.
4. Click Person.
A box appears to indicate that the record was deleted by merge. It also lists the date
when the record was deleted, the name of the user who did the merge, and the reason
for the merge. Before this box appears, the screen looks the same as if it were going
to display the person’s details page. It may take a few seconds for the box to appear.
FamilySearch Family Tree (18 October 2013)150
Merging Duplicate Records

5. Click Restore Person.
A message appears to let you enter a reason for restoring the record.
6. Enter a reason to explain why you are restoring this person.
7. Click Restore.
The record is restored, and the person’s details page appears.
If the two records are not about the same person, and if the records show up in the list
of possible duplicates, review the duplicates again. This time, select the Not a Match
option.
151FamilySearch Family Tree (18 October 2013)
Merging Duplicate Records

Indicating Two Records Are Not a Match
When someone indicates that two records are not a match, Family Tree no longer suggests
them as possible duplicates.
If later you find that the two records are a match, you can review the match again and,
if needed, remove it from the not a match list.
To indicate that possible duplicates are not a match, display the person’s details page.
1. Open the person’s details page.
a. On the tree, click the person’s name.
The summary card appears.
b. On the person’s summary card, click Person.
The person’s details page appears.
2. Near the top right, in the Tools box, click Possible Duplicates.
A list of possible duplicates appears.
3. You can either compare the information between the possible duplicate and this
person, or you can indicate they are not a match.
• If you know that the two persons are not a match, click Not a Match.
• If you want to compare the information, click Review Merge.
Compare the information on the left with the information on the right. If the
records are about different people, at the bottom, click Not a Match.
4. Enter a reason why these records are not a match, and click Not a Match.
The person no longer appears as a possible duplicate.
Removing a Record from the Not a Match List
When you indicate that persons are not a match, they are placed on the person’s Not a
Match list. If a record should not be on this list, you can either move it back to the list
of possible duplicates or compare and merge the records.
1. Open the details page of the person whose Not a Match list you want to see.
a. On the tree, click the person's name.
The summary card appears.
b. On the person's summary card, click View Person.
FamilySearch Family Tree (18 October 2013)152
Merging Duplicate Records

The person’s details page appears.
2. Near the top right, under Tools, click Possible Duplicates.
A list of possible duplicates appears.
3. Click the Not a Match tab.
The records that have been identified as not matching this person are listed.
4. If you want to move a person back to the list of possible duplicates, follow these steps:
a. Click the person’s May Be a Match link.
b. Enter a reason why you think this record may be a match.
c. Click May Be a Match.
The person moves to the list of possible matches.
Or if you want to compare and merge the records, follow these steps:
a. Click the person’s Review Merge button.
The merge screen appears. The rest of the process works the same as merging
duplicate records. You can review the record and either merge it or indicate it is
not a match.
b. If the records are not about the same person, click Not a Match.
The merge confirmation appears.
c. Enter a reason why the merge is correct, and click Finish Merge.
153FamilySearch Family Tree (18 October 2013)
Merging Duplicate Records

The record will be updated with the information you chose to add or replace. The
duplicate record will be archived. A note will appear in the change history
documenting the merge so it can be undone if needed.
Fixing Incorrectly Combined Records from
new.FamilySearch.org
Tools are being developed for Family Tree that will allow incorrectly combined records
to be corrected in the near future.
FamilySearch Family Tree (18 October 2013)154
Merging Duplicate Records

Chapter 10
Working with Other Users
One of the advantages of having your family history online is the ability to work with
close or distant relatives. You can work together to make the information about your shared
history as complete and correct as possible.
So that you can work with others, make sure that your user profile contains a valid email
address where you can be contacted. Also make sure that your user profile settings are set
to allow contact by at least one method (mail, telephone, or email).
You can work with others in these ways:
• You can contact the user who contributed information about a person or family.
• You can participate in discussions.
• You can “watch” people in the tree. The system sends you a weekly email to notify you
if changes occurred.
Appropriate Use of Contact Information and Discussions
Please keep all interactions with other users polite and appropriate to the purpose of the
FamilySearch website.
For example, when you participate in discussions or contact another user directly, do
not include the following types of information:
• Offensive or abusive language or content
• Information that might harm or embarrass living relatives
• Links to external web pages with inappropriate content
• Solicitations for business or research services
For more information, please see the Conditions of Use.
Seeing Contributor Information
Family Tree keeps track of who adds, changes, and deletes information. You can quickly
display that contributor’s contact information if he or she allows it to be displayed.
You can contact other users under these circumstances:
• The contributor is a current user of the system.
• The contributor allows the system to display contact information. FamilySearch
Support cannot give you contact information when a user chooses not to display it.
Note: To change how much contact information Family Tree displays about you,
click your username in the upper-right corner of the screen. Click Settings, and
scroll down to the Contact section. Click the Public option for each piece of
information that you want displayed with your contact information.
155FamilySearch Family Tree (18 October 2013)

If someone entered the information in behalf of someone else, you see both a contributor
and a submitter. The contributor is the person who provided the information. The
submitter is the person who entered it for the contributor.
1. To display the contributor’s contact card, click his or her contact name.
You can display the contact card from a person’s details page, a change history, the
search results, or any other screen on which the contributor’s name is displayed.
2. Use the contact information.
• If the contributor provided an email address, click it. Your computer’s default
email program opens, and you can write your message.
Note: On most personal computers with Windows, the default email program is
Microsoft Outlook. If you use an online e-mail service, such as MSN or Google,
you will need to go to your email account online, create a new email, and copy
the contributor’s email address into the To field.
• If you prefer to communicate by other means, either print the contact information,
or write it down so you can use it to call or write a letter.
Tip: The printout does not contain any information that reminds you what
information this contributor provided. You may want to also print the information
in question or keep notes that help you remember what you wanted to discuss.
• If a contributor chooses not to display contact information, try starting a discussion.
That user may choose to respond through the discussion board. If not, please
respect the privacy of users who choose not to display contact information.
FamilySearch Support cannot give you contact information when a user chooses
not to display it.
3. When you are finished, click on the screen somewhere outside of the contact card.
The contact card closes.
In your communications with other contributors, it is helpful if you do the following:
• Explain how you got the other person’s contact information.
• List the person or family line of interest to you. It is especially helpful if you can
include ID numbers (formerly called person identifiers) so the other person can quickly
find the information of interest to you.
FamilySearch Family Tree (18 October 2013)156
Working with Other Users

• Remember that other users might not see exactly the same information as you when
they look at their family line. For example, they may not see the same living people.
Or they may see a different family line because they descend through a different
spouse.
Participating in Discussions
Discussions are a great way to coordinate family history work with other Family Tree
users. Participating in discussions is easy. They work like social networking sites that
you may already use.
The system provides a discussion board for most people in the system. It does not provide
a discussion board for people who are living, who were stillborn, or who have restricted
records.
In a discussion board, you can do the following:
• Work out issues that require interaction with other interested researchers.
• Post questions requesting more or better information about a person.
• Coordinate additional research with other interested users.
1. On the fan chart or pedigree view, click the person’s name.
2. Display the discussions using either of the following methods:
• On the summary card, click Discussions.
• On the summary card, click Person. Then on the person’s details page, click the
Discussions link in the header. (Or scroll down to the Discussions section.)
The Discussions section appears.
3. Read through the discussions.
• To see the comments on a discussion, click the title of the discussion.
• If a discussion or comment is too long to be displayed on the screen, click More.
4. (Optional) To add a comment to an existing discussion, follow these steps:
a. Click the Add Comment link of the discussion or comment to which your
comment pertains.
b. In the field that appears, enter your comment.
c. Click Save.
5. (Optional) To start a discussion about a new topic, follow these steps:
a. Click Add a New Discussion.
b. For the title, enter a brief description that introduces your concern.
c. In the next field, explain the issue.
157FamilySearch Family Tree (18 October 2013)
Working with Other Users

Important: Please be polite and factual in your discussion posts. The following
types of content are not appropriate:
• Offensive or abusive language or content
• Information that might harm or embarrass living relatives
• Links to external web pages with inappropriate content
• Solicitations for business or research services
If you have more questions about what is appropriate, please review the Terms of
use.
d. Click Save.
Editing Your Discussions and Comments
You can add to and correct the discussions and comments that you add.
1. On the fan chart or pedigree view, click the person’s name.
2. Display the discussions using either of the following methods:
• On the summary card, click Discussions.
• On the summary card, click Person. Then on the person’s details page, click the
Discussions link in the header. (Or scroll down to the Discussions section.)
The Discussions section appears.
3. Find the discussion or comment that you want to edit.
4. Click the Edit link for the discussion or comment.
The Edit link appears only if you entered the discussion or comment.
5. Make your changes.
Important: Please be polite and factual in your discussion posts. The following
types of content are not appropriate:
• Offensive or abusive language or content
• Information that might harm or embarrass living relatives
• Links to external web pages with inappropriate content
• Solicitations for business or research services
If you have more questions about what is appropriate, please review the Terms of
use.
6. Click Save.
Deleting Your Discussions and Comments
You can delete the discussions that you begin and the comments that you enter.
When you delete a discussion, all of its comments are also deleted, regardless of who
entered them. Delete a discussion only when it contains no information of lasting value.
You cannot delete a “Legacy Disputes” discussion. If you entered a dispute on this person,
it is now a comment within this discussion. You can delete your comments from the
discussion.
1. On the fan chart or pedigree view, click the person’s name.
FamilySearch Family Tree (18 October 2013)158
Working with Other Users

2. Display the discussions using either of the following methods:
• On the summary card, click Discussions.
• On the summary card, click Person. Then on the person’s details page, click the
Discussions link in the header. (Or scroll down to the Discussions section.)
The Discussions section appears.
3. Click Open Details.
4. Find the discussion or comment that you want to delete.
5. Click the Delete link for the discussion or comment.
The Delete link appears only if you entered the discussion or comment.
6. When the system asks if you are sure, click Yes.
What Causes Discussions to Disappear
A discussion can disappear from a person’s record for several reasons.
The most common reasons are the following:
• The user who began the discussion deleted it. If you think the issue was not resolved,
begin a new discussion.
• A system administrator deleted the discussion. A system administrator would have
deleted a discussion only if its content was not appropriate. You can begin a new
discussion that is appropriate.
• The person’s record was separated. Do a search to find the correct record.
Note: You cannot separate records using Family Tree. If the record was separated, it
was done by a system administrator.
Reporting Inappropriate Discussions and Comments
If a discussion or comment contains content that you feel should not be included in the
system, a system administrator can review it. If it is found to be inappropriate, the
administrator can then delete it.
Before you report an inappropriate discussion or comment, try adding a polite comment
to suggest that discussion or comment be reworded or deleted. The issue may get resolved
without having to report the issue to support.
Types of inappropriate discussions or comments to report might include the following:
• Offensive or abusive language or content
• Information that might harm or embarrass living relatives
• Links to external web pages with inappropriate content
• Solicitations for business or research services
Important: Please use the Report Abuse link to notify FamilySearch Support about
inappropriate content in a discussion. Do not use it to report inaccurate information
about people or families in the system, such as incorrect names, dates, places, and
relationships. To correct these errors, work with other contributors, and use the
Discussions feature.
1. Open the details page of the person where the discussion is located.
2. Scroll down to the Discussions section.
159FamilySearch Family Tree (18 October 2013)
Working with Other Users

3. Click the Open Details in the Discussions section.
4. Find the item that you want to report.
5. Click the item’s Report abuse link.
6. Click the reason that you feel the item is a problem.
If you click Other, please enter your specific concern.
7. Click OK.
The system indicates that FamilySearch Support has received your report. This message
also lists the email address to which a response will be sent.
8. To close the message, click OK.
FamilySearch Family Tree (18 October 2013)160
Working with Other Users

A system administrator reviews your concerns. If your user profile contains an email
address, you will receive an email to explain what actions were taken.
Watching and “Unwatching” Information
In Family Tree, you can watch sources and records about people. When you watch
information, you receive an email notification when changes are made to that
information. Both types of notifications are listed in the same email. You can also
“unwatch” any information that you have been watching.
To get the notifications that you want, you need to watch the correct type of information:
• Watch a record about a person to learn when someone changes the person’s summary,
when new activity in a person’s discussions occurs, when sources are attached or
detached, and when the person’s record is combined with or separated from a record.
• Watch a source to learn when someone changes a source’s title, URL, citation, notes,
or justification.
1. Display the information that you want to watch:
• To watch a record about a person, display his or her summary card or details page.
• To watch a source, display the details page of any person where the source is
currently attached. Click the title of the source that you want to watch. Then click
View and then Tools.
2. Click Watch.
This link is located in the upper-right portion of the screen.
You are now watching the selected information, and the word “Watch” changes to
“Unwatch.”
If you later decide that you do not want to watch this information, repeat this process,
and click Unwatch.
If you do not receive the email or if you want to stop receiving it, click your username
in the upper-right corner of the screen. Click Settings, and deselect the option Email
weekly updates to ancestors I'm watching.
From your settings, you can also change the email address where these notifications are
sent.
Watching and “Unwatching” Records about People in Family Tree
When you watch a record about a person, you receive an email notification that tells
you when someone changes the person’s summary, when new activity in a person’s
discussions occurs, when sources are added, and when the person’s record is combined
with or separated from a record. If you later decide that you do not want to watch
information, you can “unwatch” it (which means to stop watching it).
1. Open either the summary card or the details page of a person whose record you want
to watch.
a. On the pedigree view or fan chart view, click the person’s name.
b. On the person’s summary card, click Person.
161FamilySearch Family Tree (18 October 2013)
Working with Other Users

2. Click Watch.
This link is located in the upper-right portion of the screen.
You are now watching the selected information, and the word “Watch” changes to
“Unwatch.”
If you later decide that you do not want to watch this information, repeat this process,
and click Unwatch.
If you do not receive the email or if you want to stop receiving it, click your username
in the upper-right corner of the screen. Click Settings, and deselect the option Email
weekly updates to ancestors I'm watching.
From your settings, you can also change the email address where these notifications are
sent.
Watching and “Unwatching” Sources in Family Tree
When you watch a source, you receive an email notification that tells you that someone
edited the information about the source, such as its URL or citation. If you later decide
that you do not want to watch a source, you can “unwatch” it (which means to stop
watching it).
You can use Family Tree to watch sources.
1. On the fan chart or pedigree view, click a person to whom the source is attached.
The person’s summary card appears.
2. If the source is attached to the person, on the summary card, click Sources.
Or if the source is attached to a relationship that this person is in, follow these steps
to display the relationship:
a. On the summary card, click Person.
The person’s details page appears.
b. On the person’s details page, click the Family link in the header. (Or scroll down
to the Family Members section.)
c. If the source is attached to a couple relationship, click the Edit Couple link that
is in the box that shows the husband and wife.
Or the source is attached to a parent-child relationship, hover your mouse cursor
over the child’s name. Click the Edit Relationship link that appears.
d. Scroll down to the Sources section of the relationship.
The Sources section appears.
3. Click the source’s title.
The source’s details appear.
4. Click the View link that is located beneath the source’s title.
5. Click Tools, and select Watch .
You are now watching the selected information, and the word “Watch” changes to
“Unwatch.” You see a message that explains the notifications that you will receive.
6. Click OK.
If you later decide that you do not want to watch this information, repeat this process,
and click Unwatch.
FamilySearch Family Tree (18 October 2013)162
Working with Other Users

If you do not receive the email or if you want to stop receiving it, click your username
in the upper-right corner of the screen. Click Settings, and deselect the option Email
weekly updates to ancestors I'm watching.
From your settings, you can also change the email address where these notifications are
sent.
Using Your Watch List
Your Watch List shows all of the people that you are watching. From the Watch List,
you can see basic information about the people, see the last change made to the person,
and “unwatch” several people at once.
1. Click Watch List.
The watch list appears:
2. Decide what you want to do next:
• To stop receiving notifications about one or more people, click Unwatch for
each person that you no longer want to watch.
• To see a person’s summary card, click his or her name.
• To see the person’s details page, click the blue link in the Last Modified column
that describes the change. For example, click Birth Edited. From the details page,
you can review the change and use the change history to undo it if needed.
• To see a contributor’s contact information, click his or her contact name. It is
located in the Last Modified column.
163FamilySearch Family Tree (18 October 2013)
Working with Other Users

Glossary
Affiliate
A software vendor, web application service
provider, records provider, image provider,
or other entity that has agreed to work
with FamilySearch International.
Ancestral File
Ancestral File is a file containing
lineage-linked, genealogical information
that is submitted by patrons. It contains
names and often other vital information
(such as date and place of birth, marriage,
or death) of millions of individuals who
have lived throughout the world. It is
available for searching on the FamilySearch
website.
Ancestral File number (AFN)
A unique identification number that was
assigned to every person that originally
came from Ancestral File. An example of
an AFN number is 3C88-WF.
Certified third-party program
A computer program that works with
products from FamilySearch International
but that was not developed by
FamilySearch International. A review board
reviews the programs to make sure they
work with the systems as promised.
Contributor
A person who provides information to the
system.
Details page
In Family Tree, a screen that shows all of
the information about a person. It looks
like this:
Discussions
A feature in Family Tree that helps you
coordinate family history work with other
FamilySearch users. The Discussion feature
works similar to social networking sites.
Event
An occurrence—such as a birth, marriage,
or death—in a person’s life.
Fact
A piece of information about a person that
is not related to a life event. A fact may or
may not have a date and place. Examples
of facts might include hair color,
occupation, religious affiliation, and so
forth.
FamilySearch Account
A single user name and password that
people who are not members of the
Church use to sign in to FamilySearch
websites.
165

FamilySearch International
The largest genealogy organization in the
world. Millions of people use FamilySearch
records, resources, and services to learn
more about their family history. For over
100 years, FamilySearch has been actively
gathering, preserving, and sharing
genealogical records worldwide. Patrons
may freely access our resources and services
online at FamilySearch.org, or through
over 4,500 family history centers in 70
countries, including the renowned Family
History Library in Salt Lake City, Utah.
GEDCOM
An acronym for “GEnealogical Data
COMmunications.” GEDCOM is a
computer data format created by The
Church of Jesus Christ of Latter-day Saints
for storing genealogical information so
that many computer programs can use it.
ID number (Person Identifier)
A number that identifies people in Family
Tree. (This same number is used in
new.familysearch.org. There it is called a
“person identifier.”) A person’s ID number
does not change over the life and death of
the person. ID numbers are generated
randomly to help the system keep track of
a person’s record. You cannot use them to
determine specific information about the
person or the source of the information.
International Genealogical Index
(IGI)
The International Genealogical Index is a
computer file that listed several hundred
million names of deceased persons from
throughout the world. It is available on
the FamilySearch website. Indexed records
are found today in the Community
Indexed IGI and also by searching the
historical records collections. Patron
contributed records are exclusively found
today by searching the IGI collection
found in the historical records online by
searching the Community Contributed IGI
record set.
Looping pedigree
A pedigree in which people are incorrectly
linked back to themselves in future or
previous generations. For example, a
person may be mistakenly combined with
a father or grandfather of the same name.
Merge
To combine two records that are for the
same person. Merging creates a record that
displays the most complete and accurate
information from both records. (For
example, the name may come from one
record and the birth information from the
other record.)
New FamilySearch Website
(new.familysearch.org)
An online family tree application that is
being replaced by FamilySearch.org and
Family Tree.
Note
Narrative, free-form information that is
attached to a person.
Pedigree Resource File
The Pedigree Resource File is a computer
file that contains names; family
relationships; and birth, marriage, and
death information for millions of people.
The Pedigree Resource File was originally
published on compact disc. It is also
available on www.familysearch.org.
Person
A person with a record in the system. Also
the record itself.
Possible Duplicates
Records that are similar enough that they
may be duplicate records for the same
person. The system finds and displays the
similar records so that users can determine
whether the records are for the same
person and should be merged.
Relationship type
A piece of information in Family Tree that
describes how a parent and child are
related. The relationship types include
biological, step, foster, and so forth.
166
Glossary

Sign in
To enter a user name and password for the
purpose of using a computer system.
Sign out
To end access to the computer system.
Source
The record or the person who supplied the
information.
Source box
A screen that contains the sources that you
create and use in the FamilySearch Family
Tree. It lets you reuse sources instead of
retyping a source each time you need to
use it.
Submitter
A person who enters information into the
system in behalf of someone else; a helper.
Summary card
In Family Tree, a box that shows the most
important information about a person in
the system. To display it, click a person’s
name. The summary card looks like this:
Synchronize
A feature of some third-party programs
that can do the following:
• Add information from your database to
the system without using GEDCOM.
• Add selected information from the
system to your database.
• Combine duplicate records.
• Separate records that were incorrectly
combined.
Unwatch
In Family Tree, a feature that lets you stop
receiving notification when information
about one of your ancestors changes.
User name
A sequence of characters that identifies the
person who is using a computer system.
Vital information
In Family Tree, the most important
identifying information about a person.
Vital information includes the person’s
name, gender, birth, christening, death,
and burial information.
Watch
In Family Tree, a feature that lets you
receive notification when information
about one of your ancestors changes.
167
Glossary
