
OPERATION MANUAL
2

3
4
Contents
Dangers, Warnings & Cautions................................................................................................................................6
Yoder Components....................................................................................................................................................9
Smoker Arrival & Assembly.....................................................................................................................................10
Quick Start Guide.....................................................................................................................................................12
Yfi App Connection...................................................................................................................................................16
Smoker Placement & Leveling...............................................................................................................................30
Operating the Smoker..............................................................................................................................................31
Initial Burn O.............................................................................................................................................................31
Lighting Your Smoker...............................................................................................................................................31
Pre-Heating.................................................................................................................................................................31
Lid Position..................................................................................................................................................................31
Pellet Usage................................................................................................................................................................31
Door Open Function................................................................................................................................................31
Prime Button...............................................................................................................................................................31
Pre-Grill Checklist/Routine Maintenance...........................................................................................................32
Startup Procedure....................................................................................................................................................35
Shutting Down the Smoker.....................................................................................................................................37
Manual Startup..........................................................................................................................................................38
Getting the Most From Your Yoder: Direct & Indirect Grilling, Smoking & Baking...................................40
Variable Displacement Damper............................................................................................................................42
5
YODERSMOKERS.COM
Grill Maintenance......................................................................................................................................................44
Preparing the Grill For Season..............................................................................................................................44
Painted Surfaces.......................................................................................................................................................44
Cooking Grates.........................................................................................................................................................44
Heat Diuser/Drip Plate..........................................................................................................................................44
Cooking Chamber.....................................................................................................................................................44
Firebox and Burn Grate Assembly Maintenance...............................................................................................45
Stainless Steel Burn Grate.....................................................................................................................................45
Burn Grate Inspection..............................................................................................................................................45
Igniter...........................................................................................................................................................................47
Fan Cooled Hopper Assembly..............................................................................................................................48
Grease Management Area and Bucket...............................................................................................................48
Additional Maintenance..........................................................................................................................................48
Fuse Replacement....................................................................................................................................................49
Storing Your Grill........................................................................................................................................................49
Smoker Exploded Views.........................................................................................................................................51
Recipes........................................................................................................................................................................62
Notes............................................................................................................................................................................68
Warranty Information...............................................................................................................................back cover
Contents

6
• Failure to follow the “Dangers, Warnings and Cautions” may result in serious bodily injury, death, or fire.
• Read this manual completely before using your Yoder for the first time.
• Keep the grill a minimum of 18 inches away from combustible surfaces.
• The cooking chamber door must remain closed during the cool-down cycle. Failure to do so
can cause burn back in the hopper.
• Do not modify the holes in the burn grate.
• Do not add pellets by hand to the burn grate when the grill is in use.
• Do not use your grill in the rain or around any source of water.
• Do not leave your grill unattended during operation.
• Close supervision is necessary when any appliance is used by or near children.
• Do not transport your grill while operating or when the grill is hot. Make sure the fire is out and
the grill is cool before moving.
• Extreme caution must be used when moving an appliance containing hot oil or other hot liquids.
• Exterior surfaces on the grill will be hot when in use and during cool down.
• Unplug from outlet when not in use and before cleaning.
• Allow to cool before putting on or taking o parts, or before performing any routine service
or maintenance.
• Should a grease fire occur, turn the controller to the “o” position and unplug the unit to stop the fans.
Keep the lid closed until the fire is out.
• If the Yoder fails to initially light after pressing the START button, or goes out during operation (due to
a power surge or power failure), do not restart the Yoder without removing the cooking grates and
heat diuser/drip plate to check for a pellet overflow that may have occurred.
• Do not store the grill cover or other flammable items under or near the grill.
• After a period of non-use, the hopper, auger and firepot must be inspected for obstruction.
• Do not touch hot surfaces. Use handles or knobs, and wear heat resistant gloves when
operating the grill.
DANGERS, WARNINGS AND CAUTIONS
7
• If your grill is stored outside, care should be taken to assure that water does not enter the pellet hopper.
(The use of a grill cover is highly recommended).
• When you are finished cooking, turn the power switch to the “o” position. The fan will continue to run
for 18 minutes or until the temperature inside the cooking chamber falls below 125° F, whichever occurs
first. During this period the cooking chamber door must remain closed. Failure to do so can cause burn
back in the hopper.
• Longer detachable power-supply cord or extension cords are available and may be used if care is
exercised in their use. If a longer detachable power-supply cord or extension cord is used:
a) The marked electrical rating of the cord set or extension cord should be at least as great as
the electrical rating of the appliance (2 amps).
b) The cord should be arranged so that it will not drape over the countertop or table where it
can be pulled on by children, tripped over unintentionally, or contact hot surfaces.
• Caution: Risk of Electric Shock. Keep extension cord connection dry and o the ground.
Do not immerse cord or plugs in water or other liquid.
• Caution: To ensure continued protection against risk of electric shock, connect to properly grounded
outlets only.
• Outdoor extension cords should be used with outdoor use products and are surface marked with
the sux letter “W” and with a tag stating “Suitable for use with outdoor appliances.”
• Do not operate any appliance with a damaged cord or plug, or after the appliance malfunctions or has
been damaged in any manner. Return appliance to the nearest authorized service facility for
examination, repair, or adjustment.
• Always attach plug to appliance first, then plug cord into the wall outlet. To disconnect, turn any control
to “o”, then remove plug from wall outlet.
• The use of accessory attachments not recommended by the appliance manufacturer may cause injuries.
• Store product indoors when not in use if possible – out of the reach of children.
• Do not clean this product with a water spray or the like.
• Do not place on or near a hot gas or electric burner, or in a heated oven.
• For household use only.
• Do not use appliance for other than intended use.
• Check www.YoderSmokers.com occasionally for updates and new product information.
8

9
COOKING GRATES
HEAT DIFFUSER
HOPPER
CONTROLS
IGNITER
BURN GRATE
FIRE POT
VARIABLE
DISPLACEMENT
DAMPER

10
SMOKER ASSEMBLY
Smoker Arrival
Your Yoder Smoker will arrive boxed and ready to assemble. Please follow the assembly instructions. If
you purchased the competition cart, then it arrived on a pallet wrapped, and held on with bands. Cut the
bands and remove the plastic wrap and foam from the smoker. Remove the smoker from the pallet. It is
recommended that two people remove the Yoder from the pallet due to its size and weight. Open the
hopper lid and remove the grease bucket that contains the power cord and a spare fuse and set aside.
Open the cooking chamber and remove all of the wrapped components. There will be a front shelf,
a side shelf, four cooking grates, a heat diuser plate, burn grate, and smoke stack.
NOTE: If pellets were ordered, they will be in the cooking chamber as well.
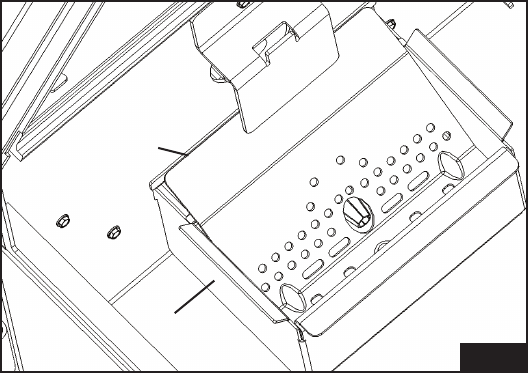
Assembly of your new Yoder starts by installing the burn grate inside the firebox (FIG 1). Install the heat
diuser plate and smoke stack next (FIG 2). The smoke stack installs flush to the inside of the cooking
chamber with the long leg pointed straight up. Tighten the thumb screw securely.
BURN GRATE
FIRE BOX
FIG 1
FIG 2

11
Use the side shelf to assist in moving the Yoder into positon. It is recommended that two people move the
Yoder due to its size and weight. Once in position, follow the setup instructions (Page 30) to prepare your
new cooker for use.
Attach the front and side shelves to the Yoder. (FIG 4)
Place the cooking grates inside the cooking chamber. (FIG 3)
FIG 3
FIG 4

12
POWER
BUTTON
SELECTION
BUTTONS
LCD DISPLAY
SCREEN
ROTARY
SELECTOR
INDICATOR
LIGHT
TEMPERATURE
PROBE JACKS
POWER BUTTON – Powers the grill on and o. Once the grill is turned on, and a fire has started,
pressing the power button to turn the unit o will initiate shut down mode. This mode allows the
fans to continue running to ensure a safe, full burn of any pellets left in the firepot. The unit will turn
o once the grill reaches 125°F or runs for 18 minutes, whichever occurs first.
SELECTION BUTTONS – These buttons are used to make selections throughout the menu.
LCD DISPLAY SCREEN – Displays all content.
ROTARY SELECTOR – Allows you to navigate the menu by rotating the knob and also allows you
to make selections or switch between options by pressing in on the knob.
INDICATOR LIGHT – Lit when power to the unit is on, and when the grill is in shut down mode.
TEMPERATURE PROBE JACKS – Plug in your temperature probes to be able to view food
temperature on the display screen.
QUICK START GUIDE
CONTROLLER LAYOUT
SECTION 1.A
start-up menu
SECTION 1.B
start
menu
prime
START – Press to initiate cooking functions
MENU – Press to access programs and settings
PRIME – Press to manually operate the auger

13
350°F
175
50
52
°F
350°F
OPERATING MODE
INDICATOR
GRILL
TEMPERATURE
PROBE/CHANNEL 2
TEMPERATURE
SET TEMPERATURE
175
°F
PROBE/CHANNEL 1
TEMPERATURE
GRILL TEMPERATURE – Displays the current temperature of the grill at the center of the main
cooking surface. Upon startup, the display will flash “HEAT UP” until the internal temperature
of the unit reaches 125°F. At that point, the controller will display the temperature of the main
cooking surface.
OPERATING MODE INDICATOR – Indicates the current mode the grill is operating in.
SET TEMPERATURE – Displays the selected set temperature. To adjust the set point, turn the
dial on the rotary selector knob clockwise to increase or counter-clockwise to decrease. The
rotary selector adjusts in 5° increments. You can press in on the rotary selector to switch to 25°
increments.
PROBE / CHANNEL 1 TEMPERATURE – Displays the temperature reading from Probe 1 when
a food probe is inserted into the appropriate jack. If no probe is connected, the screen will not
display temperature in this area.
PROBE / CHANNEL 2 TEMPERATURE – Displays the temperature reading from Probe 2 when
a food probe is inserted into the appropriate jack. If no probe is connected, the screen will not
display temperature in this area.
Heat-Up Mode – An upward pointing, blinking arrow indicates
the grill is increasing the temperature.
Maintenance Mode – A diamond indicates the grill is in maintenance mode
and is operating to maintain the set temperature.
Cool Down Mode – A downward pointing, blinking arrow indicates
the grill is decreasing the temperature.
home screen
SECTION 1.C

14
VIEW – Press to toggle between view options.
See Section 1.E for additional view options.
MENU – Press to access programs and settings.
PRIME – Press to manually operate the auger.
in-cook selection menu
SECTION 1.D
ALTERNATE DISPLAYS
SECTION 1.E
This menu allows access to options that are available during a cook. To access the menu, press any
of the three selection buttons while at the home view screen. The menu will appear and allow for a
selection to be made for three seconds before returning to the home view. The currently selected
view will appear at the top of the screen.
As shown in Section 1.C, the “Pit & Probes” view is the default display option. There are five total
display options; they can be chosen by pressing the view selection button on the control panel.
PIT & probes
PROBE 1
PROGRAM
PIT
PROBE 2

15
TIME COOK PROGRAM – The time cook function is used to run the grill for a set amount of time at
a specified temperature.
TEMP COOK PROGRAM – The temp cook program is used to run the grill at a specified
temperature until either Probe 1 or Probe 2 (user specified) hits the desired temperature.
CUSTOM PROGRAMS – The custom program feature allows the user to create and save a program
with as many as nine steps for the cook to follow. This function is beneficial when there is a specific
method you follow when cooking a certain type of meat or a particular recipe.
WIFI – Displays the current WiFi connection settings.
SETTINGS – Allows access to additional settings, such as temperature selection between Fahrenheit
& Celsius or calibration of the thermocouple while the grill is running. There is a test function that
can be initiated before starting the grill. The test function allows each mechanical component of the
hopper assembly to be tested.
ABOUT – Displays the current controller program information.
main menu
The main menu is accessible in either the start-up menu or in the in-cook selection menu. This
menu allows the user to access their dierent programs, settings, and general information about
their grill. Navigate the available selections in the main menu by using the rotary selector knob.
You can turn the knob clockwise or counter-clockwise to change your selection and press inward
on the knob to make a selection.
SECTION 1.F

16
CONNECT TO THE APP
App Install + Account Creation
The very first thing you’ll need to do is download the free FireBoard app onto your smartphone or
tablet. From your mobile device, please visit https://apps.yodersmokers.com to obtain download
links for iOS or Android platforms.
After installing and opening the FireBoard app, you’ll be presented with a login screen (FIG 5).
If you don’t already have a FireBoard account, you’ll need to create one. Tap on “Create Account”,
fill in the fields (FIG 6), and tap “Register.”
Once registered and logged in, you should be located on the settings screen (FIG 7), ready to pair
your cooker’s embedded FireBoard with the app. If your app isn’t already on the settings screen, tap
the gear icon in the bottom right hand corner of the screen to navigate to the settings screen.
FIG 5 FIG 6 FIG 7
17
pairing your device
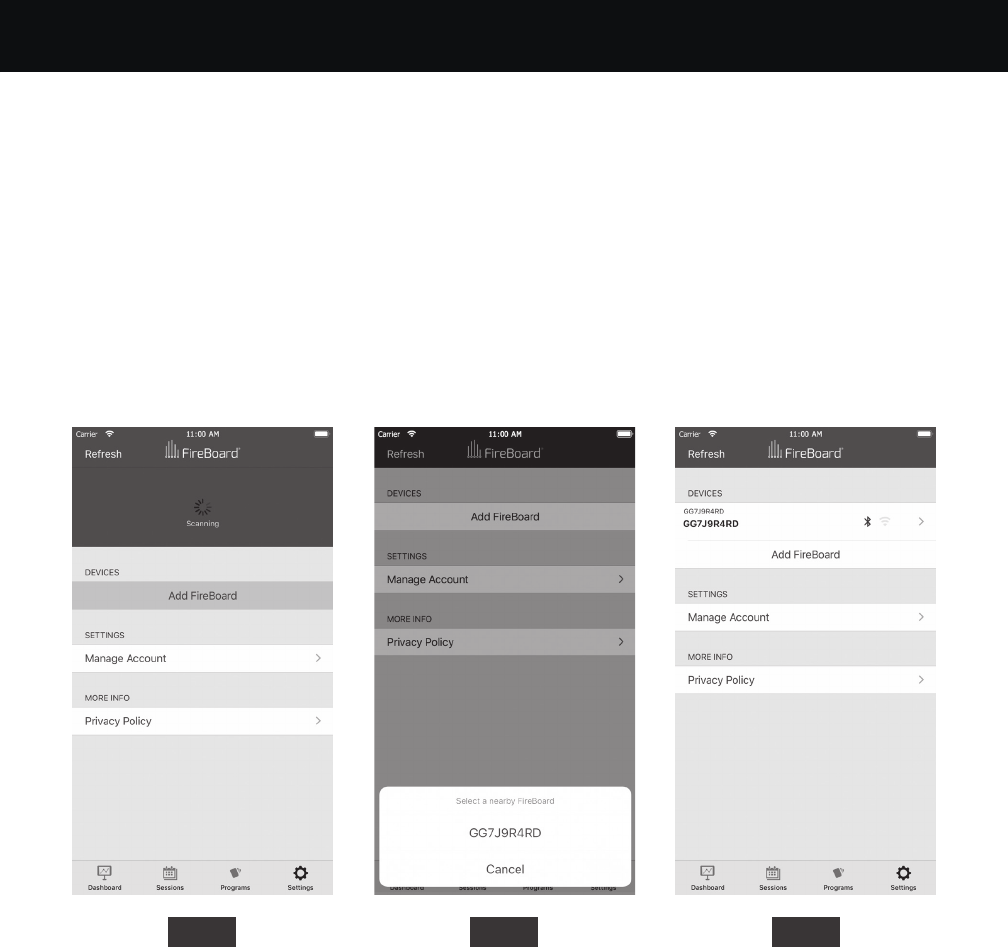
Next, make sure your cooker is plugged in, and the power button has been pushed. You should see
the default screen with the “YS” logo and the default menu displayed on your cooker. Also, please
make sure your mobile device’s Bluetooth connectivity is on. It should be noted, Android users must
have their mobile device’s location services enabled, or the Bluetooth pairing will fail. While within
30 feet of your cooker, tap the “Add FireBoard” button on your app screen. Your mobile device will
scan for nearby FireBoard devices (FIG 8) and will find the one embedded into your cooker’s ACS.
Once found, the app will show you the serial number of your cooker’s internal FireBoard (FIG 9).
Finally, tap the serial number shown to complete the pairing process. Once complete, you’ll see
your cooker’s FireBoard serial number listed in the settings screen. After a few seconds, you’ll also
notice the Bluetooth icon becomes active on your cooker’s listing (FIG 10).
FIG 8 FIG 9 FIG 10

18
CONFIGURING WIFI
Tap your cooker’s serial number from the list, and a few tasks can be accomplished from this new
screen (FIG 11), but for now, we’re interested in getting Wi-Fi connectivity configured, so tap on the
“Manage Wi-Fi” option.
In this new screen (FIG 12), you’ll notice a place for a network name and a password. If you already
know the network name you’ll be using, or if the network you use is not broadcasting its name (also
referred to as an SSID), you can enter the name and password of the Wi-Fi router or access point on
the provided lines. Please note that network names and passwords are case sensitive.
If you’re unsure of the exact spelling of your network name, or you are unsure of which networks are
within the range of your cooker, you can use the “View Available Networks” button to have your
mobile device scan for nearby 2.4GHz networks (FIG 13).
FIG 11 FIG 12 FIG 13 FIG 14
Tap on the Network you’d like to use, provide the appropriate password, and tap the “Connect”
button. It may take up to a minute for the connection to fully establish, but you’ll soon see that the
Wi-Fi icon on your cooker’s listing will activate (FIG 14). If, after a minute or so, it does not, try re-
entering your network name and password, and try connecting again.

19
THE APP IN DEPTH
Before we get into all the details, we’d like to point out that the cooker cannot be started from the
app. You will have full control once it has been started - including the ability to shut it down - but
the cooker must be started from its front panel before the app can do anything aside from reporting
current status. This helps ensure the safe operation of your cooker.
THE DASHBOARD
If you click on the first icon of the tab bar (the navigation that spans across the bottom of the screen),
you’ll be presented with the Dashboard (FIG 15). This is your quick overview screen, as well as one
of the main sections you’ll use to interact with your cooker.
The large grey bar across the top indicates your cooker’s current setpoint, internal temperature, and
the temperature of the two probes, if you have them plugged in. If you don’t have the probes plugged
in, or the pit is not currently running, you will see dashes in place of the temperature readings.
Below the large grey bar is an area used to show the various temperature readings available in
graph format. We will get into more detail on this in a bit.
Once the cooker is running, the setpoint and pit values will reflect the current status
of the pit (FIG 16).
FIG 15 FIG 16

20
NOTABLE DASHBOARD FEATURES
• You can change the pit’s setpoint by tapping on the setpoint in the grey banner (Figure 17). Simply
enter your new desired setpoint and tap the “Set” button. Please note that changes to the setpoint
take a few seconds to take eect. Please be patient for them to be reflected in the cooker and in the
app’s dashboard.
• The names of the two probe ports can be set according to what you’re cooking. Tapping on the
probe port in the grey banner will allow you to change its name (FIG 18). This name will also be used
in the various charts throughout the app.
• An alert – in the form of an app alert, an SMS text message, or an email – can be set to let you know
when one of the meat probes are at a certain temp. Simply tap on the temperature shown for the
probe in the grey banner, tapping “Add New Alert,” then “Set Up Alert” and set up your parameters
(FIG 18, 19).
Alerts can be restricted to only occur during specific times of the day or at a given frequency by
using the “Custom Start/Stop Time” selection. Please note that SMS text and email alerts require a
little bit of set-up in the settings screen, which is described later in this document.
FIG 18 FIG 19FIG 17

21
FIG 20
FIG 21
FIG 22 FIG 23
NOTABLE DASHBOARD FEATURES (CONTINUED)
• You can choose between two visualizations of the running temperature data: a basic chart, and
a detailed chart. You can toggle between the two by tapping on the word “Chart” or “Detail,”
respectively, in the title bar area of the app (FIG 20, 21).
• Tapping the small wrench icon in the upper right of the grey bar will take you to a section that allows
you to choose between multiple cookers (if you have more than one paired to your mobile device)
(FIG 22) and also allows you to shut down your cooker (FIG 23).

22
SESSIONS
The second icon from the left on the icon bar will navigate you to the sessions screen. This is
straight-forward. A session is a record of pit and probe temperatures throughout a cook. Sessions
are created automatically when probes are plugged in, or your cooker is started. By clicking the
plus sign (on Android) or the “New” button (on iOS), a new session can be started at the time of your
choosing. Sessions display as graphs, very similar to the detail graph shown in the dashboard.
PROGRAMS
Your cooker can be set up to execute a series of instructions that construct a cooking plan, called a
program. This program consists of one or more steps that run until a criterion is met. That criterion
can be a set amount of time or until one of the two meat probes hit a given temperature. The
programs section can be reached by tapping the third icon from the left on the apps tab bar (FIG 24).
To add a new program, tap on the “Add New Program” button. A new dialog will pop up to prompt
you to choose the type of program you’d like to add (FIG 25).
FIG 24 FIG 25

23
PROGRAMS (CONTINUED)
You have three options:
• Time Cook: Cooks at a given setpoint for a given amount of time. Once complete, the cooker will
change its setpoint to given holding temperature. All three parameters are user-definable.
• Temp Cook: Cooks at a given temperature until one of the probes reaches a given temperature.
Once complete, the cooker will change its setpoint to a given holding temperature. Again, all three
parameters are user-definable.
• Custom Drive Program: A complete user-definable series of steps that can combine cooker
setpoints, run-times, and measured probe temps to form any conceivable cook plan you desire.
For the purposes of this manual, we’ll walk through a simple custom program example for cooking
burgers. This program starts the cooker o at a low setpoint so the burger patties can enjoy some time in
the smoke, before ramping up to grilling temperature and cooking until our patties are at 145° internal and
ready to carryover cook to a medium level of doneness.
Tap the “Custom Drive Program” button. The screen you come to next is a blank custom program (FIG 26).
We’ll next tap the “Add Step” button. Set the cooker to run at 180° for 1 hour and 20 minutes (FIG 27).
FIG 26 FIG 27

24
PROGRAMS (CONTINUED)
Steps save automatically. Just press the back button to return to the previous screen, and add a
second step. This time, we’ll set the cooker to run at 450° until the measured temperature on probe
1 has reached 145°. You’ll note we’re also setting a hold temperature of 180° (FIG 28).
In actuality, this automatically creates a third step with a setpoint of 180° and no time limit. Pressing
back will show the resultant program, and now fill in the Name and Description fields (FIG 29).
After making sure that the “Start” button on the cooker’s front panel has been pressed and that the
cooker is in operation, you can now tap the “Start Program” button, and your new cook plan will
begin within a few seconds (FIG 30).
FIG 29 FIG 30FIG 28

25
PROGRAMS (CONTINUED)
While a program is running, you have the freedom to tap on any other step in the program, which
will cause the cooker to skip to that step after a few seconds. You may also stop or pause a running
program at any time, or delete a program by tapping into it and then tapping the “Delete” button in
the upper right of the app’s title bar (FIG 31). Similarly, individual steps of a program can be deleted
by tapping into them and tapping the “Delete” button in the upper right of the app’s title bar.
FIG 31

26
SETTINGS
Some of the information you’ll see in this screen you’re already familiar with and is covered in the
First Steps section of this document, so we won’t cover that again here. Tapping on the gear icon of
the tab bar in the lower right corner of your screen takes you to the settings page (FIG 14).
Account Management + Alerts
Tapping on the “Manage Account” button takes you to the account overview screen (FIG 32). Here,
you can see at a glance how your account is configured, including the settings of any alerts you may
have set up. Tapping the edit button takes you to the account edit screen. This section allows you
to edit the name associated with your FireBoard account (the email address is not changeable) and,
perhaps more importantly, set up the basic information needed for the types of notifications you
desire to use. We support app alerts, SMS text alerts, and email alerts.
FIG 33 FIG 34FIG 32
App alerts are the most convenient and straightforward alerts; they use your mobile device’s native
alerting system and one of our custom tones to let you know one of the criteria you’ve set up has
been reached. (FIG 33) By tapping the “Notification Tone” line, you can customize the notification
tone used to one of your liking. (FIG 34).
We also support SMS text alerts and email alerts. Tapping on the “SMS” or “Email” lines will allow you
to edit the phone numbers and email addresses used to send those types of alerts. Tapping “Back”
will return you to the account overview screen, and tapping “Back” again will return you to the main
settings screen.

27
Current Temperature Notification (Android Only)
You can enable what’s known as a “persistent notification” – a notification that will stay in your
notifications area (like the swipe-down action on many Android mobile devices) – that will show you
the current temperature of your pit and the meat probes, if you have them plugged in. Simply toggle
this notification on and o according to your preference (FIG 35).
FIG 35

28
DEVICE SETTINGS
By tapping on your device, you’ll be back in the “Device Settings” section. If you have more than
one device listed, these settings are specific to each of your device.
Naming Your Cooker
You can change the name your cooker is referred to throughout the app. By tapping on the “Change
Device Name” line, you can edit the name to your liking (FIG 36), then tap “Submit” to save your
changes and return to the device settings screen.
DRIVE SETTINGS
While Standalone FireBoard devices have more options available in the “Drive Settings” section of the
app, the only option embedded in your ACS is the ability to turn the pit o (FIG 37). This is also
available, as previously mentioned, from the dashboard section of the app.
DEVICE LOG
Tapping on the “Device Log” line will show a large spectrum of information about the state of your
cooker’s ACS and its embedded FireBoard (FIG 38).
FIG 37 FIG 38FIG 36

29
REMOVING YOUR COOKER FROM THE APP
Should you need to remove your cooker from the app for whatever reason, the big red “Remove
FireBoard from my account” will accomplish this for you. You will be prompted to confirm that this
is indeed your wish. It should be noted that any given cooker can only be added to a single account
at a time.
ADVANCED SETTINGS
This section of the app contains some seldom-used but occasionally helpful options regarding your
preferred app temperature scale, adjusting your cooker’s display screen contrast, and a couple of
troubleshooting options that should only be used as prescribed by your Yoder Smokers support
representatives.
NOTES

30
18”
18”
18”
FIG 39
Smoker Placement
Yoder smokers/grills should always be a minimum of 18 inches away from any combustible surface (wall,
deck, rail, etc.). A heat-protective pad is recommended if the smoker is on a wooden deck. (FIG 39)
Leveling the Smoker
The smoker must be level front to back. However, the smoker does not have to be perfectly level from
left to right as long as the drip bucket end of the cooker is the lowest point — otherwise problems with
grease running towards the burn pot could result in a grease fire.
OPERATING THE SMOKER

31
Initial Burn Off
Before cooking on your smoker/grill for the first time, burn o the grill to rid it of any foreign matter. Follow
the instructions on Page 19 for initial start-up. Operate the grill at 350° F with the heat diuser/drip pan and
grates in place with the lid closed for one hour.
Lighting Your Smoker
Always go through the Pre-Grill Checklist (Page 32). Should the igniter fail to ignite the pellets, it is easy to
light your grill manually with a match and lighting agent (Page 38).
Pre-Heating
There are two ways to cook on your Yoder grill. When the grill is set up for direct cooking, start the grill 10
to 15 minutes prior to cooking. When the grill is set up with the heat diuser/drip pan in place, start the grill
20 to 30 minutes prior to cooking. This allows the body of the grill to heat up improving heat retention and
shortening the recovery time after opening the lid.
LiD Position
Preheat and cook with the lid closed. This allows for faster heat-up and keeps the cooking temperature
even; the food will cook faster while using less fuel.
Pellet Usage
Pellet usage will vary depending on the type of pellets, cooking temperatures, ambient air temperature,
wind and whether or not the Yoder is equipped with a thermal jacket. Generally, usage is about 2 pounds
per hour at grilling temperatures (350 to 450° F). At smoking temperatures (225 to 250° F) usage is about
1 1/2 pounds per hour. Consumption can vary from 1 1/2 pounds to 4 pounds per hour.
NOTE: If the Yoder runs out of pellets, the controller will continue to drive the auger and attempt to regain the
set temperature, so it’s important to monitor the cooker and assure an adequate pellet supply.
Door Open Function
When the cooker has been in maintenance for more than 10 minutes and the cooker loses more than 15
degrees, the program interpretes that the cooking chamber door has been opened. When this happens,
there is a specific piece of programming that is executed to speed recovery back to the set point.
Prime Button
The prime button overrides the program altogether and turns the auger continuously, feeding pellets as
long as the button is depressed. This is valuable anytime you have had the door open for a long time and
have lost significant temperature or if you want to raise the cooker temperature from say 250 to 350° F. To
use this function, press and hold the prime button on for 60 seconds, then let o for 60 seconds. You may
repeat this twice allowing at least 2 minutes before repeating.

32
Pre-Grill Checklist/Routine Maintenance
Perform the following services prior to each cooking session when the grill is cool
1. Open the cooking chamber door and remove the cooking grates (FIG 40).
2. Remove the heat diuser/drip plate (FIG 41), remove and discard previously used protective foil cover, if
foil has been applied. Install a new layer of protective foil. Select heavy duty foil that is wide enough to wrap
around the edges of the diuser plate and cut long enough to cover the entire plate. Install the foil from left
to right and fold over all four sides. Be sure the foil folded over the right hand edge is not hanging over the
front edge (no more than 1”). Foiling the diuser may cause variances in temperatures and may be removed
to see if temperatures stabilize.
FIG 40
FIG 41

33
3. Remove the burn grate from the firebox (FIG 42). Inspect and clean thoroughly. Make certain that the
combustion holes in the burn grate and the igniter tube in the firebox are free of debris or ash build up.
Visually inspect the air way between the combustion fan and the firebox to be certain that it is free and clear
of ash and debris (A shop vacuum works well for ash and debris removal).
4. Inspect for and remove any grease build up on the bottom of the cooking chamber.
5. Inspect the silicone seal around the firebox, paying particular attention to the seal above the firebox at the
hopper wall. It will be necessary from time to time to reapply high heat silicone such as Permatex 81160 in
this area which ensures proper combustion and grill performance.
6. Reinstall the burn grate. Begin by resting the right hand side of the burn grate on the firebox and then
pressing down on the left hand side of the burn grate until fully seated. When the burn grate is properly seat-
ed it rests firmly on the right hand side of the firebox and fits close to the hopper wall. Finally, check that the
igniter assembly is centered in the respective hole in the burn grate (FIG 43).
BURN GRATE
FIRE BOX
FIG 42
FIG 43

34
7. Reinstall the heat diuser/drip plate. The heat diuser plate attaches to the hook on the auger shield
and rests on the grease divider on the right hand side of the grill. Once installed, check to be certain that
the edges are approximately one-quarter inch below the grate rails at the hopper end and that the plate is
adjusted evenly from front to back. (The diuser is angled toward the right side of the grill to channel grease
into the grease container.) (FIG 44)
8. Reinstall the cooking grates and second shelf.
9. Remove, inspect and clean the grease bucket as needed. Reinstall the grease bucket under the right
side of the grill.
10. Open the hopper lid and inspect for any foreign materials.
11. After complete inspection, continue to the Startup Section on the next page.
FIG 44

35
Startup Procedure
(When using the Yoder with the heat diuser/drip plate in position, it is best to start your grill 20 to 30
minutes prior to cooking. This allows the grill and cooking grates to heat completely improving heat
retention and recovery when opening the cover during cooking.)
1. Confirm the power cord is unplugged from wall outlet.
2. Load the hopper with “food grade” pellets. DO NOT use heating grade pellets. The hopper will hold
20 pounds of pellets allowing 5 to 13 hours of cooking depending on cooking temperatures, ambient
temperatures, wind condition and whether or not the optional thermal jacket is installed.
3. Open the cooking chamber door.
4. Remove the cooking grates and heat diuser/drip plate (FIG 45).
5. Adjust the variable displacement damper to wide open — fully on the right side (FIG 46).
6. Check to see that the burn grate is properly seated in the firebox (FIG 47).
7. Place 1/8 cup (about a palm full) of pellets on the burn grate.
NOTE: This step is only necessary when the unit is first put into service or if it runs out of pellets.
8. Reinstall the heat diuser/drip pan and cooking grates (FIG 45).
FIG 45

36
VARIABLE DISPLACEMENT
DAMPER
FIREBOX
BURN GRATE
FIG 46
FIG 47
37
9. Plug the female end of the cord in the receptacle on the back of the pellet hopper. Plug the male end
into a 120 volt, 15 amp GFCI-protected receptacle. If an extension cord is required, please see the caution
notes on page 7 of the manual.
10. Push the power switch “on.” This starts the combustion air fan and illuminates the power light. Press the
“start” button on the control panel to activate the auger feed system. (The default temperature set point is
350° F). If a higher or lower temperature setting is desired, use the increase/decrease buttons to set the
temperature. This can be adjusted at any time after the start cycle is activated.
11. Flames should be visible on the burn grate within 3 to 4 minutes. (The igniter is active for 4 minutes.)
When you hit “start”, the auger turns continuously for 30 seconds to prime the burn grate. At 31 seconds,
the igniter is powered on; within 2 minutes, the heat from the igniter and the combustion air from the fans
will have a small smoldering fire started.
NOTE: The only way to reactivate the igniter is to turn the cooker o and let it go through the cool down
cycle, or simply pull the plug for a hard reset at which point you can restart the cooker. Before restarting
the Yoder, remove the grates and heat diuser and inspect the burn grate for any pellet overflow.
Remove all pellets from the burn grate area and from the pit floor if present.
12. Once the temperature reaches the set point, open the cooking chamber and carefully oil the grates with
vegetable oil. You are ready to cook!
SHUTTING DOWN THE SMOKER
When finished cooking, push the power button. The controller will begin its automatic shutdown procedure
by displaying ‘cool down’ on the controller screen.
• The auger feed system will stop feeding fuel.
• The combustion cooling fan will continue to run until the fire is burned clean.
• The fan will continue to run until the grill temperature reaches 125° F or 18 minutes, whichever
occurs first.
• When the procedure is complete, the fan and power LED will turn o.
• Disconnect the Yoder from its power source. When the grill is completely cool, cover the grill to
protect your investment and keep the pellets dry.

38
MANUAL START UP
Here are the steps to manually light the grill in the event that the igniter fails. (Steps 2 & 3 only
apply if the igniter has developed a dead short and is tripping the GFCI or blowing the fuse.)
1. Be sure the Yoder’s power cord is unplugged. Remove the cooking grates (FIG 48),
diuser plate (FIG 49) and burn grate (FIG 50).
.
2. Reach into the hopper cavity on the left side of the igniter tube and pull the igniter wires
into the firebox.
FIG 48
FIG 49
FIG 50

39
3. Unplug the igniter’s weather tight connection and push the wires back into the hopper cavity (FIG 51).
4. Reinstall the burn grate and place a small handful of pellets onto the grate.
5. Light the pellets with a torch, starter gel or starter stick.
6. Once lit, plug the power cord into an outlet, turn the power switch to the “on” position and press
the start on the control panel:
• The feed system begins the prime cycle before defaulting to the set temperature feed rate.
• Set the desired cooking temperature (default set point is 350° F).
• Your smoker will begin to produce a smoke during “startup” within approximately 1 to 2 minutes.
To check if the pellets ignited, open the smoker and a flame should be visible in the burn pot area.
You will be able to view this without having to touch any hot surfaces.
TO CONTROL BOX
TO IGNITER IN
COOKING CHAMBER
FIG 51

40
Getting the Most From Your Yoder:
Direct & Indirect Grilling, Smoking & Baking
“How long does it take from the time I press “start” until I am ready to cook?”
When the cooker is set up traditionally (diuser plate installed), the heat up time is 20 to 30 minutes. When
the cooker is set up for direct grilling (diuser plate out), the heat up time is about 15 minutes.
It is also important to note that when the cooker is set up “direct”, the temperature at the center of the
grate is hotter than the reported temperature. How much hotter depends on the set point. At 350° F on the
display, the grate center is approximately 425° F. At 475° F on the display, grate center is approximately
625° F. The dierence is caused by the reduction of airflow to the thermocouple when the direct grates are
installed. This is true with the diuser in or out.
Finally, precise temperature management is not important when you are doing short cooks where you are
opening and closing the pit frequently. Find a set temperature that works well for the type of food you are
grilling… for instance burgers and brats do well at a 350° F set point when indirect grilling.
The versatility of your Yoder is realized by choosing one of its three unique setups:
1. Smoking from 175 to 275° F & baking from 350 to 400° F (with diuser plate in place).
2. Indirect grilling from 275 to 350° F (with diuser plate and optional Direct Grill Grates installed).
3. Direct grilling where searing temperatures are desired, simply by removing the heat diuser plate and
installing the optional Direct Grill Grates.
The traditional setup for the Yoder has the heat management plate between the firebox and the cooking
grates. With this setup, the cooking style is best described as a wood-fired oven. This setup is ideal for all of
your smoked and baked foods.

41
Setup #1: Smoking and baking. Heat diuser plate in and standard cooking grates installed. In this setup, the
variable displacement damper (VDD) is generally pushed in about 6 inches from the right hand side to create
an even temperature across the grates (FIG 52).
Setup #2: Moderate temperature grilling, such as wings and boneless chicken breasts (grate temperatures
up to 350° F): Heat with the diuser plate in place and a set of Grill Grates installed on the left side of the
cooker. The “Direct Grilling Kit” consists of three custom-made aluminum panels which replace two standard
cooking grate (FIG 53).
Option: Two sets of grill grates for extended direct grilling surface.
Setup #3: Direct grilling with searing capability (set temperatures above 400°). Remove the heat diuser
plate, set the variable displacement damper in the full open position (FIG 57) and install the Grill Grates on
the left side of the cooker. (With the heat diuser/drip plate removed, some users prefer to line the bottom
of the cooker with foil to facilitate cleanup). When setup direct (heat diuser out, one set of Grill Grates and
standard cooking grates installed), the Yoder allows true direct/indirect cooking.
With a second set of Grill Grates installed on the right side of the Yoder, temperatures are fairly even across
the entire cooking surface; this is true with the diuser in or out.
DIRECT GRILLING GRATES 8” COOKING GRATES
VARIABLE DISPLACEMENT
DAMPER
FIG 52
FIG 53

42
VARIABLE DISPLACEMENT DAMPER
The YS640 is fitted with a variable displacement damper for managing heat distribution in the pit from the
firebox to the chimney end (FIG 54).
When the YS640 is set up with the heat diuser in place, the Variable Displacement Damper allows the pit
master additional temperature control at the grate level. With the damper pushed all the way in, the left half
of the grill will run hotter. (FIG 55) When positioned all the way open, the right side of the grill will run hotter.
With the damper pushed in about 5 inches, the grate surface will cook evenly, creating an ideal environment
for slow cooking.
With the direct grill kit in place, it is recommended that the damper is completely open to develop heat
across the entire cooking surface.
FIREBOX
DAMPER POSITION
HANDLE
HEAT
CONCENTRATION
DAMPER POSITION / ALL THE WAY IN
(TOP VIEW)
DAMPER
HANDLE
CHIMNEY
STACK
DAMPER AT MID-LOCATION
DAMPER AT MID-LOCATION
FIREBOX
FIG 54
FIG 55

43
• By pushing the damper all the way in (toward the firebox), heat is concentrated for grilling on the
left side of the Yoder (FIG 55).
• You can create dissimilar side-to-side temperature which is useful, for example, for cooking
poultry on the left at 300° F and a butt or brisket on the right at 240° F. This puts dierent surface
temperatures to work for you (FIG 56).
• When the damper is positioned approximately 5 inches from the stack end of the pit (full open
position), this adjustment will allow you to even out temperatures from left to right, creating the
ideal environment for slow cooking similar cuts of meat (FIG 57).
FIREBOX
DAMPER POSITION
HANDLE
HEAT ZONE
@300 DEG. F
HEAT ZONE
@240 DEG. F
DAMPER POSITION / DIVIDED AREAS
(TOP VIEW)
DAMPER POSITION FOR EVEN HEAT
FIREBOX
DAMPER
POSITION
HANDLE
HEAT DISTRIBUTED THROUGHOUT
(TOP VIEW)
FIG 56
FIG 57

44
GRILL MAINTENANCE
Notice: Damage caused by improper maintenance can lead to costly repairs and may not be covered by
warranty. Perform maintenance work only if the required information and proper tools are available. If they
are not, or repairs beyond the scope of this manual are required, see your local dealer or contact Yoder
Smokers to have trained technicians do the work.
Preparing the Grill for the Season
Begin with a thorough inspection of the entire grill correcting any issues you find. Follow the steps
found in the Pre-Grill checklist (Page 32).
Painted Surfaces
Yoder smokers are painted with high heat silicone paint. When cleaning the smoker, surfaces should be
washed down with warm soapy water using a neutral detergent, then rinsed with clean water. The paint
should be periodically inspected and touched up when scus or bare spots are exposed. For information
about high heat paint that can be used for touch-up, contact customerservice@yodersmokers.com.
Cooking Grates
When new, wash thoroughly with warm soapy water, place back in the smoker and lightly coat with
vegetable oil. Condition the grates during the burn o process. When you begin the next cooking session,
bring the grill up to the desired cooking temperature and use a long-handled grill brush to clean the grates
before evenly coating the grates with vegetable oil.
Heat Diffuser/Drip Plate
This requires very little maintenance if the plate is lined with foil (non-stick foil). If foil is used, it cannot be
more than 2” longer than the heat diuser plate. The foil must be folded up tight to the bottom of the plate.
Any foil hanging o the front will eect the performance of the grill. It is recommended that you change the
foil every one to three uses. If the heat diuser/drip plate is used without foil, it will need to be cleaned after
each use. Failure to do so creates the potential for a grease fire.
Cooking Chamber
It is recommended that each time you run through the steps in the Pre-Grill Checklist (Page 16) that you
inspect and thoroughly clean the interior of the cooking chamber. Any excess grease can be cleaned up
using a plastic scraper and paper towels. Pay particular attention to the grease channels on the right hand
side of the cooking body. At the beginning of the season, and as necessary throughout the rest of the year,
de-grease the interior with a citrus based cleaning solution.
• Ensure that the grill is completely cold before using a shop vacuum or before scooping out and
disposing of the ashes. Dispose of the ashes in a metal container.
• Use a citrus based cleaning solution to clean the entire inside of the body. This will control grease
build-up and the possibility of flare-ups
45
FIREBOX AND BURN GRATE ASSEMBLY MAINTENANCE
It is recommended that the firebox assembly is regularly inspected to be certain that it remains free of ash
and debris which will ensure proper performance. The firebox is a fully welded structure that carries the
burn grate and channels the combustion air. The firebox is bolted to the cooking chamber floor. The seams
on the hopper wall and the floor of the cooking chamber are sealed with a high temperature silicone.
Perform regular inspection of the silicone seal, particularly on the top side of the firebox along the hopper
wall. If this seal is broken, remove the old silicone, clean the surface, reapply new high temperature silicone
and let it cure for 24 hours before use. We recommend using Permatex 81160 high temperature silicone or
Sure Bond SB-188.
The seating of the burn grate into the firebox is critical for proper grill performance. Begin by resting the
right hand side of the burn grate on the fire pot and then pressing down on the left hand side of the burn
grate until fully seated. Once the burn grate is seated there is little-to-no movement in this assembly. Also,
check to be certain that the igniter assembly is centered in the respective hole in the burn grate.
Stainless Steel Burn Grate
It is important to regularly check the combustion air holes located on the floor and sides of the burn grate
for any blockage or build-up. Using a wire brush or flat-head screwdriver, scrape o any build-up or debris.
Burn Grate Inspection
NOTE: Only do this when the smoker is completely cool.
To ensure that the pit is burning eciently, a visual inspection of the burn grate is required periodically. The
burn grate should sit flat against the back wall. Due to the intense heat that is created, the burn grate can
change shapes. There should be no more than a 3/16” gap from the back wall to the burn grate (FIG 58). If
a gap does exist, then it must be corrected to ensure proper pellet burning. To access the burn grate see
Page 33.
NO MORE THAN
3/16 GAP BETWEEN
BURN GRATE
& BACK WALL
BURN GRATE
FIG 58

46
If the gap is greater than 1/8”, the steps below should be followed:
1. Start by removing the burn grate from the firebox and placing it on its top.
2. Next, step on the burn grate and apply enough pressure to bend it back to its original shape.
DO NOT apply too much pressure or you will overcorrect the burn grate and it will not fit
back into the firebox (FIG 59).
3. Place the burn grate back into the firebox and check the gap between the back wall and the burn grate
to ensure a proper fit. If a gap still exists, then repeat steps 1 and 2 (FIG 60).
FIG 59
FIG 60

47
IGNITER
When inspecting the firebox assembly, confirm that the igniter assembly, tube and igniter rod are free of ash
or other debris. Periodically inspect the igniter tube, to ensure it is tightly secured, by grabbing the tube and
turning it clockwise (FIG 61).
FIG 61

48
FAN COOLED HOPPER ASSEMBLY
Always disconnect the power to the grill before performing any service
1. Remove any debris from the combustion air fan intake. Use compressed air to remove dust and debris from
both fans.
2. Inspect and clean the pellet hopper area. The interior hopper surface can be wiped down using warm
water and detergent. To protect the surface and promote smooth pellet feeding, coat surface with car wax.
3. Inspect the metal auger area and remove any debris or sawdust that may have built up.
4. Using a 5/16” socket, remove the 11 screws securing the end panel to the hopper assembly (FIG 62).
This will allow you to perform the following:
• Check and clean any debris within the hopper housing.
• Check and clean any debris in the fan blades or housing.
• Check and clean any debris from the auger motor.
• Visually inspect the wiring harnesses and terminal connections.
5. Upon inspection (and any required maintenance) replace all screws. Hand start each screw to ensure
proper threading.
GREASE MANAGEMENT AREA AND BUCKET
Always be sure the grease catch area is clean and free of debris; empty the grease bucket regularly.
Additional Maintenance:
In addition to regular cleaning, perform the following procedures every 30 days:
1. Use a sti brush to remove any build-up on the inside walls of your grill. Inspect and clean the inside of
the lid, the heat diuser/drip tray and the inside walls of the cooking chamber.
2. When your grill is cool to the touch, use a shop vacuum to thoroughly clean the cooking chamber, firebox
and hopper assembly.
3. Use a citrus based cleaning solution to thoroughly clean the inside of the grill.
4. Finally, visually inspect the painted surfaces and touch up any scratches with high heat black paint.
FIG 62

49
FUSE REPLACEMENT
If there is no display and the LED light isn’t on after the power button has been pushed, check the power
source to verify the GFCI hasn’t tripped. If the power source is working, check the Yoder fuse. The fuse holder
is located on the hopper end panel (FIG 63). Verify that the power is o and the Yoder is unplugged. Insert
a small flat blade screwdriver into the slot on the top of the fuse container and twist it counterclockwise to
open. If the fuse is blown, replace it with the supplied replacement fuse. (The fuse is a 5-ampere quick-blow
fuse.) Reconnect the power and turn the Yoder on. If the fuse blows again, contact us for technical support.
STORING YOUR GRILL
Cover your Yoder Smoker to protect it from the weather and to keep the pellets dry. If storing your cooker
inside, be sure the smoker is cool to the touch before moving it inside. Inspect the hopper and cooking
chamber for any remaining embers before storing the unit.
FIG 63

50
ITEM # PART # DESCRIPTION QTY.
1 90737 STAINLESS HINGE 2
2 1024X12FHMSSS FLATHEAD MACHINE SCREW, STAINLESS 10-24 X 1/2 4
3 1024WHN 12-24 WHIZ NUT 8
4 24497 SERIAL PLATE 1
5 236-2489-02 POP RIVET 4
6 W90780 YS640s CHAMBER LID 1
7 41435 HANDLE ROD 1
8 22866 HANDLE SPRING 2
9 22924 3/8” PUSH CAP 2
10 90901 UNIVERSAL CHROME COOKING GRATE 8” 4
11 W91641 HEAT DIFFUSER 1
12 W90813 ADJUSTABLE DAMPER 1
13 1213HN ½-13 HEX NUT 2
14 90429 DAMPER HANDLE 1
15 W90348 YS640 SECOND SHELF WELDMENT 1
16 23108 ½” PUSH CAP 1
17 90377 THUMBSCREW 1
18 W90067 CHIMNEY 1
19 1420X12SHCSSS SOCKET HEAD SCREW ¼-20 X 5/8” 1
20 1420WHN ¼-20 WHIZ NUT 3
21 90117 HOPPER MOUNTING BRACKET 1
22 1420X58WHB ¼-20 X 5/8” WHIZ BOLT 2
23 90460 YS GALVANIZED BUCKET 1
24 W90779 YS640s CHAMBER 1
25 90197 YS640s/YS480s CHROME WIRE SIDE SHELF 1
26 90195 YS640s CHROME WIRE FRONT SHELF 1
27 90352 LEFT 2ND SHELF RAIL 1
28 90353 RIGHT 2ND SHELF RAIL 1
29 24712 COUNTERWIEGHT BUMPER 2
30 818X34PHSDS SELF DRILLING SCREW FOR COUNTERWEIGHT BUMPER 2
31 1024X34BHCSSS BUTTON HEAD CAP SCREW, STAINLESS 10-24 X 3/4” LONG 1
32 91742 #10 3/4” OD .030 THICK FLAT WASHER, STAINLESS 1
33 91762 #10 5/16” OD 1/8” LONG SPACER 1
34 91741 PROBE PORT DOOR, STAINLESS 1
35 91777 SILICONE PROBE PORT PLUG 1
36 1024FLN 10-24 FLANGE LOCK NUT 1
37 48259 1/8” THICK SHIM 2
38 1024X34FHMSSS FLATHEAD MACHINE SCREW, STAINLESS 4
39 92001 GASKET 21.5” LONG 2
40 92002 GASKET 29.5” LONG 2
41 92301 BOLT-IN DIFFUSER SUPPORT 1
42 92302 BOLT-IN GREASE DRAINING TRAY 1
43 1420X34CB 1/4-20 X 3/4” CARRIAGE BOLT 2

51
15
10
4
5
16
8
26
42
25
25
21
22
20
24
12
11
40
39
41
43
20
17
18
30
29
38
37
2
3
14
13
28
27
34
31
32
33
36
1
6
7
8
9
640 COOKING COMPONENTS

52
ITEM # PART # DESCRIPTION QTY.
1 W90779 YS640 CHAMBER 1
2 1420WHN 1/4-20 WHIZ NUT 1
3 10X34HHSDS HEX HEAD SELF DRILLING SCREW 5
4 1420X1HB HEX BOLT 1/4-20 X 1” LONG 1
5 91713 STAINLESS AUGER COVER BRACKET 1
6 W90811 STAINLESS FIRE POT 1
7 92401 STAINLESS REINFORCED BURN GRATE 1
8 24667 CERAMIC IGNITER ASSEMBLY 1
9 A91413 SIDE WALL THERMOCOUPLE ASSEMBLY 1
10 92271 STAINLESS THERMOCOUPLE WIRE COVER 1
11 92191 IGNITER TUBE 1
640 IGNITER AND THERMOCOUPLE COMPONENTS

53
11
8
5
3
9
7
4
6
3
10
1
2

54
640 HOPPER AND COOKING CHAMBER
ITEM # PART # DESCRIPTION QTY.
1 A92473 HOPPER ASSEMBLY, YS480s/YS640s WITH ACS 1
2 10X34HHSDS SCREW, HEX HEAD, SELF DRILLING 10 x 3/4 10
3 1420X12HHSTS SCREW, SLOTTED, HEX HEAD, SELF TAPPING, 1/4-20 x 2 2

55
1
2
3

56
ITEM # PART # DESCRIPTION QTY.
1 24640 3” CASTER WHEEL, YODER ORANGE 2
2 1420HNNL 1/4-20 NYLOCK NUT 16
3 3816HNNL 3/8-16 NYLOCK NUT 2
4 1420X58WHB 1/4-20 x 5/8” LONG BOLT 16
5 701-102-02 PIN 2
6 90398 AXLE 2
7 1016X38HHSMS HEX HEAD SLOTTED SHEET METAL SCREW 16
8 90172LFP YS 640s BOTTOM SHELF 1
9 W90786 RIGHT FRONT LEG 1
10 W90784 LEFT FRONT LEG 1
11 24252 8” WHEEL 2
12 90166LFP YS640s LONG SKIRT 2
13 90165LFP SIDE SKIRT W/ YODER SMOKERS LOGO 2
14 W90782 REAR LEG (CASTER) 2
640 STANDARD CART

57
7
8
11
4
12
13
14
2
6
10
5
9
1

58
640 COMP CART
ITEM # PART # DESCRIPTION QTY.
1 A90491 YS640s CHAMBER ASSEMBLY 1
2 W90551 YS640s COMP CART BASE WELDMENT 1
3 24625 8” CASTER WHEEL, RIGID 2
4 24626 8” CASTER WHEEL, SWIVEL 2
5 W90531 YS640s TIE DOWN 1
6 3816X1FHB FLANGE HEAD BOLT 3/8-16 x 1” LONG 20
7 3816HNNL 3/8-16 NYLOCK NUT 20
8 90527 YODER SMOKERS COMP CART SIGN 2
9 1420X12BHCSSS BUTTON HEAD CAP SCREW, STAINLESS 1/4-20 x 1/2” 8
10 1420X1FHB FLANGE HEAD BOLT 1/4-20 x 1” LONG 8
11 1420HNNL 1/4-20 NYLOCK NUT 16
12 91434 COMP CART WIRE HARNESS EXTENSION 1
13 632X38MS PHILLIPS HEAD MACHINE SCREW 6-32 x 3/8” LONG 2
14 632HN 6-32 HEX NUT 2
15 A90535 STAINLESS FRONT SHELF YS640s 1
16 A90511 STAINLESS SIDE SHELF YS640s 1
17 W90348 YS640s SECOND SHELF WELDMENT 1
18 90460 YS GALVANIZED BUCKET 1-1/4 QT. 1
19 24117 EDGE TRIM 6 LF

59
1
17
16
15
18
11
10
9
8
7
4
6
3
5
13
14
12
2

60
ITEM # PART # DESCRIPTION QTY.
1 90101 HOPPER FRONT PANEL 1
2 90102 HOPPER BULKHEAD MOUNT 1
3 90106 HOPPER FAN END PANEL 1
4 W90791 STAINLESS HOPPER 1
5 A91999 AUGER BUSHING ASSEMBLY 1
6 24673 CONTROLLER KNOB 1
7 W92017 AUGER WELDMENT 1
8 90027 AUGER ANTI-TORQUE PLATE 1
9 90001 AUGER MOTOR 1
10 90060 INNER FAN 115 CFM 1
11 1420X12SHCS SOCKET HEAD CAP SCREW, 1/4-20 .05 LONG 1
12 10X34HHSDS ADJUSTABLE DAMPER 33
13 A92250 CONTROLLER WTH BOX HARNESS 1
14 832X12PHMSP SCREW, MACHINE, PAN HEAD, PHILLIPS, 8-32 x 1/2” LONG 2
15 516X12SHSB SHOULDER BOLT, .313 x .50 SOCKET HEAD 1/4-20 1
16 51618X12SHSS SOCKET HEAD SET SCREW, 5/16-18 x 1/2 1
17 1024X12HHSTS HEX HEAD SELF TAPPING SCREW 10-24 X ½” LONG 2
18 22866 SPRING HANDLE 1
19 1420WHN ¼-20 WHIZ NUT 1
20 W90790 HOPPER BACK 1
21 W90788 HOPPER LID 1
22 90312 SOCKET, 15 AMP 1
23 632X38MS ROUND HEAD MACHINE SCREW, 6/32 x 3/8 LONG 2
24 632HN HEX NUT 6-32 2
25 832HN HEX NUT 8-32 4
26 90413 FUSE 5 AMP 1
27 92095 FUSE HOLDER OUTER 1
28 92096 FUSE HOLDER INNER 1
29 W90553 FAN HOUSING 1
30 832X12MS PHILLIPS HEAD MACHINE SCREW 4
31 90686 OUTER FAN 68 CFM 1
32 90893 FAN DIFFUSER 1
33 23985 VELCRO 1
34 90313 POWER CORD 1
35 90413 5 AMP FUSE 1
36 24714 WIFI ANTENNA EXTENSION CABLE 1
37 92194 IGNITER TUBE MOUNTING PLATE FOR CERAMIC IGNITER 4
38 92256 FAN ISOLATOR 1
39 1016X38HHTFS HEX HEAD SLOTTED THREAD FORMING SCREW 6
40 1420X12SHCSSS SOCKET HEAD CAP SCREW, STAINLESS 1
41 24678 WIFI ANTENNA 1
42 92315 HOPPER INSULATION 1

61
2
4
34
15
8
9
10
39
32
31
38
38
27
28
35
39
25
30
17
33
5
16
7
2
1
12
41
366
14
13
12
37
29
11
1
18
21
12
20
23
12
22
40
42
HOPPER ASSEMBLY
62
BRATWURST SLIDERS WITH BEER CHEESE SAUCE
Makes about 16 sliders
2 lb ground pork
1/4 lb ground bacon
Backwoods Bratwurst Seasoning
2 T Grannie’s Hickory Mustard
Smokehouse Onions (recipe below)
IPA Jalapeño Cheese Sauce (recipe below)
Soft Pretzel Buns
Combine the ground meats, mustard and brat seasoning (dissolved in water) in the bowl of a stand mixer
fitted with the paddle attachment. Mix on low until the meat mixture becomes tacky and holds together.
Preheat cooker to 450ºF. Form meat into 2 ounce patties. Grill until internal temperature reaches 165ºF.
*Alternatively: You can purchase uncooked brats, uncase them and form them into patties.
Smokehouse Onions
2 large yellow onions, sliced thin
1/4 cup melted butter
1 1/2 Tbsp Cattleman’s Tri-tip Seasoning
Toss the sliced onions in the melted butter. Season with Cattleman’s Grill Tri-tip Seasoning. Smoke in a foil
pan at 275ºF for 1 hour, increase to 400ºF and cook until soft and browning, about 45 minutes.
IPA Jalapeño Cheese Sauce
1 cup heavy whipping cream
6 oz white american cheese, grated
6 oz pepper jack, grated
6 fl oz your favorite IPA beer
1 Tbsp Grannie’s Hickory Mustard
Bring the cream, beer and mustard to a simmer. Slowly whisk in cheeses. Season with salt and pepper.
Soft Pretzel Buns
3 cups warm water (110ºF)
2 1/4 teaspoons (one package) active dry yeast
1 tablespoon sugar
2 teaspoons salt
2 cups bread flour
6 cups all-purpose flour
1/2-1 Cup baking soda
6 tablespoons melted butter, divided
Cattleman’s Grill Grey Salt
Dissolve the sugar in the warm water. Sprinkle the yeast over the water and let sit and foam up for 5-6
minutes. Pour the yeast water into the bowl of a stand mixer. Combine the salt, bread flour, all-purpose flour,
and 2 tablespoons of melted butter then add to the bowl. Mix on low for about 5-6 minutes. Dough should
be pulled away from the sides of the bowl. Place dough in an oiled bowl, cover, and allow to rise for 1 hour
(or until doubled in size). Fill a large pot with 8 cups water and 8 tablespoons (1/2 cup) baking soda. Stir to
dissolve. Bring water to a low boil. If you need more water, just be sure to add a tablespoon of baking soda for
63
every cup of water. While the water heats up, divide the dough into about 30 small, roughly equal sized balls.
Preheat your cooker to 375ºF. Working in batches, place the balls in the boiling water for one minute each,
flipping halfway through cooking. Use a slotted spoon to remove them from the water, draining away as
much water as you can. Place on a baking sheet lined with parchment paper. Rest for 15 minutes
Brush the tops of the pretzels with melted butter, score the tops and sprinkle on the sea salt. Bake at 375°F
for 20-25 minutes, until tops are golden brown.
CHICKEN ARTICHOKE SKILLET PIZZA
Makes dough for 3-4 pizzas
Ingredients
Pizza dough (recipe below)
Pizza sauce (recipe below)
Grilled artichoke
Grilled chicken breast
Cattleman’s Grill Italiano Seasoning
Baby spinach
Mozzarella, diced or grated
Olive oil
Step 1: Season your breasts with Cattleman’s Grill Italiano Seasoning and grill at 400ºF until internal
temperature reaches 160ºF. Rest five minutes. Dice.
Step 2: Assemble pizza: Preheat your cooker to 500ºF. Stretch the dough to 14 inches. Place in an oiled
12” Lodge Cast Iron Skillet. Brush the crust with olive oil. Spread a layer of pizza sauce over the dough.
Top sauce with spinach, then mozzarella, then diced grilled artichoke and chicken breast.
Step 3: Bake at 450ºF until dough is cooked through, about 20 minutes.
Pizza Dough
500g Napoli Antimo Caputo 00 Flour
325g water
10g salt
5g dry active yeast
Combine all ingredients in a stand mixer. Mix until all flour is incorporated, then a minute longer. Place in an
oiled bowl. Let rise until doubled in size. Divide in 3 or 4 pieces. Roll into balls. Let rest at least thirty minutes
before stretching/rolling.
Pizza Sauce
1 (28 oz) can Strianese San Marzano Tomatoes
2 cloves garlic, minced
2 T fresh basil, minced
1 1/2 T sugar
1 1/2 T salt
Combine ingredients. Bring to a simmer. Taste and adjust seasoning.
64
Grilled Artichoke
2 artichokes
1 lemon, wedges
olive oil
Cattleman’s Grill Italiano Seasoning
Using a very sharp or serrated knife, slice o the top 1/3 of the artichoke. Peel o the outer layers of leaves,
starting at the base. Trim any remaining leaf tips with scissors. Rub all trimmed surfaces with lemon, as you
go. Peel the stem with a peeler or paring knife. Cut the entire Artichoke in half, through the stem. Place the
halves in a pot of simmering water. Cook 15-20 minutes, until stem is tender. Remove from water. When
cool, scoop out the choke (the fuzzy material where the stem meets the base). Rub the halves with olive oil.
Season with Cattleman’s Grill Italiano Seasoning. Grill on a hot grill (450ºF+), until you have nice grill marks.
Peel o the outer leaves. The “meat” at the base of the leaf is edible, good for snacking. When all leaves
are removed, you’re left with the heart and stem. Dice these to add to your pizza.
COFFEE CRUSTED FILET MIGNON WITH CHIPOTLE AIOLI
Filet mignon steaks
Sweetwater Spice Ancho Chipotle Bath
Cattleman’s Grill Smoky Chipotle Steak Seasoning
Chipotle Aioli (recipe below)
Directions
Step 1: Place your steaks in a zip top bag with the Sweetwater Spice Ancho Chipotle Bath. Marinate for 45
minutes.
Step 2: Preheat your Yoder Smokers YS640s Pellet Smoker to 475ºF, set up with GrillGrates. Remove the
steaks from the marinade, and wipe o the excess with a paper towel. Season with Cattleman’s Grill Smoky
Chipotle. Let sit five minutes.
Step 3: Grill the steak on each side for about five minutes, getting nice grill marks. Grill until the internal
temperature reaches 120ºF. Pull and rest five minutes before slicing. Serve with Chipotle Aioli.
Chipotle Aioli
1 egg yolk
1 chipotle in adobo sauce
1/2 tsp adobo sauce
1 clove garlic, chopped
1 Tbsp lime juice
1/2 cup grape seed or vegetable oil (don’t use olive oil)
Directions
Combine all ingredients except oil in a food processor. Process to puree ingredients, then with the
processor running add the oil very slowly until it’s all incorporated.
65
FRENCHED RACK OF PORK
Smoke on Wheels BBQ Marinade
Cattleman’s Grill Steakhouse
Cattleman’s Grill California Tri-tip
Place the frenched rack of pork loin in a large (2.5 gal) zip top bag. Cover meat with Smoke on Wheels
Marinade. Squeeze the air out of the bag, seal it, and allow the pork to marinate for six hours. Remove the
pork from the marinade. Preheat your cooker to 325ºF. Wipe the excess marinade o the pork, but do not
rinse. Use the residual marinade to bind the rubs to the pork. Cover the meat with equal parts Cattleman’s
Grill Steakhouse and Cattleman’s Grill Tri-tip. Rest meat for 10 minutes. Cook at 325ºF until internal
temperature reaches 140ºF-145ºF. Remove. Cover loosely. Let rest 15 minutes. Slice in-between the bones
for single chop servings.
GRILLED TRITIP
1 beef tri-tip
Sweetwater Spice Tres Chiles
Cattleman’s Grill California Tri-tip Seasoning
Oakridge BBQ Santa Maria Grill Seasoning
Directions
Step 1: Marinate the tri-tip in the Sweetwater Spice Tres Chiles according to the provided instructions.
Step 2: Preheat your Yoder Smokers YS640s to 500ºF, and set up GrillGrates for direct grilling. Apply
a 50/50 mixture of Cattleman’s Grill California Tri-tip and Oakridge BBQ Santa Maria seasonings to the
surface of the tri-tip. Let rest until rub looks wet, about 10 minutes.
Step 3: Grill on both sides over direct heat until good grill marks are achieved. Move to indirect heat. Cook
to an internal temperature of 125ºF-130ºF. Rest 10 minutes before slicing, across the grain of the meat.
STUFFED PORK CHOPS
4 Servings
4 pork chops
1 1/2 C cornbread, crumbled
2 T golden raisins
1/4 C walnuts, toasted, roughly chopped
1/4 C dried cherries, halved
1/4 C buttermilk
1/2 t black pepper
2 t fresh sage, thinly sliced
1/2 t kosher salt
1/2 C bourbon
Smoke on Wheels Pork Marinade & Injection
John Henry Pecan Rub
66
Directions
Step 1: Place the dried cherries and raisins in a small bowl. Pour the bourbon over the top. Place chops into
container or bag and cover with Smoke on Wheels Pork Marinade & Injection. Refrigerate for 2 hours.
Step 2: Remove chops from container, cut horizontal pockets in each pork chop for stung. Preheat your
Yoder Smokers YS640s to 450ºF, set up with GrillGrates.
Step 3: Remove the fruits from the bourbon. Combine them with the rest of the ingredients, and put into
piping bag that is not fitted with a tip. Pipe each chop full with cornbread mixture. Alternatively, you can stu
the filling by hand, or use a zip top bag as a makeshift piping bag. Just put the filling in the bag, and cut o
one corner. Once the chop is stued, dust with John Henry Pecan Rub.
Step 4: Grill the chops on medium high heat for about 6 minutes on each side. Turn each chop 45 degrees
after 3 minutes to mark. Remove from the grill when the internal temperature reaches 145ºF.
TURKEY ROULADE
Serves 4-6
2 turkey breasts
6 slices prosciutto
Smoke on Wheels BBQ Marinade
2 (6-8”) strips of Frogmat
For the stung:
4 C cornbread, crumbled
1/2 C shallots, sliced
1/2 C pecans, toasted, chopped
1 T fresh thyme, leaves only
1/2 C maple syrup
2 T heavy cream
Directions
Remove the turkey breast from the breast bone if necessary. Pull the skin o and discard. Butterfly the
breast, to make a flat, even piece of meat. Marinate in Smoke on Wheels BBQ Marinade for one hour.
Meanwhile, over low heat, cook the shallots in a tablespoon of oil, with a pinch of salt until lightly browned.
Combine the remaining stung ingredients in a bowl and mix to incorporate. Preheat cooker to 325ºF.
Remove the turkey from the marinade. Wipe o excess marinade. Lay the breast flat on top of the Frogmat.
Place three slices of prosciutto over the breast. Then, evenly spread the stung over the prosciutto. Roll
the breast up. Wrap it with Frogmat. Tie the Frogmat with butcher’s twine. Cook until internal temperature
reaches 165ºF, about one and a half to two hours. Rest 10 minutes. Slice to serve.
STACKED BEEF ENCHILADAS
Serves 6-8
2 lb ground beef
1 Cup 505 Southwestern Chipotle Honey Roasted Chiles
3/4 Cup yellow onion, diced
2 Tablespoons green onions, sliced
2 (16 oz) jars 505 Southwestern Enchilada Sauce
67
1 Tablespoon flour
1 Tablespoon butter
1 Cup beef stock
2 canned chipotles in adobo sauce, diced (2 peppers, not 2 cans)
1/2 t cumin
1 t Cattleman’s Grill 8 Second Ride Carne Asada Seasoning
1 lb cheddar cheese, grated
12 corn tortillas
Directions
Combine beef, onions and 505 Southwestern Chipotle Honey Roasted Chiles in a skillet. Cook the beef all
the way. Mix in the green onions. Season with salt. Set mixture aside. In a separate skillet, melt the butter,
over medium heat. Add the flour, cumin, chipotles in adobo and Cattleman’s Grill Carne Asada and whisk
constantly for about one minute. Slowly whisk in the beef stock. Once all of the stock is incorporated, add
in the 505 Southwestern Enchilada Sauce. Season with salt. Keep sauce warm. Cover the bottom of a skillet
with oil (grape seed is best). Fry each tortilla on both sides, until lightly brown & slightly crispy. Immediately
transfer the tortilla to the warm sauce. Dip the tortilla entirely with tongs, then set aside on a sheet pan.
Repeat this process until all tortillas are fried and soaked in sauce. Cover the bottom of a half sized
aluminum foil steam table pan (12.75” X 10.3”) with the enchilada sauce. Lay out a layer of 4 tortillas. Cover
tortillas with one third of your beef mixture, then one third of your cheese. Repeat this process until you’ve
used all the ingredients. Bake in your cooker at 400ºF, until the top is lightly browned, about 40 minutes.
BOURBON PEACH & BLUEBERRY COBBLER
Filling:
6 large peaches, sliced
1 C blueberries
1/2 C bourbon
1/4 C sugar
2 T cornstarch
2 t cinnamon
1/2 t vanilla extract
juice of half a small lemon
Topping:
1 C flour
1/2 C rolled oats
1/2 C sugar
1/2 t salt
3/4 C unsalted butter, small cubes
2 T heavy cream
Directions
Step 1: Preheat your cooker to 400ºF. Combine the filling ingredients in a bowl and toss to distribute evenly.
Step 2: Make the topping: In a large bowl, mix topping ingredients until all ingredients are incorporated.
Dump filling into a Lodge Logic 12” Cast Iron Skillet. Crumble the topping over the filling.
Step 3: Bake until topping is golden brown and filling is thick and bubbling, about 1 hour. Serve warm with
vanilla yogurt or ice cream.

68
NOTES:

69
NOTES:

1816 E Wasp Rd.
|
Hutchinson, KS 67501
|
877.409.6337
YODERSMOKERS.COM
10
10 GAUGE
COOKING BODY
03
CONTROL
SYSTEM
03
IGNITER
ROD
