
Chase Quick Deposit
User Guide

© 2010 JPMorgan Chase Bank, N.A. Member FDIC. Equal Opportunity Employer.
S U C Q D
Getting Started ............................................................................................................. 2
Set Up Internet Explorer®............................................................................................4
Set Up Your Scanner......................................................................................................5
Activate Accounts and Manage Locations................................................................7
D C
Deposit Checks.............................................................................................................. 9
Continue a Saved Deposit............................................................................................12
I R
Search for Check or Deposit........................................................................................ 13
Download Check Images............................................................................................. 13
Download Reports........................................................................................................ 14
View Returns and Adjustments.................................................................................. 14
A I
Check Retention Guidance...........................................................................................15
Scanning Tips.................................................................................................................. 15
Scanner Maintenance................................................................................................... 15
W C Q D
This guide will walk you through getting ready for Chase Quick Deposit, preparing your system, installing
your scanner, setting up your accounts, making a deposit, accessing information reporting tools, and addi-
tional Chase Quick Deposit information. Please note that initial set up and activation must be performed by a
System Administrator.
If you have questions about Chase Quick Deposit, please call one of the numbers below based on your
line of business:
Business Banking clients
Phone Number: 877-CHASEPC (877-242-7372)
Commercial Banking clients
Phone Number: 877-226-0071

© 2010 JPMorgan Chase Bank, N.A. Member FDIC. Equal Opportunity Employer.
E C Q D
When you enroll in Chase Quick Deposit, you will need to complete the following tasks:
• Activate the accounts you want to use with Chase Quick Deposit. You can use multiple accounts for deposit.
• Set up your locations. You can set up multiple locations.
• Indicate what kind of remittance data you would like users to enter for each location (optional).
• Order scanner(s).
After you enroll in Chase Quick Deposit, you can change or update these items at any time. Please refer to page 7 of
this guide for information on how to complete these tasks.
B Y B I S
We recommend that you confirm the following before installing your scanner:
Minimum System Requirements
Review the following system and Internet requirements to make sure that Chase Quick Deposit will work for you.
Supported Operating Systems
• Windows® 7 - 32-bit and 64-bit versions with latest updates
• Windows® Vista (Home Basic - Ultimate) - 32-bit and 64-bit versions with latest updates
• Windows® XP Professional - 32-bit versions (Service Pack 3 is recommended)
• Windows® XP Home Edition - 32-bit versions (Service Pack 3 is recommended)
Note: The service packs listed above are free updates to the Microsoft® Operating System that runs your PC. If your
PC does not have these recommended service packs installed, you can easily download them from the “Downloads &
Trials” page on the Microsoft Web site.
Additional Note: Macintosh machines and operating systems are not supported.
Internet Requirements
To use Chase Quick Deposit, you must use one of the following Internet browsers:
• Internet Explorer 8.0
• Internet Explorer 7.0
• Internet Explorer 6.0
You will also need to have high-speed Internet service such as cable or DSL.
Your Company’s Policies
Installing the Chase Quick Deposit software sometimes requires some changes to your settings. Ensure the following
policies are in place in order to begin:
• Your company allows you to download ActiveX controls.
• Your company has given you administrative rights to install software on your PC.
Note:
Most people can perform the above tasks themselves. However, if you work for
a company that has a
person or department that maintains your PC for you, you may have to work with the appropriate person to install
these features for you.
2
G S
Review the information below to help you prepare for Chase Quick Deposit.

© 2010 JPMorgan Chase Bank, N.A. Member FDIC. Equal Opportunity Employer.
Your Scanner Parts and Accessories are on Hand
Please have the following parts on hand to begin your setup:
• Unpack your scanner and identify its parts and accessories.
• Locate the power cord, USB cable and scanner feeder tray for initial setup.
• You do not need to install the ink cartridge included in your scanner box.
Note: In order to properly use the scanner, you will need an available USB 2.0 port on your PC.
The Space Around Your Scanner is Prepared
Ensure the following items are prepared for your workspace:
• The scanner is not plugged into a power source or your PC before you download the scanner software.
• The scanner is at least 18 inches from any device that creates interference (fans, heaters, computer monitors, CPUs,
etc.)
• You are not running any other software on your computer that enables you to scan paper checks, as it is highly
likely that your new scanner may not operate correctly. If you are, you should uninstall the other check scanning
software before you begin to install your scanner.
T S
If you have questions about installing your scanner software, or about any of the steps in the installation process,
please call one of the numbers below according to your line of business:
Business Banking clients
Phone Number: 877-CHASEPC (877-242-7372)
Commercial Banking clients
Phone Number: 877-226-0071
3

© 2010 JPMorgan Chase Bank, N.A. Member FDIC. Equal Opportunity Employer.
Open a new Internet Explorer® window. Click “Tools” and
choose “Internet Options.”
The “Internet Options” dialog box will display. Select the “Se-
curity” tab, and then click the “Custom Level” button.
The “Security Settings” dialog box will display.
Scroll through the list and click on the “Prompt” radio
button for each of the options shown below.
Click the “OK” button.
You may receive a pop up box that states “Are you sure you
want to change the security settings for this zone?” If so,
click “Yes.”
S U I E®
Before you begin installing your scanner you need to modify your Internet settings.
4

© 2010 JPMorgan Chase Bank, N.A. Member FDIC. Equal Opportunity Employer.
S U Y S
In order to set up your scanner you will need to first install software and then connect the scanner to your PC.
Access Chase Quick Deposit
Go to the Chase Quick Deposit home page. Click on the “Set
up scanner” link under the “Related Links” heading.
Download the Scanner Driver Software
Turn off your scanner and unplug it from your computer
before you install the software.
When you click “Install Software,” you will see a File
Download window. You will see three options: Run, Save and
Cancel. Click “Save” to save the file. The Save As window will
open. Save the file to your desktop.
Double-click the SierraScannerSDKWebClient icon on your
desktop to launch the Setup Wizard. The Setup Wizard
window will open. When it does, click “Next” and follow the
instructions.
When you complete the software installation, click “Next.”
Note: You may be asked to reboot your computer as part
of the software installation. If you are prompted to do so,
please reboot your computer. Once you have rebooted your
computer, navigate back to the Chase Quick Deposit home
page. Click “Deposit Checks” to continue to the next step.
5

© 2010 JPMorgan Chase Bank, N.A. Member FDIC. Equal Opportunity Employer.
Connect the Scanner to Your Computer
When prompted, connect the scanner to your computer by
placing the round power supply connector into the back of
the scanner and plugging the power supply into a power
outlet. Then, place one end of the USB cable into the back
of the scanner and the other end into any USB port on your
computer.
If the “Found New Hardware” Wizard appears, follow the
instructions on your screen.
Note: For additional information on assembling your
scanner, connecting the scanner to your computer, reading
the status lights, or troubleshooting issues please refer to
the Panini Operator Manual.
Test Scanner
Click the “Test Scanner” button to complete the scanner
test.
Note: The scanner will make a brief noise.
Upon successful completion of the scanner installation, you
will receive a confirmation message that your scanner is
ready to use.
6

© 2010 JPMorgan Chase Bank, N.A. Member FDIC. Equal Opportunity Employer.
A A M L
System Administrators can activate multiple accounts and locations for use with Chase Quick Deposit at any
time.
Start Account Activation
On the Chase Quick Deposit home page, click the “Manage
accounts” link under the Related Links heading.
Select Accounts
Find the account you want to set up for deposits, and click
“Activate.” You will then see two radio buttons appear
under the “Virtual Endorsement” heading. If you would like
Chase Quick Deposit to place an endorsement on check
images after scanning, select “Yes.” If you wish to manually
endorse your checks, select “No.”
Please note that you are able to return to the Manage
Accounts page in the future to change your Virtual
Endorsement settings if necessary.
Manage Locations
Enter a name for your location, select a deposit to account,
and then indicate whether you want to order a scanner for
that location. Click “Submit” to continue.
Note: You can add new locations at any time by clicking
“Manage Locations” on the Chase Quick Deposit home
page.
7
© 2010 JPMorgan Chase Bank, N.A. Member FDIC. Equal Opportunity Employer.
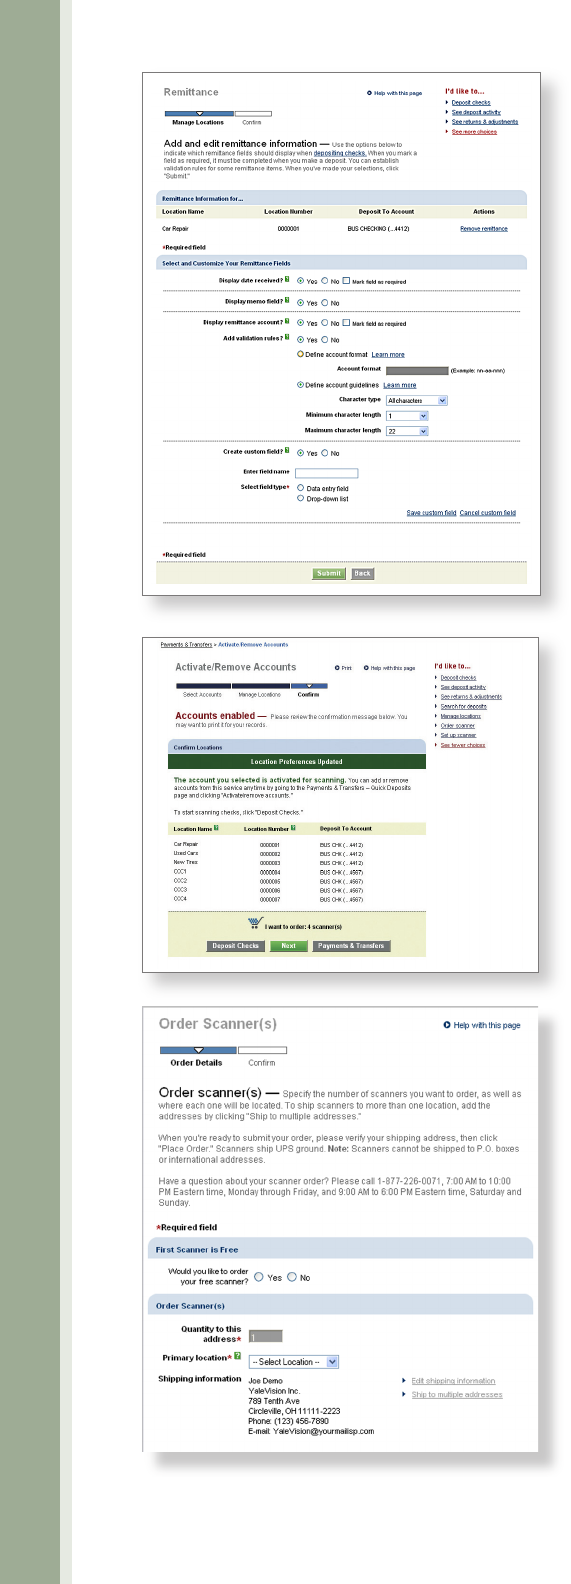
Set Up Remittance Data
If you would like for users to add remittance information to
deposits for a certain location, click the “Add remittance”
link next to the appropriate location.
Indicate which remittance data fields should display when
depositing checks. You can choose to display date received,
a memo field, the remittance account, or a custom field.
Please note that if you choose to display the remittance
account, you will be asked if you wish to define rules for
entering the account number to ensure that it is recorded
correctly.
Once you have indicated which fields you wish to display,
click “Submit.” You will return to the Manage Locations
Page. Click “Next” to continue.
Confirmation
You will receive a confirmation page that shows all your
active accounts and locations.
Order Scanners (optional)
If you indicated that you need to order a scanner for your
location, you will be prompted to complete the scanner
order page. Please note that you can ship your scanner to an
address other than the one indicated on the page by clicking
“Edit shipping address.” Once you have completed the
required information, click “Next” to continue.
You will receive a screen confirming that your scanner order
has been received. We will also send you a message to the
e-mail address you provided to confirm the shipping date
and tracking number for your order.
If you need to order additional scanners in the future, click
“Order Scanner” on the Chase Quick Deposit home page.
8

© 2010 JPMorgan Chase Bank, N.A. Member FDIC. Equal Opportunity Employer.
Enter Deposit Total
From the Payments & Transfers page, select the Chase
Quick Deposit tab and click “Deposit checks.”
Select your deposit to account and your location. If
remittance data has been defined for the location you
selected, you will be asked if you want to enter remittance
data for your batch. You must also enter the total amount
of your deposit. If you wish, you can also enter a deposit
description.
Click “Next” to continue.
Scan Checks
All items presented for deposit utilizing the Chase Quick
Deposit service should be endorsed, either manually or
using virtual endorsement. After you are
prompted, place
the checks you wish to deposit into the scanner document
feeder. Line up the checks in the feeder by aligning the
bottom and outer front edge of the checks. Order checks by
size from smallest to largest. Ensure all the checks are facing
toward the outside of the scanner and place the checks in the
scanner so that the front edges line up with the bottom half
of the arrow. A visual depiction of how to scan checks can be
found in the Panini Operator Manual.
Edit Check Information
After you have scanned your batch, some of the checks
may require additional information or corrections. If you
need to correct a check, you will see “Error found” in the
status column for that check. Click on “Correct error/add
details” to begin correcting the check information.
If you would like to add remittance details to a check that
does not require correction, click the “Add details” link for the
appropriate check.
D C
System Administrators and Authorized Users can deposit checks into any account for which Chase Quick
Deposit has been activated.
9

© 2010 JPMorgan Chase Bank, N.A. Member FDIC. Equal Opportunity Employer.
Items that require correction will be highlighted below
the check image. Enter the information requested, such
as routing number, check amount, account number or
check number. If you need to edit information that
is not highlighted, simply click the “Edit” link next to
the information you wish to correct. If your System
Administrator has set up remittance data for this location,
you can also add additional information in the “Remittance
Details” section, located below the “Check Details” section.
Remove a Check
In some cases, Chase Quick Deposit may prompt you to
remove a check from a batch. If this is the case, you will see
a “Remove” link next to the impacted check. Once you have
removed the check from the currently scanned batch, you can
attempt to rescan the check into the same batch or a new
batch, or you can take that check to a branch for deposit.
Add a Check to a Batch
Once you have made the necessary adjustments to your
checks, you have the option to add checks to your batch.
On the “Review checks and prepare deposit” page, click
“Scan more checks.” You will be prompted to enter the total
amount of all additional checks. As you did before, scan your
checks and correct any errors.
10

© 2010 JPMorgan Chase Bank, N.A. Member FDIC. Equal Opportunity Employer.
Update Expected Total
Occasionally, your scanned deposit total may be different
from the total you entered when you began your deposit.
When this happens, you will be prompted to review the
items in the deposit and make corrections to either check
amounts or the expected deposit total.
To update the amount of a check, click the “See/update”
link next to the appropriate check. To edit your expected
deposit total, click the “Edit” link next to the total, located
at the top of the screen.
Submit Deposit and Confirmation
We will prompt you to verify your deposit. If everything is
correct, click “Submit Deposit.”
After you submit your deposit, you can print your deposit
details, start a new deposit, or go to the deposit activity
page to review your recent activity.
Note: Deposits submitted before 9:00 p.m. ET /
6:00 p.m. PT on a business day will be processed that day.
Deposits submitted after 9:00 p.m. ET / 6:00 p.m. PT or on
a non-business day will be processed on the next business
day.
11

© 2010 JPMorgan Chase Bank, N.A. Member FDIC. Equal Opportunity Employer.
C S D
Once you have completed scanning your checks, you can save the deposit and return to complete it later.
Please note that you can only have one unsubmitted deposit at a time.
Access Your Unsubmitted Deposit
You will be alerted to an unsubmitted deposit on
the Chase Quick Deposit home page. To resume a deposit,
click “See unsubmitted deposit.” Please note that each
user can only have one unsubmitted deposit at a time.
Click “Resume Deposit” and complete the steps to submit
your deposit.
12

© 2010 JPMorgan Chase Bank, N.A. Member FDIC. Equal Opportunity Employer.
I R
Chase Quick Deposit gives you access to up to 270 days of check images for checks drawn on Chase accounts,
120 days of check images for checks drawn on other financial institutions, and 13 months of transaction de-
tails. You can also review returns and adjustments online.
Search for a Check or Deposit
To begin, click “Search for checks & deposits” on the Chase
Quick Deposit home page.
Create and Save Your Search
Select the account and location for which you want to search
deposits or checks, and indicate if you are searching for a
deposit or check. Then select a date range for your search.
You may also enter the amount of the check or deposit if
that information is available.
If you wish to save this search for use in the future, you can
enter a search name in the “Save search as” field. Your saved
searches will appear as a link at the top of the page in the
“Saved Searches” section.
Once you have entered all the information, click “Search.”
Search Checks and Deposits
The deposits or checks you searched for will appear on the
next page. From here, you can create a PDF document
containing images of the checks or batches you searched for,
or download a custom report.
Download a PDF Document of Check Images
To download a PDF document of deposit details and check
images retrieved in a search, click the “Include in PDF” box
next to an individual check, or the “Select Deposit” box
next to a deposit. After selecting the appropriate checks or
deposits, click “Create PDF.” When your document is ready,
you will be able to view or download it through the Download
Center.
13

© 2010 JPMorgan Chase Bank, N.A. Member FDIC. Equal Opportunity Employer.
Download Your Customized Report
To download a custom report of items returned in a search,
click “Download Search Results.” Customize your report by
selecting the information you would like to download from
the “Available fields” section and clicking the left arrow to
move it to the “Include in report” section. You can change
the order that the information appears in by highlighting the
field in the “Include in report” section and clicking the up or
down arrows.
When you have selected all of the information you want to
download, click “Download Report.” You will be prompted
to save a CSV (comma-separated value) file that can be
opened in programs such as Microsoft Excel®.
View Returns and Adjustments
To view returns and adjustments, go to the Chase Quick
Deposit home page and click “See returns and adjustments.”
Select the account for which you want to view returns and
adjustments, and then select the type of returns you want
to view.
You’ll see a list of items, including the return date, amount,
return type and location. Click the “See” link for more
information, or to view an image of the item.
On the Check Detail page, you can view the reason for the
return, an explanation, and actions you can take for this
item. You can also view the front and back of the check.
14

© 2010 JPMorgan Chase Bank, N.A. Member FDIC. Equal Opportunity Employer.
15
Check Retention Guidance
After successfully scanning and submitting your checks for deposit, you should mark and store them in a secure
location until destroyed. Please ensure that the scanning, storing and destruction of the original checks are done
under controls appropriate for your business.
Scanning Tips
• When scanning checks, line up the checks in the feeder by aligning the bottom and outer front edge of the checks. Order
checks by size from smallest to largest. Ensure all the checks are facing toward the outside of the scanner and place the
checks in the scanner so that the front edges line up with the bottom half of the arrow.
• Chase Quick Deposit is only for business checks, personal checks, U.S. treasury checks, traveler’s checks, and money
orders payable in U.S. dollars and drawn on banks in the United States. Foreign and Canadian checks are not
allowed.
• We do not require you to scan a paper deposit slip with the checks in your deposit.
• For optimal scanning, keep your scanner clean and free of dust and small particles.
• Checks written with red or faint ink, or that contain prominent background images, may not be read by the scanner.
Scanner Maintenance
In order to ensure that your scanner reads checks consistently, it is important to perform routine scanner cleaning
both weekly and monthly. For your convenience, Panini has included a one-time use cleaning card with your scanner.
To use the cleaning card:
1. From the computer on which your scanner is installed, open your Internet browser and go to
http://www.paniniportal.com/scannercleaning.aspx. Click “Continue” to begin the cleaning process.
2. Run the cleaning card through your scanner 3-7 times, each time rotating the cleaning card top to bottom, as well
as flipping over, so the cleaning card is inserted each time with a different orientation.
3. Once you have finished using the cleaning card, close your Internet browser window and discard the used
cleaning card.
The cleaning card is not intended to remove debris from the track, clean the sensors, clean the ink cartridge, or
replace the cleaning procedures outlined in the Panini Operator Manual. For more information about cleaning your
scanner, please refer to your Panini Operator’s Manual. To order additional cleaning supplies for your scanner, please
visit www.paniniportal.com.
Technical Support
If you have questions while using Chase Quick Deposit, please call one of the numbers below according to your line
of business.
Business Banking clients
Phone Number: 877-CHASEPC (877-242-7372)
Commercial Banking clients
Phone Number: 877-226-0071
A I
Learn more about check retention, check scanning, how to maintain your scanner, and who to contact if you
have questions.

© 2010 JPMorgan Chase Bank, N.A. Member FDIC. Equal Opportunity Employer.
JPMorgan Chase is licensed under U.S. Patent Numbers 5,910,988 and 6,032,137.
©2010 JPMorgan Chase Bank, N.A. Member FDIC. Equal Opportunity Employer.
“Chase” is a marketing name for certain businesses of JPMorgan Chase & Co. and its subsidiaries (collectively, “JPMC”). JPMC also uses the “JPMorgan Chase” and “JPMorgan” marketing names for certain of its
businesses. Products or services, including those referred to herein, may be marketed and/or provided by appropriately licensed JPMC personnel and entities including commercial banks, securities or other non-
banking affiliates or other JPMC entities.
