

Contents
A) What is Kami? pg.3
B) Setting up your Kami classroom
1. Installing Kami onto your device pg. 4
2. Connecting your Google Drive pg. 5
3. Installing Kami onto Student’s devices pg.5
4. Connecting Student’s Google Drive pg.6
5. Sharing your license pg.6
C) Navigating Kami
1. The tool bar pg.8
2. The menu bar pg.10
D) Integrations
1. Google classroom pg.19
2. Canvas pg.28
3. Schoology pg.34
E) Kami across the curriculum
1. Kami for English Language pg.39
2. Kami for Math pg.40
3. Kami for Science pg.41
4. Kami for ELA and Social Studies pg.41
5. Kami for Special Ed pg.42
6. Kami for foreign Language pg.43
2

What is Kami?
Kami is a leading digital classroom app. It allows you to take any existing document,
including scanned PDFs, and write, draw, type, annotate, comment, augment, enhance, and
otherwise bring it to life - all within your browser.
It’s intuitive design and collaborative features are specifically designed to improve
classroom engagement and interaction - all while making the task of providing and
completing classroom assignments effortless.
With Kami as your digital pen and paper, students can learn, create, and collaborate
together or in their own time. With Kami you can:
● Provide students with documents that they can complete using the full array of
Kami tools.
● Have students return completed documents to you for in app grading.
● Present a document on screen and use Kami as a digital whiteboard overlay
● Share a document within teams or across the whole class for collaborative
annotation, discussion, or debate.
● And so much more!
Kami is integrated with Schoology, Canvas and Google Classroom LMS’s. These LMS’s help
teachers manage the administrative side of class life and make more effective use of their
time. Now with the integration to Kami, you can achieve the same benefits in the learning
process. Push assignments out from your LMS directly into Kami for students to work on.
When they're done, they "turn in" their complete assignment right back into the LMS where
you can review and grade their work - all with Kami!
Kami getting started vid
3

Setting up your classroom with Kami
Now you are ready to get started with Kami - great stuff! Follow our easy step by step
instructions to set up Kami on your own device and then your students.
One | Installing Kami To Your Device
Before you start you need to install the following three extensions from the Chrome web
store:
Kami Chrome Extension
Split and Merge tool
Kami Screen Capture tool
This ensures you have full functionality and access to all of our tools.
Notes: Be sure to check with your Google Administrator that your students
have the ability to add extensions, if they do not, ask the administrator to
whitelist the following three extensions.
Google Administrators also have the ability to push out extensions to student
accounts, ask your administrator to push out the following three extensions.
You can do this following the instructions here.
Once these extensions have been downloaded onto your device you will
need to:
4

1. Open the Kami app.
2. It will ask you to create a login. Follow the instructions on screen and make sure to
use your school email address.
Hey presto you can now use Kami on new blank pages. Next we need to link Kami to your
Google Drive so that you can open any PDF or document and edit using Kami’s tools.
Two | Connecting Your Google Drive To Kami
1. Find a document in your Google Drive which you would like to open in Kami.
2. Right click the document in your Google drive.
3. In the menu that appears select “Open with”.
4. Select “Connect more apps”
5. Search for Kami in the search window that opens.
6. Then simply click the green “Rate it” button.
Check out a quick demo on how to follow these steps:
Instruction video
Once you have completed the following you can open any Google Drive file with Kami.
Three | Installing Kami to Student Devices
As with your own set up, all your students will first have to install the following three
extensions to their devices:
Kami Chrome Extension
Split and Merge tool
Kami Screen Capture tool
5

Once everyone has successfully installed the extensions they will need to:
1. Open the Kami app.
2. Follow the on screen instructions to create a Kami login using their school email
address.
Four | Connecting Student’s Google Drive To Kami
Follow the instructions given in part two to link each student’s Google Drive with Kami.
Five | Sharing Your License With Your Students
There are two easy ways that you can link your students to your Kami license.
Assigning through your LMS (Auto-recognition)
The quickest way is to add all of your students to your license in one go. This is done by
creating and sending out an assignment via a Learning Management System. Kami
supports Google Classroom, Canvas and Schoology.
1. Create an assignment using the Create Kami Assignment button.
2. Send the assignment.
3. Any student who opens the assignment will have the sending teacher's license
automatically applied to their account.
Activation through License key
Students can also individually be linked to your license account.
To do this you will need your license key. This will have been emailed to you on
acknowledgement of your purchase. If you can’t find it please contact
[email protected] or [email protected] and we will locate it for you.
6

1. Sign into Kami on your teacher account.
2. Click the Profile icon in the top right, then select "Enter License/coupon."
3. Enter your license key into the appropriate field.
4. Click Apply. A green popup message will then inform you that your profile has been
successfully updated.
7

5. Everyone who clicks on this link will be added onto your license.
Congratulations! Now you have Kami successfully installed onto everyone’s device and
you’re ready to start.
Navigating Kami
There are two distinct interfaces within Kami:
1. The toolbar: The black bar which appears on your left hand side in the app. It
provides the tools you need to interact with files.
2. The menu bar: The indigo bar which appears at the top of the screen. It provides
the tools you need to manage your overall Kami settings and file functions.
The toolbar
Kami’s wide selection of tools gives users the freedom to interact with files in whichever
way best suits their learning.
Let's have a look at some of the tools you can find on our toolbar and how they can be
used:
One | Reading and manipulation tools
At the heart of Kami is the ability to close read and move through files. To do this we have:
● Select tool: Your basic mouse tool allows you to interact with the file without
creating annotations. You can also use it to copy and paste.
● Hand tool: Expressly for navigating the file, the hand tool enables easy scrolling.
8

● Text to speech: This tool has two modes. Simply clicking it will read the whole file
out loud from the beginning. Alternatively, you can highlight the text selection that
you wish to hear. For added fun try changing the accent!
● Dictionary: This tool allows you to select a word that you would like to see defined.
Two | Markup tools
To annotate, highlight or otherwise edit your file you can use our selection of markup tools:
● Highlight: This tool allows you to highlight text throughout a file. You can also free
draw with the Highlight Tool by selecting the 'Box Highlighter' option.
● Comment: This tool can be used to select a section of text and then make
associated comments within the automatically created annotation box. Comments
or annotations can be made through the keyboard, via voice typing (where spoken
words are translated into text on the page) or screen capture. Kami also offers audio
or video comments. This is where students can leave short videos or audio
recordings of their comments and thoughts which can be linked to a specific word,
sentence or paragraph.
Instruction video
● Text box: This tool allows you to place text boxes anywhere in their document,
perfect for filling in forms. Both the color and size of the text can be adjusted as
needed.
● Equation: This tool allows you to create equations by using the symbols palette
(click the pi symbol to see the full selection).
● Strikethrough: The Strikethrough Tool allows you to cross out text. This is most
useful for those editing or proofreading a document.
● Underline: The underline tool can be used to help emphasize a point or draw
attention to the area.
Three | Creativity tools
To add some colour and fun to your file you can try:
9

● Drawing: This tool allows for freehand drawings to be made anywhere on the file.
The stroke thickness and transparency can be adjusted, as can color. The tool can
be adapted to create perfectly straight lines by holding shift before drawing.
● Shapes: This tool allows you to place shapes on your PDF. You can create circles,
squares, and lines in any colour and to whatever size.
● Eraser: The eraser tool removes shapes, text, signatures, and drawings that have
been made onto your PDF. To use the eraser tool, simply click and drag over the
annotation that you wish to remove.
Four | Features for inserting media
Lastly, you can insert a range of media into your Kami file:
● Insert image: Using this tool you can insert an image from a variety of locations:
your own documents, Google Drive, Google Image safe search or a webcam photo.
● Insert signature: This is used to upload and store your signature to sign PDF files
quickly. You can upload an image of your signature, draw it into the file or even
draw on your phone - whichever method works best to get the highest quality
version.
The menu bar
The menu bar functions as your navigation centre for the whole Kami app. It contains all
the tools you need to save, find and send work, alongside your general profile settings.
Let’s have a look at how to use the menu bar commands. Moving from the left of your
screen to the right we start with:
One | The left hand side
1. Kami Account
10

There are multiple types of Kami accounts. Your type of account will be stated on
the left-hand side of the bar.
2. Toggle Sidebar
Clicking this opens up a vertical page navigation panel or sidebar to the left of your
toolbar. Scrolling through this allows you to quickly find the right page of your file.
You can close the sidebar by clicking the Toggle button again.
3. Find in Document
The Find Document button locates words or phrases within your file. When you click
the icon, a drop down box will appear with a search bar. Type in a word or phrase,
and Kami will display how many times it is present and can highlight the instances,
so you can find them on the page.
4. File Name
Next to the Google Drive icon will be a line of text. This text is the name of the file. If
you click the line, you can rename the file in Kami. Kami does not have access to
local files, so this will not update a local file's name (you will need to export the file).
Two | The right hand side
5. Zoom Bar
You can zoom in and out manually by clicking the plus or minus symbol.
6. Open File
Clicking on the Open File icon will present you with a drop-down menu. Within it are
a range of locations where you can open a file from, as well as a list of recent files,
and tracked copies. Note tracked copies are a way to keep multiple versions of the
same file.
7. Share Document
11

This will allow you to share your file with collaborators. You can share your
document with a direct link and control various sharing settings.
8. Print Document
Click this button to print your document.
9. Save
This allows you to upload your file to Google Drive, and save back to that file.
10. Download
You can use this button to download the file, with or without annotations, locally or
to Google Drive.
11. Help
This button allows you to see recent Kami updates and provides links to the
knowledge base and forum.
12. Menu
The Menu icon gives you access to a range of features. Most importantly it is your
access point for the Split and Merge tool and the OCR tool. (to learn more about
these tools check out pages 10 -15 where we explore them in more detail). Further
down the menu are various options for navigating and viewing your document. For
example here you can jump to the first or last page, rotate the file or put it into
presentation mode.
13. Profile
Finally your profile icon gives you access to your app settings, license dashboard and
coupon code entry. It is also where you go to log out of Kami.
12

Extra tools
OCR tool
One | What is the OCR tool?
The OCR tool (or Optical Character Recognition tool) is a technology designed to turn a
scanned document into a fully digitally recognisable PDF. What does this mean exactly?
Well when you scan a document into a computer, it can’t read anything on it. In effect the
computer just sees the file as one large image. This is why you can’t interact with any of the
features on the file, merely view it.
The OCR tool basically gets the computer to actually read the scan you have given it. The
program allows the computer to recognise all the characters written on it so that you the
user can start to interact with the contents. For example, the Kami text-to-speech tool can’t
read anything on a standard scanned file as it simply doesn’t perceive that there is anything
there to read. But once the OCR tool has worked it’s magic, text-to-speach can identify and
accurately read all the text!
It’s important to use the OCR tool on scanned docs before loading them into Kami, as this
ensures that all of Kami’s annotation tools will work properly. Remember if you ever find
yourself having trouble selecting text with the tools, or if the Text to Speech is unintelligible,
you are likely using a freshly scanned PDF that hasn't been read by OCR.
Two | Where is the OCR tool?
Our OCR tool is can be found on:
● The Kami app starting screen page, above your document options.
● In the Kami app menu bar, specifically the menu icon at the far left of your screen.
13

The OCR tool displayed in the Kami app starting screen
The OCR tool under the menu icon in the menu bar
Three | How to use the OCR tool
14

Once you have successfully found and clicked on the OCR tool, it will ask you to add the file
you want to be read. You can do this by dragging and dropping your chosen file or selecting
one from you Google Drive.
Once the file has finished processing, you can download it or open it in Kami - easy peasy!
Split and Merge tool
One | What is the Split and Merge tool?
The Split and Merge Tool allows you to easily combine separate files into one master file, or
do the opposite and split up one file into separate smaller ones. You can also delete pages,
rotate individual pages and rearrange pages. Basically it gives you control to manipulate
your document layout as you wish. It is compatible with PDFs, and all Google file formats
(Slides, Docs, .etc).
To allow for this next level of functionality, our Split and Merge Tool works as a separate
Chrome Extension that you can use for free, with full access available to Work and School
Plan users. If you already have a Kami account, you can sign in using your existing Kami
login details.
Two | Where is the Split and Merge tool?
You can find the Split and Merge Tool next to the OCR button in either the:
● The Kami app starting screen page, above your document options.
● In the Kami app menu bar, specifically the menu icon at the far left of your screen.
15

Three | How to use the Split and Merge tool
Once you have clicked on the Split and Merge button you will then need to choose the file
you want to Split or Merge. You can either drag-and-drop into this window or you can click
the Drive icon to load a file from your Google Drive.
When your document has loaded, you will be taken to the Split mode. Here all of the pages
within the document will be displayed along the top of your window.
16

Click-and-drag the pages along the first bar to change up their order within the existing
document.
You can also move selected pages onto the lower row to create a seperate file that can be
saved as a standalone PDF (these changes will not commit until you export the file itself).
17

Using the Merge Mode (which is enabled on the top indigo bar) you can add in any pages
that you want merged into the original uploaded file.
18
Do this by uploading any documents you wish to be merged using the pink plus on the
bottom left of your screen. Choose from either your computer files of Google Docs. Once
the file has uploaded you can include them in your split mode rearrangements.
Note: You can also select Google Slides or Docs and these will automatically fetch a PDF
copy of these files and allow you to merge slides and pages from other document types.
Integrations
The Kami app integrates with a number of popular Learning Management Systems,
including Google Classroom, Canvas and Schoology. This means that Kami’s functions can
be used within an LMS, and files edited in the app can be saved and graded within the
system.
Basically, it saves time and makes for a smoother experience for everyone! Here is how to
use Kami alongside your LMS:
One | Google Classroom
19

Kami has a free version, and a paid version for educators and this slightly alters your
experience when using Google Classroom. The main difference between the two is that
Kami’s paid version includes deeper integration to Google Classroom, such as built-in "Turn
In" button, and assignment creation, to help simplify the process for students.
We will look at how both versions can be used effectively within Google Classroom.
*Note* To use Kami within Google Classroom you must first have:
1. Setup up your student in a Google Classroom Course.
2. Installed the Kami Chrome extension and app into both your own and your students'
Chrome browser.
Free version
Instruction video
Teachers: Sending an assignment to students
Sending a Kami assignment to students through Google Classroom is very straightforward.
Follow these 3 basic steps.
1. Select create an assignment from the left hand side bar.
20

2. Attach the file you intend to distribute to students and select 'make a copy for each
student'.
21
3. Click ‘Assign’ at the bottom left hand corner.
Student: Opening assignments in Kami and turning them in
Successfully sending out the assignment should mean that all your students now have their
own individual copy.
To open the work in Kami, students will need to have the Chrome extension installed. They
can then open the file directly from the Google file preview window into the Kami app.
Once they have finished the work (hopefully on time!) they will need to turn it back in for
marking through Google Classroom.
1. First the file needs to be saved to their Google Drive. They can do this by hitting the
save button in the menu bar (at the top right of the screen).
22

2. Students will then need to go into Google Classroom, find the correct assignment and hit
‘Turn in’.
Optional: If you want to check in to see how the students are getting on, prior to
submission, there is a Grade with Kami option that will allow you to see any changes that
students are making on the file. You can access this from the Grading Viewer for the
assignment.
23

Paid version
With the paid Kami integration, there are three steps to creating and completing a Kami
assignment within Google Classroom:
Teachers: Creating the Kami assignment
1. Go to the "Classwork" tab in your Classroom course.
2. Click the "Create" button.
3. Select "Kami assignment" from the list of options.
24

OR, you can head to Kami’s mian screen and select the "Create Classroom Assignment"
button from the options available.
4. Either assignment method will take you to Kami’s assign screen. Here you can add a title,
description and select the file you want to send your students. Note that the assignment
you create in Kami will also appear in your Google Classroom.
25

5. We recommend selecting "Make a copy for each student" from the drop down menu on
the file, as this ensures each student has their own file - so they won’t be trying to edit the
original.
Students: Opening, completing and turning in a Kami
assignment
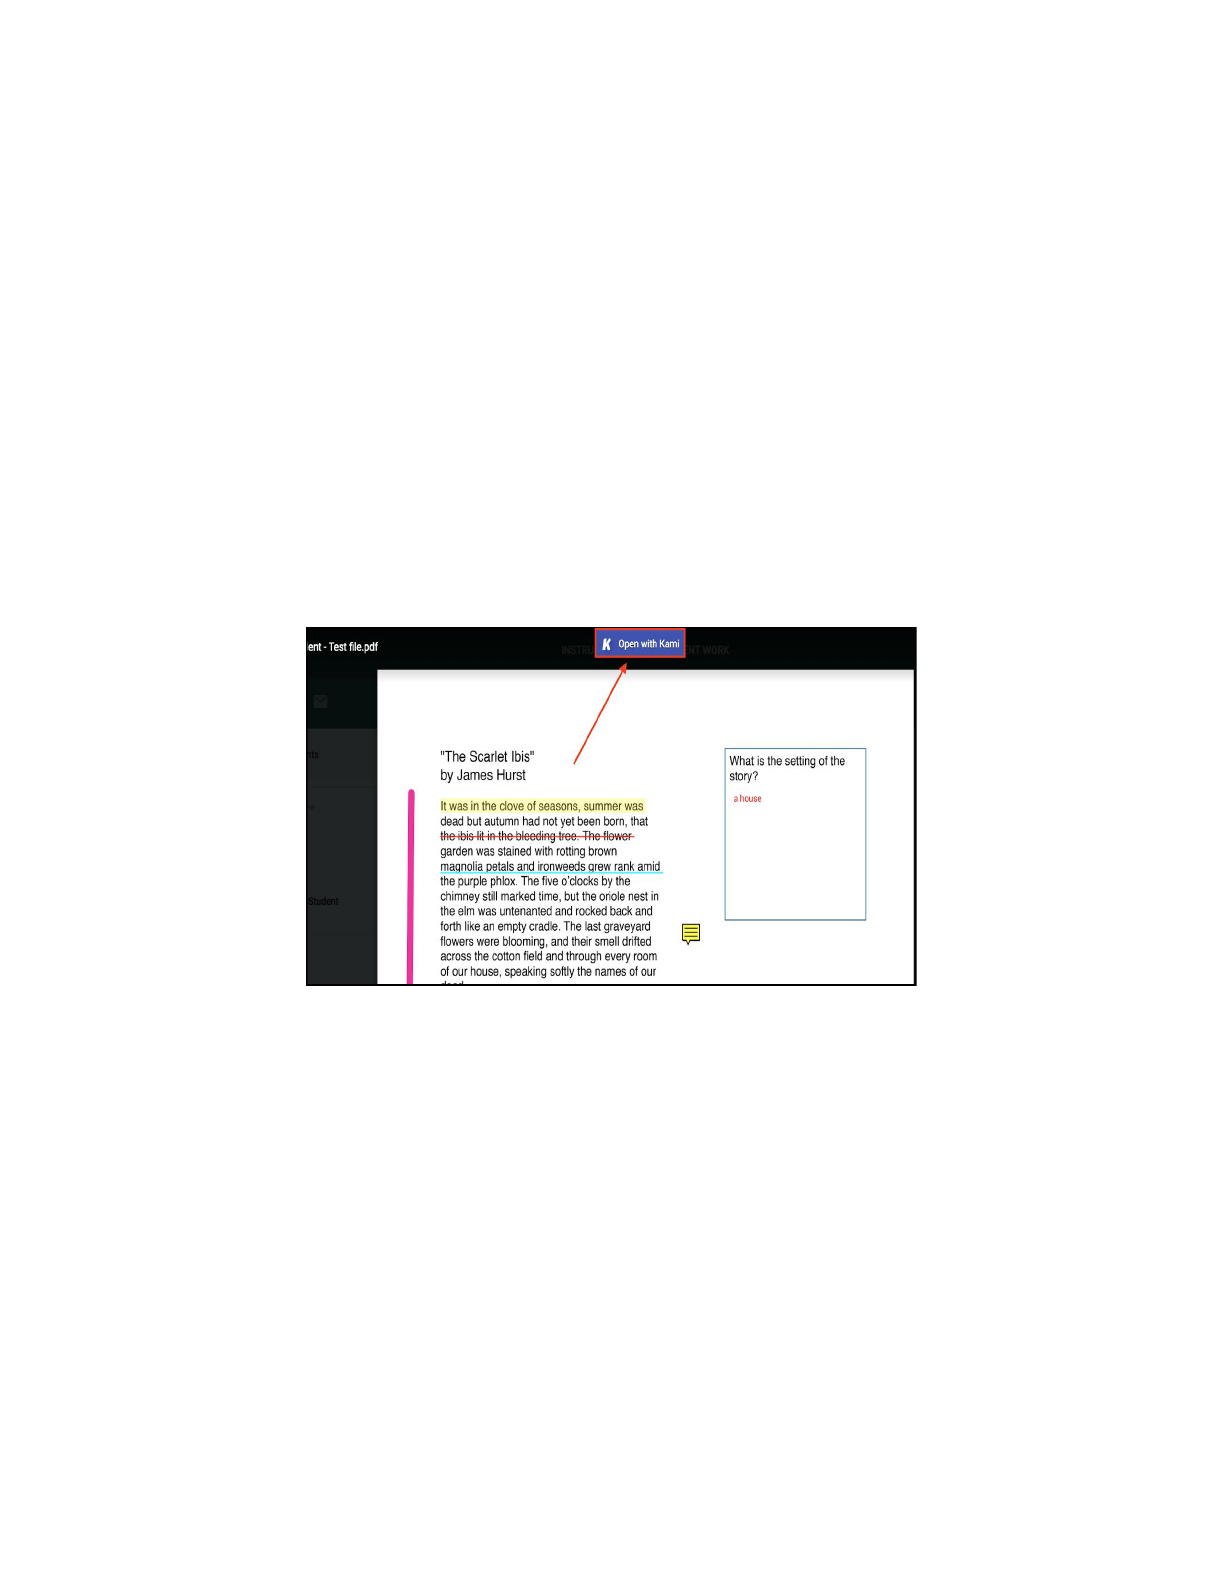
1. Open the assignment directly into Kami by clicking on the “Open with Kami” option at the
top of the preview screen.
26

2. Students can complete their work using all of the Kami tools.
3. When the work has been finished students click the "Save" button in the top right
corner of the screen.There is also an auto-save that runs every 30 seconds and
students should see a Turn In button next to it when the assignment has been
pushed out correctly.
4. This will bring up a small pop up. Within this pop click the purple ‘Turn In’ button.
This will force save the student's annotations and automatically turn the assignment
in to the Google Classroom platform.
27

Two | Canvas
As with Google Classroom, the Canvas integration can be used with both the free and paid
versions of Kami. Let’s go through how to use each of them.
Free version
Teachers: Sending an assignment
1. Create an assignment as you normally would by clicking the ‘+ Assignment’ button in
Canvas.
2. Under the Submission Type screen, select ‘Website URL’.
28

3. Go into the Google Drive file you wish to send to your students.
4. Create a shareable link of the file by clicking the ‘Share’ button in the top right hand
corner and then ‘get shareable link’. Remember to alter the settings to ‘can view’ or ‘can edit’
depending on whether you want to give students editing rights.
5. Insert the file link into the assignment.
Here is what the assignment looks like with the hyperlink:
The assignment is now ready to send!
Students: Opening and turning in assignments
1. Once the assignment has been sent, students can open the file into Kami straight from
the file preview window. They do this by clicking the ‘open with Kami’ button at the top of
the preview screen.
29

2. Complete the work using the Kami selection of tools.
3.When they have finished, students can turn in their work by creating their own shareable
link in Google Drive or creating a Kami sharing link.
4. The link should then be inserted it into the Website URL option in Canvas. This will send
the completed file to the teacher, who can either open it in Kami or use Canvas’ in-app
grading system.
Paid version
Teachers: Creating a Kami Assignment
30

1. Go to the assignment creation screen as normal. In the 'Submission Type' box, choose
'External Tool'. Tick the ‘Load tool in a new tab’ selection.
2. Click the 'Find' button.
3. Choose Kami Google Drive assignment in the next screen.
31

4. Select the correct assignment file from your Drive. Kami will convert files, so images,
office documents, PDFs are all OK.
5. Finally hit Kami Google Drive assignment in the next screen to save the external tool
selection. Note, we recommend you also choose 'Load in a new tab' so your students get a
full-screen Kami view.
32

Students: Opening and turning in an Assignment
1. When the assignment has been sent your students will be able to open it either through:
● An embedded Kami view.
● Or, if the assigning teacher chose the 'Load in a new tab' option when assigning the
work, a button to opening Kami on a separate tab. (recommended method).
2. Once students have loaded the file, Kami will automatically create a separate copy of the
document for that student. This copy will then be automatically added to both their and
their teacher’s Google Drive account.
33

3. When the work is finished, it can be turned in by simply clicking the ‘Turn in’ button on
the right hand side of the Student’s Kami menu bar.
Three | Schoology
Kami's streamlined Schoology integration allows Kami assignments to be created inside
Schoology. They can then be distributed to students, each of whom gets their own copy of
the file, and easily turned in when work is completed. This integration is only available with
a paid Kami Education plan (i.e. the Teacher, School, and District plans).
● Note: This integration uses the Kami Google Chrome extension, and will only work
with Chrome. It also requires that the Teachers and Students have Google accounts
34

as it integrates with Google Drive - if you'd like to use this without Google login, let
me know at [email protected].
Teachers: Creating an Assignment using Kami and
Schoology
1. Ensure the Kami Extension is installed. There is no need to install a Kami app from the
Schoology App Store. When the extension has been successfully installed you should see
the blue K icon showing at the top right of your Chrome Window - if its not there, go to the
Chrome Web Store to install the extension.
● Note: for the best experience, we recommend that your IT department rolls out the
extension to all your users following the instructions here.
2. In Schoology, navigate to your course and choose Add Materials > Add Assignment.
3. Under the ‘Assign From App’ section choose ' Kami’.
35

4. Choose a file from your Google Drive, or upload one using the 'Upload' tab. Kami
supports a wide range of files so you can use a PDF file, Image Files, Word, Powerpoint, and
many other formats.
36

5. Finish creating your assignment within Schoology as you normally would and send it.
Students: Opening Assignments and Turning In
1. Assignments can be found as normal within Schoology.
2. When the assignment is selected and option to ‘Open Assignment with Kami’ button will
appear.
3. Click this button. Kami will then open and load the file. Simultaneously the file will be
automatically uploaded to the Student's Google Drive, and also shared with the teacher's
Google account, so the work in progress can be viewed.
37

● Note: The first time a student uses Schoology with Kami, we will ask them to select
the Google Drive account for the "Kami Schoology Assignments" folder.
4. If the students come back to Schoology later and click the 'Open Assignment' button again,
they will be able to continue their work on the same file. They can also open the file with
Kami directly from their Google Drive, and continue their work that way.
5. Once work is completed, it can be turned in by simply clicking the 'Turn In' button at the
top right of the Kami menu bar.
5. This will export the document with their changes, and return them to Schoology, where
they can simply click 'Submit' to complete the submission.
38

The file is now attached as a normal Schoology assignment submission, and you can mark
it and assign grades using the usual Schoology tools.
Kami across the curriculum
Kami can be an asset to any classroom. Here’s how our features can be tailored to the
English, Math, Science, ELA/ Social studies and Special Education lesson needs.
One | Kami for English Language Arts
English is a core subject - and for good reason! Kami’s tools can help students to complete
close reading exercises and improve comprehension.
Check out our video
39

● Defining Tricky Words: The Dictionary Tool gives students easy access to
definitions when they meet a new word or one they don’t quite understand - all
without leaving the page they are reading from!
● Close-Reading Exercises: Kami’s selection of markup tools has been carefully
designed to help students to express their thoughts in a way that makes most sense
to them.
● Reading Documents Aloud: The Text-to-Speech tool comes in very handy for those
who struggle to process dense text or like to read along while listening.
● Reading Fluency: Students can use the audio comment feature to record
themselves reading passages and turn them into their teacher to check for reading
fluency.
Two | Kami for Math
Whether it is times tables, plotting graphs or completing complex calculations, Kami has
some great features that can help any math class.
Check out our video
● Completing equations and using fractions: The equation tool provides over 60
math symbols to help create and complete all manner of calculations. You can also
type fractions by pressing the / key.
● Exponents and multi-line calculations: Use rich text editor to complete bigger
equations and access your math symbols with the formula tool. You can also add
exponents by pressing the Shift + 6 key.
● What about freehand working out?: For those with a touch screen device, our
drawing tool enables precise touch control, so you can simply write out workings as
if you were using a sheet of paper.
● Showing working out: Using a screen capture comment, students can record
themselves using the drawing tools to work through a math problem and submit to
their teacher.
40

Three | Kami for Science
Kami’s versatile arrangement of tools can be easily applied to the science classroom.
Check out our video
● Inserting and Labelling Diagrams: Scientific diagrams can easily be inserted and
labelled using text boxes.
● Plot graphs: Our insert line and shapes tools make plotting graphs easy and
accurate.
● Equations and formulas: Our insert equational tool contains all the symbols you
will need to complete even the most complex chemistry calculations. The formula
function also enables volumetric calculations that take place over several lines.
● Document experiments: While conducting a lab, students can use the insert image
from webcam feature to take pictures of the various stages of their experiment.
Once the images are inserted into the document, students can use the annotation
tools on the images.
Four | Kami for Social Studies
Social studies brings together an important combination of skills sets. Kami’s wide variety
of tools can help you with a number of lesson plans.
Check out our video
● Annotate and analyze: We’ve got your close reading exercises covered with a
range of annotation and mark-up tools, so students can express their thoughts and
interact with important texts.
41

● Get involved with maps: Trace battle maps, label key locations or colour in
important features with the selection of draw and insert shape tools.
● Wordsearch and games: Make use of the shape and line tools to complete games
and word searches in class.
Five | Kami for Special Ed
Education should be accessible to every student - it’s that straight forward. Here's how
Kami can be used to create a universal learning environment in your classroom
Check out our video
● Learn new words and definitions: Kami’s Dictionary Tool lets students lookup
unfamiliar words quickly and broaden their vocabulary.
● Read along: Sometimes reading alone can be a struggle, but with Kami students
never have to. Simply clicking the Text-to Speech tool will read the whole file out
loud from the beginning. Alternatively, you can highlight the text selection that you
wish to hear. For added fun try changing the accent!
● Alternatives to typing: The Keyboard isn't the only way to communicate your
thoughts. With Kami you can turn your voice into typed text using text-to-speech,
leave voice recorded comments or even video clips.
● Dark mode and colour overlay: Kami’s Dark Mode can be switched on to help
students who struggle with light sensitivity. Kami is also compatible with a number
of Chrome Extension overlays.
● Explain tasks remotely: Teachers can use the screen capture comment tool to
explain assignments in detail to students. This video can then be embedded into the
document for students that would benefit from hearing the instructions multiple
times.
42

Six | Kami for Foreign Language
Knowledge of foreign languages gives students the tools to explore different cultures and
engage with a variety of world views. Kami’s tools can be used to help classes improve their
translation, reading, writing and speaking skills, here’s how:
● Speaking skills: Using the audio comment, students or teachers can record
themselves speaking the foreign language they are studying.
● Embrace organic conversations: Students can use video comments to record
themselves having conversations with other students in the language they are
studying.
● A ready check: Students can practice their language speaking by using the Speech
to Text. Should they make mistakes, they can then fix the text before submitting the
assignment to their teacher.
● Read along: Use text-to-speech to listen to passages to improve listening skills and
pronunciation.
43
