
OWNER’S
M
ANUAL
CAVS SERIES
SELF CONTAINED
RETRACTABLE NOZZLE
VACUUM SEALER

Order parts online: www.amerivacs.com
P
h 619.498.8227
Fx 619.498.8222
sales@amerivacs.com
1
WHAT’S IN THE PACKAGE?
• This Operation Manual.
• (1) Vacuum Sealer.
• (1) E-(unit size) Heating Element, inside the manual sheet protector.
• (1) T-(unit size) Teflon Set, in a roll, placed next to this manual.
•
(1) Power cord Vacuum Packed by this very same vacuum sealer
WHAT THIS MACHINE REQUIRES TO RUN
• Standard 120 Volt A.C. outlet (or 220-240 Volt A.C. outlet if your unit is
made for this higher voltage – See serial number tag next to the Power
Receptacle of your Sealer to confirm).

Order parts online: www.amerivacs.com
P
h 619.498.8227
Fx 619.498.8222
sales@amerivacs.com
2
LET’S GET YOU FAMILIARIZED
Unpack your new Vacuum Sealer and place it on its new home, with the logo on
the left. Place the foot switch on the floor so it is easy to activate with your foot.
Looking at the top of the unit, you will find from left to right:
•
Vacuum Gauge.
• Nozzle Enclosure in the middle.
• Heat Timer.
• Cool Timer.
• Main On/Off power switch.
• Pressure Bar at the front of the unit.
Looking at the back side of the unit, you will find:
• Electrical Power Receptacle.
• Foot Pedal cable.
• Internal air pressure release push button. Use this to remove the air
pressure in order to service the Pressure Bar or, to lower the Pressure Bar
if you will not be using the sealer (Please push nozzle back before letting
Pressure Bar rest)
• Exhaust for internal air pressure. Note: Water might be discharged.
If you ordered the Vacuum Regulator and/or Vacuum Filter accessories, you will
also find these on the back of the Vacuum Sealer and user instructions on the
last page of this manual.
GETTING CONNECTED
1.
POWER:
Make sure the Main on/off switch is set to the “0” position. Connect your
Power Cord to the Power Receptacle on the back of the Vacuum Sealer
and to a Standard 120 Volt A.C. outlet (or to a 220-240 Volt A.C. outlet if
your unit is made for this higher voltage – See serial number tag next to
the Power Receptacle of your Sealer to confirm)

Order parts online: www.amerivacs.com
P
h 619.498.8227
Fx 619.498.8222
sales@amerivacs.com
3
SETTING THE SEAL PART OF YOUR AMERIVACS
RETRACTABLE NOZZLE VACUUM SEALER
1. Turn on your Vacuum Sealer by pressing the main On/Off (I/0) switch.
The built-in Air Compressor will fill up the internal pressure tank. Always
wait until the Air Compressor stops before stepping on the Foot
Switch.
2. Set Heat Timer to four (4) seconds and Cool Timer to six (6).
3. Take one bag and fold it in half. Place your folded bag between the jaws
back enough to extend past the Pressure Bar. Placing it above, below or
to one side of the nozzle is ok.
4. Hold bag taut on the
sides close to the front of
the Pressure bar (to
avoid any wrinkles in
your seal), and keeping
fingers away from the
Sealing Jaws, press Foot
Switch long enough so
that the Pressure Bar
closes, then release; The
Nozzle will retract, the
Pressure Bar will close
tighter and the bag will
be heat sealed as indicated by the LED lights on the Heat and Cool
Timers then, the Pressure Bar will rise, releasing your bag and the nozzle
will slowly extend outward, ready for the next cycle.
5. Remove the bag and inspect the heat seal. The heat source is from the
bottom, so the heat will go upward on your bag. The lower two (2) layers
of the bag will most likely be sealed, but you want to make sure that the
upper two (2) layers are also sealed. This will ensure that if you do seal a
wrinkle in your bag (which is essentially four (4) layers of bag material) it
will definitely be air tight.
NOTE: Explanation applies to units not equipped with Bi-Active sealing.
6. Raise Heat Timer setting one half (1/2) second if the seal is weak or lower
by one half (1/2) second if the seal is good. Test again by repeating from
step #3 onward. Adjust Cool Timer so material has time to set before
sealing bar opens, usually about 50% higher than the Heat Timer.

Order parts online: www.amerivacs.com
P
h 619.498.8227
Fx 619.498.8222
sales@amerivacs.com
4
NOTE: To avoid overheating and to extend the life of the Heating Element,
set the Heat Timer to lowest possible setting that will result in a strong
seal.
Before continuing, please read and understand the following
steps before doing them, as the process will be very fast.
OPERATING YOUR AMERIVACS
RETRACTABLE NOZZLE VACUUM SEALER
Now that your seal parameters are set, let’s start vacuum sealing:
7. Keep your Heat and Cool Timer settings just as you determined on the
previous steps.
WARNING: Please do not vacuum seal products with liquids only. Small
amounts of liquids, powders or other small particles will be sucked by the
vacuum nozzle. Make sure your Vacuum Sealer has a Vacuum Filter
installed on it (by AmeriVacS), or the product will go directly to the vacuum
pump making the vacuum sealer inoperative.
NOTE: Avoid activating sealer without a bag between the sealing jaws.
Doing so will make the Retractable Nozzle deteriorate the Rubber seals
and Teflon between the jaws.
8. Place your bag with
product between the
jaws and with the nozzle
inside of the bag.
Position the bag so the
bag open end goes
beyond the pressure bar.
Position the product so it
is close to the nozzle
(this will keep the bag
from closing the nozzle
and obstructing the air
flow to it. The product
does not have to be at the bottom of the bag)

Order parts online: www.amerivacs.com
P
h 619.498.8227
Fx 619.498.8222
sales@amerivacs.com
5
9. Hold bag taut on the sides close to the front of the Pressure bar (to avoid
any wrinkles in your seal), and keeping fingers away from the Sealing
Jaws, press and hold the Foot Switch. When you see that the package
has reached the desired amount of vacuum, release the Foot Switch and
the Nozzle will immediately retract. The Pressure Bar will close tighter
and the bag will be heat sealed as indicated by the LED’s on the Heat and
Cool Timers. The Pressure Bar will rise, releasing your bag and the nozzle
will slowly extend, ready for the next cycle. Remember to always wait
until the Air Compressor stops before stepping on the Foot Switch.
WARRANTY
Al
l AmeriVacS Vacuum Sealers are warranted for two (2) full years from
date of delivery against electrical and mechanical defects, excluding
normal wear items such as Elements, Element post, Teflon, Pressure Bar
pads and Seal Gaskets. The warranty is voided if the machine is
damaged due to improper use or unauthorized repairs. Any defective
machine under warranty that is returned freight prepaid will, at our option
be repaired or replaced by AmeriVacS, at no charge.

Order parts online: www.amerivacs.com
P
h 619.498.8227
Fx 619.498.8222
sales@amerivacs.com
6
BASIC SERVICE INSTRUCTIONS
PLEASE READ AND UNDERSTAND
BEFORE SERVICING
REMOVING THE PRESSURE BAR FOR EASIER SERVICING
Y
ou can remove the pressure bar for easier servicing by simply removing The
Pressure Bar Bolts. Do not use any tools to hold the Pressure Bar Rods as they
may be damaged. They can only be held from the flat spots at the top of the rod.
When re-installing, please make sure to:
1) Remove the air pressure to the Vacuum Sealer.
2) Push the Nozzle inside the Nozzle Enclosure.
3) Lower the Cylinder rods on each sides
4) Re-install the Pressure Bar making sure there is an internal tooth washer
between the Pressure Bar and the Cylinder Rod, and another on top
against the head of the Bolt.
To order spare parts go to www.AmeriVacS.com and click on “Shop Online” then
“Replacement Parts”
THE HEATING ELEMENT (Part No. E- and T-)
R
emove the broken Heating Element:
1) Remove 1½” Teflon that covers the old Heating Element.
2) Remove thumb nuts and washers from both sides. Remove Heating
Element.
3) Remove ½” Teflon that was under the Heating Element.

Order parts online: www.amerivacs.com
P
h 619.498.8227
Fx 619.498.8222
sales@amerivacs.com
7
Installing the new element:
1) Remove backing on new ½” Teflon. Center over the ½” wide aluminum
flat bar and press to adhere. NOTE: Leave an extra ½” of Teflon tape
extending past each end of the aluminum flat bar to avoid electrical
grounding with the Heating Element.
2) Place one washer on each post. Install the new Heating Element over the
right (spring) side element post first, folded side of element downward.
Position the Heating Element on top of the ½” flat bar, add another washer
and firmly hand tighten the right side with a Thumb nut. Do not use tools.
3) Press the (right)
element post assembly
inward. You can use a
large flat screwdriver to
hold it in the
compressed position
(see photo at right).
NOTE: If you have a
30” or larger sealer,
repeat above steps for
the left side post.
4) Install the Heating
Element over the left
hand post, add a washer and firmly tighten the finger nut BEFORE
releasing assembly on the right hand side (or both sides if 30” or larger
sealer). AGAIN: KEEP THE ELEMENT WITHOUT TENSION FOR THIS
STEP - THE LAST STEP IS LETTING THE SPRING SIDE(S) LOOSE.
NOT DOING SO WILL RESULT IN A SHORT LIFE ELEMENT
BREAKING ON THE LEFT SIDE POST .
5) Remove both backings from 1½” Teflon Cover. Center Teflon so that the
non-adhesive middle part covers the Heating Element. Smooth out on
each side so adhesive sets on the chassis.
Order parts online: www.amerivacs.com
P
h 619.498.8227
Fx 619.498.8222
sales@amerivacs.com
8
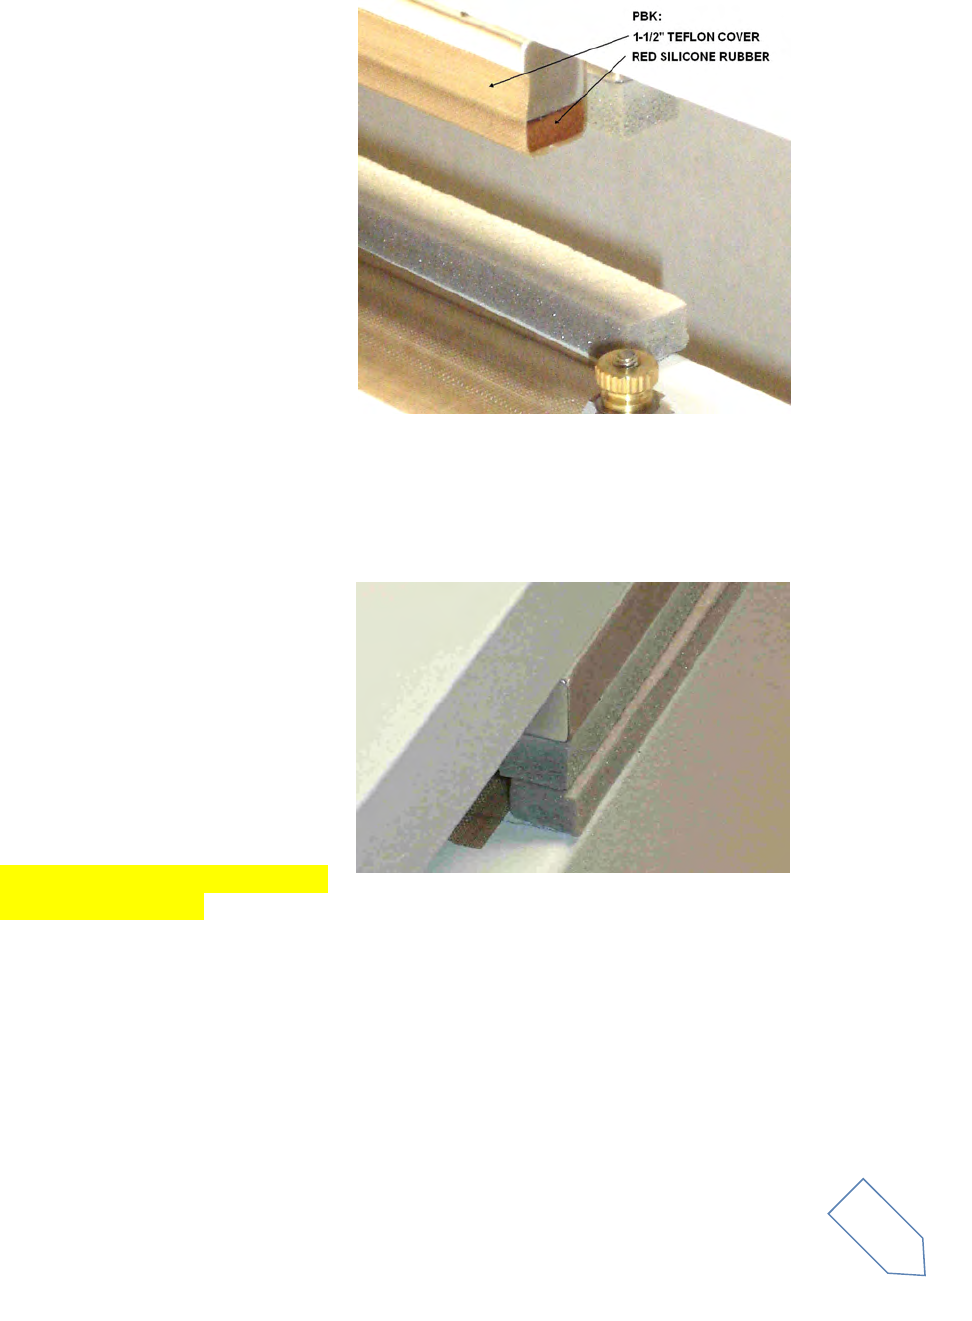
THE PRESSURE PAD (Part No. PBK-)
1) Remove the Teflon cover and
Red Rubber strip and any
adhesive left on the Aluminum
Bar.
2) Remove backing from rubber
and press onto the Pressure
Bar without stretching.
3) Remove backing from 1½”
Teflon cover. Center Teflon on
the rubber, smooth out to each
edge, and then fold over each
side.
THE GRAY OR BLACK RUBBER (Part No: GR-)
1
) Remove old gray or black
rubber from machine body and
Pressure Bar and any leftover
adhesive
2) Remove backing from the one
of the new foam rubbers (both
rubbers provided are the same)
and press onto the Pressure
Bar without stretching
3) Remove backing from the
remaining foam rubber strip,
line up with the front edge of
the machine body (not directly below the upper rubber) and then press
into place without stretching. Do not align with upper foam Rubber.

Order parts online: www.amerivacs.com
P
h 619.498.8227
Fx 619.498.8222
sales@amerivacs.com
9
TROUBLESHOOTING
PROBLEM CAUSE SOLUTION
Bag is not sealed in the
middle
Red Rubber might be
indented providing less
seal pressure.
Replace Red Rubber
and Teflon (Pressure Bar
Kit)
Low air pressure
Make sure air pressure is
set to 100 to 110 psi,
free air flow of 6CFM is
needed
Bag is not being
vacuumed
Low air pressure
Make sure air pressure is
set to 100 to 110 psi,
free air flow of 6CFM is
needed
Bag is closing around the
tip of the nozzle
Keep product as close to
the tip of the nozzle as
possible
Bag looses its vacuum
after time
Bag material might be
porous
Use a bag made for
vacuum. Do not use
channel bags
Bag might have been
punctured by sharp
corner
Use thicker bag or lower
vacuum level (An
optional Vacuum
Regulator might be
needed)
Element sparks or
breaks on the left side
Element is being held by
the post only and not
tightly between and by
the washers
Follow yellow-bold
instructions on step #4 of
“Installing new element”
section of the Basic
Service Instructions
Machine does not turn
on
Blown fuse
Replace fuse – located
on the power receptacle,
pry open fuse drawer
with small flat
screwdriver. Fuse
Drawer has spare
included

Order parts online: www.amerivacs.com
P
h 619.498.8227
Fx 619.498.8222
sales@amerivacs.com
10
AMERIVACS REPAIR REQUEST FORM
DATE:
SHIP BACK TO:
COMPANY
CONTACT FOR ADDITIONAL INFO ON THIS REPAIR
ADDRESS
NAME
ADDRESS
PHONE
Ext
CITY
E
-
MAIL
STATE
ZIP
WHICH UPS SERVICE DO YOU WANT TO USE FOR RETURN
GROUND
2ND DAY
NOTE: IF UNDER WARRANTY, WE WILL SHIP BACK WITH
3 DAY AIR
NEXT DAY
THE SAME SHIPPING METHOD AS IT WAS RECEIVED
MODEL:
SERIAL:
I
-
PROBLEM AND/OR SPECIAL REQUEST
(PLEASE ATTACH LAST PAGE OF E
-
MAIL COMMUNICATION IF ANY)
NOTES:
-
WRAP FOOT
PEDAL SEPARATELY TO AVOID SCRATCHING THE MAIN CHASSIS
-
PUSH NOZZLE INSIDE NOZZLE HOUSING AND LOWER PRESSURE BAR
-
USE 3" OF PACKAGING ON EACH SIDE TO AVOID DAMAGE
-
PLEASE INCLUDE THIS FORM WITH YOUR MACHINE
SHIP TO:
AMERIVACS REPAIRS
(619) 498
-
8227
1518 LANCASTER POINT WAY
SAN DIEGO, CA 92154
