
CONFIDENTIAL
SAP SuccessFactors LEARNING
ADMINISTRATION TRANSITION GUIDE
2
Disclaimer
The information in this presentation is confidential and proprietary to SAP and may not be disclosed
without the permission of SAP. Except for your obligation to protect confidential information, this
presentation is not subject to your license agreement or any other service or subscription agreement with
SAP. SAP has no obligation to pursue any course of business outlined in this presentation or any related
document, or to develop or release any functionality mentioned therein.
This presentation, or any related document and SAP's strategy and possible future developments,
products and or platforms directions and functionality are all subject to change and may be changed by
SAP at any time for any reason without notice. The information in this presentation is not a commitment,
promise or legal obligation to deliver any material, code or functionality. This presentation is provided
without a warranty of any kind, either express or implied, including but not limited to, the implied
warranties of merchantability, fitness for a particular purpose, or non-infringement. This presentation is
for informational purposes and may not be incorporated into a contract. SAP assumes no responsibility
for errors or omissions in this presentation, except if such damages were caused by SAP’s intentional or
gross negligence.
All forward-looking statements are subject to various risks and uncertainties that could cause actual
results to differ materially from expectations. Readers are cautioned not to place undue reliance on these
forward-looking statements, which speak only as of their dates, and they should not be relied upon in
making purchasing decisions.
3
Contents
Disclaimer ............................................................................................................................................................. 2
New Learning Administration Interface - Introduction ..................................................................................... 5
What’s New in the Guide .................................................................................................................................... 6
1. Terminology Changes ...................................................................................................................................... 7
Terminology Changes of Major Learning Administration Terms .............................................................. 7
2. Access, Navigation, and General Guidelines ................................................................................................ 10
2A. Accessing SAP SuccessFactors Learning Administration (Platform/Learning Integrated Environment)
........................................................................................................................................................................ 10
2B. How to Customize the Administrator Learning Home Page Content ................................................... 10
2C. Accessing the Entities from the New Administrator Navigation........................................................... 11
3. New Administrator Navigation ...................................................................................................................... 11
New Administrator Navigation Components and Description ................................................................ 12
4. Menu Navigation Structure ........................................................................................................................... 13
5. The Workspace Area ...................................................................................................................................... 14
5A. Search Functionality and System Administrator Functions .................................................................. 14
5B. Entity Manager ........................................................................................................................................ 14
Entity Manager Components and Descriptions ....................................................................................... 15
6. Common Components Across All Entities .................................................................................................... 16
6A. Entity Header Fields ................................................................................................................................ 16
Item Entity Header .................................................................................................................................... 17
Common Entity Header Fields Across All Entities .................................................................................... 17
6B. Entity Tabs ............................................................................................................................................... 17
Entity Details Tab (Summary Tab) – Default Landing Tab ....................................................................... 17
6C. Tabular Related Entity Tabs .................................................................................................................... 18
Entity Related Tabs Table Components and Descriptions....................................................................... 18
6D. Common Changes Across Entity Related Tab Tables ............................................................................ 19
6E. Validation Error Indication and Error Messages .................................................................................... 19
6F. Confirmation Message Toast .................................................................................................................. 20
7. Noteworthy Layout Changes ......................................................................................................................... 20
7A. Creating an Item ...................................................................................................................................... 20
7B. Item Entity – Online Content Tab ........................................................................................................... 22
Online Content Tab Components ................................................................................................................. 23
Online Content Page Components and Description ................................................................................ 23
4
Online Content Tab Without Any Online Contents Associated to the Item ............................................... 25
Adding Online Contents to an Item .............................................................................................................. 25
Save or Cancel from the Online Content Tab ............................................................................................... 28
Online Content Settings ................................................................................................................................ 29
Launch Tab from Online Content Settings Dialogue .................................................................................... 29
Launch Tab Components and Description ............................................................................................... 30
Course Progression Tab from Online Content Settings Dialogue ............................................................... 31
Course Progression Tab Components and Description ........................................................................... 31
Completion Tab from Online Content Settings Dialogue ............................................................................ 32
Completion Tab Components and Description ........................................................................................ 32
Objectives Tab from Online Content Settings Dialogue .............................................................................. 34
Objectives Tab Components and Description .......................................................................................... 34
Updates to the Online Content Tab .............................................................................................................. 34
7C. Classes Entity (Scheduled Offerings) ...................................................................................................... 35
Class Entity Feature Location Changes ......................................................................................................... 35
The Class (Scheduled Offering) Entity Header ............................................................................................. 37
The Class (Scheduled Offering) Details Tab .................................................................................................. 37
The Registration Tab and Its Functions ........................................................................................................ 39
The Time Slots (Segments) Tab ..................................................................................................................... 44
7D. User Entity ............................................................................................................................................... 51
8. Preparation Checklist ..................................................................................................................................... 52
9. Removed Functionality .................................................................................................................................. 54
Removal of Legacy Plateau Features ............................................................................................................ 57
Accessibility Notes ......................................................................................................................................... 57
10. For More Information.................................................................................................................................. 57
5
New Learning Administration Interface - Introduction
SAP SuccessFactors is planning to release a new Learning Administration interface in May 2020. As all
major browsers will end support for Flash by the end of 2020, the new Learning Administrator user
interface replaces all Adobe Flash elements with HTML-based elements. This document provides
information about the new interface to help customers prepare in advance of its release.
More than just a technology change, the new Learning Administration interface will provide an enhanced
user experience consistent with the SAP SuccessFactors suite of products. Customers will benefit from
streamlined navigation and terminology, reorganized menus and field groupings. The redesigned menu
removes duplicate functions, consolidates day-to-day tools and reorganizes menu options for optimal
use. The Administration application, available on the Platform (BizX) Home Page, has a clean, modern
look and includes a work area that can be expanded to a full screen, allowing administrators to focus on
the task at hand. These enhancements make working within SAP SuccessFactors Learning easier and
more efficient.
The new Learning Administration will be accessible from a dedicated tile on the Platform home page. The
Flash version will remain available in its current location (Learning Administration link from Administrator
Center) for 6 months after the new application is generally available, to allow Administrators time for the
transition and for customers to carry out essential change management activities.
IMPORTANT NOTE: All customer-owned and created Flash-based Learning materials (courses, videos,
etc.) are the responsibility of the customer to identify, update and change. Customers that have
Premium Content Service (PCM) can receive assistance in identifying their Flash courseware.
GUIDE LIMITATIONS: The information contained in this document is for general guidance only. The
images shown on the guide are using current terminology and do not reflect the new terminology, thus
detailed level field terminology shown on the images may change. In addition, these images reflect a
system with all the configurations enabled.
UPCOMING FEATURES: The following features are planned to be included in a later release; thus, are not
covered in this guide:
• Recents
• Record Configuration – to be renamed to Entity Configuration.
• Bookmarks is also being considered for a future release.

6
What’s New in the Guide
Description
Date
Access, Navigation, and General Guidance – Accessing the new and current
administrator interfaces. Validated Customers note, update on selecting the
new tile will navigate to the current Flash application interface.
Terminology Changes – Areas in which terminology will not change.
Translated major terms available on the Community Blog. Course Evaluation
will change to Course Feedback.
Noteworthy Layout Changes – Creating an Item function, changes from the
Flash application interface.
User Entity – editable and supported fields for users who are not
authenticated via the HXM platform.
March 2020
Terminology Changes – Terminology Updated to include terminology changes
for Purchase Order, Coupon ID, My Employees, Segment, Registration Form,
External Requests. Accessing the Entities from the New Administration
Navigation – For the entities menus to display from the menu navigation, at a
minimum, an administrator must be granted a Search or Add workflow to the
entity.
Entity Manager – Section has been updated to include a supporting
spreadsheet listing the functional/display and terminology changes per entity.
Entity Header Fields – Describes the entity header fields and common entity
header fields across entities.
Tabular Related Entity Tabs – Describes the related tabs and common
changes across the entity tab tables.
Noteworthy Layout Changes – Covers current and new Administration user
interface layout changes and behavior for Item Entity - Online Content Tab,
the Class (Scheduled Offering) entity, and the User entity.
Upcoming Features – List of features available in the second release of 2020.
Preparation Checklist – Updated it to include additional guidance.
December 2019
Customer Transition Initial Guide
March 2019

7
1. Terminology Changes
The SAP SuccessFactors Learning application’s terminology is being improved for clarity, consistency, and
alignment across the SAP SuccessFactors suite. These changes are intended to bring new insights, clearer
administrator workflows and a simpler interface and will be available with the Preview Release on both
the current and new Learning Administration interface.
Language Packs Impact: There is an impact to language packs. The Localization and Internationalization
team has worked with language experts to translate terms to all 42 supported languages. The translation
of major terms in all supported languages will be available on the Translated Major Terms spreadsheet
which will be posted on the Customer Community Blog.
Reports Impact: The new terminology will be reflected on out-of-the box reports with the Preview
Release. Custom reports which utilize the application label IDs and not custom created label IDs, will be
impacted by the terminology change.
There are a few notable exceptions in which administrators will still see the previous terminology:
• Within API validation messages
• When editing email notification token sets (Notification syntax)
• When importing or exporting administrator roles
• When editing the system configuration syntax
Terminology Changes of Major Learning Administration Terms
Listed below are major terms that are changing on the new Learning Administrator user interface. To see
the Main Navigation terminology changes, see Section 4. To see the nine (9) major entities fields
terminology changes see Section 5B.
LMS Area
Current Term
New Term
User Side Impact
Content
Document
Document Links
Yes, currently it is called
Attached Documents
Content
Content Network
Open Content Network
No
Content
Follow-Up Evaluation:
Application of Learning
Follow-Up Survey
Yes, currently it is called
Survey
Content
Item Evaluation: User
Satisfaction
Course Feedback
Yes, currently it is called
Course Evaluation and will
change to Course Feedback
Content
Questionnaire Survey
Survey
No
Content
Filename
URL
No
Class
Segments
Time Slots
Yes, currently it is called
Segment
Class
Registration Form
Special Requests
Yes

8
LMS Area
Current Term
New Term
User Side Impact
Item
Blended Course
Instructor-Led with Online
Content
Yes, currently it is called
Instructor-Led and Online
Course
Item
Length
Duration
Yes
Item
Thumbnail File
Image
No
Item
Learning Event
History Record
Yes
Finance
Order Ticket
Voucher
Yes
Finance
Subscription
Free-of-Charge
Subscription
No
Finance
Purchase Order
Prepaid Account
Yes
Finance
Coupon ID
Coupon Code
Aligning with User interface
General
Notification
Email Notification
No
General
Subordinate
Direct Report
Yes, on the Manager
(Supervisor) interface.
General
My Employees
My Team
Yes, on the Manager
(Supervisor) interface.
Learning
Activities
Requirements
Curriculum Requirements
Yes
Learning
Activities
Group Instances
Class Groups
No
Learning
Activities
Scheduled Offering
Class
Yes
Learning
Activities
Slots Reserved
Reserved Seats
No
Learning
Activities
Schedule Block
Resource Block
Yes
Library
Catalog
Library
Yes
Library
Subject Area
Category
Yes, currently it is called
Topics
People
Classes
Cohorts
No
People
Group
User Group
No
Role
Alternate Supervisor
Alternate Manager
Yes

9
LMS Area
Current Term
New Term
User Side Impact
Role
Supervisor
Manager
Yes
System
Administrator
Custom Columns
Custom Fields
No
System
Administrator
Deployment locations
Content Deployment
Locations
No
System
Administrator
Domains
Security Domains
No
System
Administrator
Global Variables
Global Application Settings
No
System
Administrator
Record
Entity
No
System
Administrator
Subdomains
Security Subdomains
No
System
Administrator
Time Slots
Time frames
No
System
Administrator
Workflows
Permissions
No
User
External Requests
External Learning Requests
Yes

10
2. Access, Navigation, and General Guidelines
2A. Accessing SAP SuccessFactors Learning Administration (Platform/Learning Integrated
Environment)
A Learning Administrator with access to the current application will have access to the new “Learning
Administration” tile once the new administrator User Interface is generally available. The new tile will be
present on the Platform Home Page from which the Administrator can access the new Learning
Administration application as shown in the image below.
Figure 1.1 – Platform Home Page
An administrator will continue to have access to the current administrator interface by selecting the
Admin Center menu option from the Platform Header, and then selecting the Learning Administration
link. To access the new interface, an administrator will select the Home menu option from the Platform
Header, and then select the “Learning Administration” tile.
Note for Validated Customers (VSaaS): The new administrator interface will be available on VSaaS Preview
and Sandbox environments with the 1H 2020 Release. On selecting the Learning Administration tile in
production environments, administrators of validated customers will be navigated to the Flash application
interface until Learning production is upgraded in November 2020.
2B. How to Customize the Administrator Learning Home Page Content
Home displays the contents of the “Introduction Panel ID” selected in Flash System Administration>
Configuration> Global Variables. If “Introduction Panel ID” is set to custom created panel, that custom
11
panel content is preserved. The out-of-the box Welcome to SuccessFactors Administration video/tutorial
and the administrator Quick Links currently on the Learning application homepage will not be available in
the new administrator interface. If “Introduction Panel ID” is set to DEFAULT_ADMIN_INTRO, this will be
modified to DEFAULT_LEARNING_ADMINISTRATION_INTRO during the upgrade process. Both of these
panels will be non-editable. The new default intro panel contains an image and a message to the
administrator in label ID label.ADMIN_HOME.WelcomeMessage. Customers that edited the default
admin intro label should use the recommend customization approach and copy any wanted content to a
newly created intro panel. The previous default intro panel will be removed when Flash is removed.
For customers that want their custom content on the home page to prepare for this change, an
administrator with proper permissions can set up an introduction message which is displayed to
administrators on accessing the administration application by creating a new User Introduction from
System Administration > Application Administration > User Introductions and then select it as the default
introduction message from the Introduction Panel ID drop-down option in System Administration >
Configuration > Global Variables page.
2C. Accessing the Entities from the New Administrator Navigation
Workflows that grant access to entity menus have been made more straightforward in the new
administrator navigation. Currently, access to each entity menu is granted to an administrator based on
that entity’s ‘Search’ or either the ‘Edit ‘or ‘View’ workflows. In the new Learning Administrator
navigation, the ‘Search’ or ‘Add’ workflows will grant access to a menu. For instance, to access the
Library (Catalog) menu, either the Search Library (Catalog) or Add Library (Catalog) workflows will grant
access to the Library (Catalog) menu within the Learning Activities main menu. Administrator ‘View’ or
‘Edit’ Library (Catalog) workflows will grant further access.
Note: The out-of-the-box system roles and any custom roles created for your organizations, which consist
of permissions (workflows), will not be impacted.
3. New Administrator Navigation
When accessing SAP SuccessFactors Learning, administrators will see the new administrator interface.
Below is an example image of the new administrator interface. Note that these options are highly
dependent on the system’s configurations and permissions granted to an administrator.

12
Figure 1.2 – New Administrator Interface Navigation
New Administrator Navigation Components and Description
Components
Description
1. Human Experience
Management
Platform Header
Available on all pages as the administrator navigates within SAP
SuccessFactors Learning.
2. Header Toolbar
Component sits above the Entity Header and is displayed when the
administrator navigates within SAP SuccessFactors Learning. In addition, this
contains the Full Screen Mode feature and access to online help.
3. Full Screen Mode
On selection, the left-side Menu Navigation will either show or hide. It
expands the Workspace Area as it increases the real estate for the
administrator to work with.
4. Menu Navigation
In the current Administrator interface, these are the top horizontal menus
which on selection render a left-side vertical menu of additional functions.
The new design follows a tree navigational structure on the left side of the
page, granting access to a primary menu, with secondary and tertiary menus
rendering the relevant menu options.
Manage User Learning:

13
Components
Description
• Manage User Learning is a new primary menu which consolidates
current tools that are used to manage a user’s learning. This
provides the administrator with a focal point to conduct tasks such
as assigning and adding to a user’s learning history.
Manage Email:
• Manage Email is a new menu created under the System
Administrator primary menu. It groups the tasks that relate to setting
up email notifications.
Relocated Menu Options:
• Currently, Tools exist under the main menus Users, Learning,
Content, and System Administrator. The functions within Tools have
been moved and organized under appropriate primary menus to
provide an organized menu structure.
• Content Network, Activate/Deactivate Content Network and, Tasks
have been moved to secondary menus under the Content primary
menu. Currently these functions exist under the Learning main
menu.
• Instructors has been moved to People, as it is the interface for
creation and management of people who are Instructors.
To see the full updated menu navigation structure, see Section 4 Menu
Navigation Structure.
Removed Menu Options:
Some menus and functions have been removed because they were either a
duplicate of another function in the system or are no longer supported. See
Section 9 Removed Functionality for more information.
5. Workspace Area
The workspace area is the area to the right side of the menu navigation. It
renders the pages driven by the selections made from the menu navigation.
When an entity search is conducted, the workspace area will present the
current search functionality. When creating, editing, or managing one of
nine (9) major entities, the workspace area will render the entity manager
which is the new look and feel to access the entities in the system. See
Section 5 The Workspace Area for more information.
6. Question Icon
The Help documentation is available by selecting the question mark icon.
4. Menu Navigation Structure
To download the current menu navigation and terminology mapped to the new menu navigation
structure and terminology, please click here to learn more.

14
5. The Workspace Area
The workspace area located to the right-side of the menu navigation, renders the search functionality,
the entity manager, and overall system administrator functions, including system configuration,
references, and overall administrator management tasks.
5A. Search Functionality and System Administrator Functions
Search functionality across all the entities and system functions such as Automatic Processes, Connectors,
Background Jobs, Environment, Configurations, including current Tools will remain as currently designed.
Figure 1.3 – Search Functionality
5B. Entity Manager
The Entity Manager is the new layout presented when creating, editing, or managing the nine (9) major
entities in the system, which are:
• User
• Assignment Profile
• Item
• Class (Scheduled Offering)
• Library (Catalog)
• Curriculum
• Coupons
• Free-of-Charge Subscriptions (Subscriptions)
• Prepaid Account (Purchase Order)
The Entity Manager is made-up of three main components:
• The Entity Header

15
• The Entity Tabs
• The Entity Detail Area
For detailed functional and terminology changes, for each of the nine (9) major entities, access the
Entities Field Changes spreadsheet. It contains the entities’ header, actions, the entity details tab fields
(summary tab), and all the supported related entity tabs per entity. Below is an image and a descriptive
table of the entity manager and its components.
Figure 1.4 – Entity Manager Navigation
Entity Manager Components and Descriptions
Components
Description
1. Entity Header
The Entity Header provides immediate entity information. It contains
primary information such as title, description, respective entity status,
and additional entity specific information, such as the average rating
for Items. See Entity Header Fields for more information.
2. Header Actions
Depending on the entity and the permissions granted to the
administrator, the header actions will display the relevant actions the
administrator can take against the entity. For instance, if the entity is
an Item, then one of the header actions will display the Assign action.
3. Push-Pin Icon
Located below the Entity Header, on selection, the Push-Pin icon pins
the entity header, making it static, so an administrator can scroll to
view the data that is on the entity detail area while the header
remains visible.
4. Caret Arrow Icon
Located next to the Push-Pin icon, on selection, the Caret Arrow icon
shows or hides a portion of the Entity Header.

16
Components
Description
5. Entity Tabs
In the current Administrator user interface, these are all the Related
and Related More tabs available from an entity. With the new design,
all the related associations pertaining to the entity will be shown in a
tab across the top of the entity detail area. See Section 6B Entity Tabs
for more information.
6. Entity Tabs Overflow
Arrows
Scrolls to the end or beginning of related associated tabs by selecting
the right or left arrow of the entity tabs, respectively.
7. Entity Tabs Drop-Down
Displays a complete menu of the entity tabs per entity.
8. Entity Detail Area
A central area where the administrator can perform multiple tasks
such as create, edit, and manage an entity. The Entity Detail Area
renders specific fields, settings, and functions based on the entity tab
that is selected.
Note: The date, time, and number patterns that are shown in an
empty field, as an example/hint of how it should be completed, is
configured on the Locale’s patterns. This is located within the
References > Manage Labels > Locales menu option.
9. Entity Footer
Save and Cancel actions are available for the administrator to save or
cancel the entered information.
Record Configuration: The Record Configuration feature, which allows an administrator to configure fields
and tab order of the nine (9) major entities and corresponding admin personalized views, will not be
offered in the new Learning Administration application, however it will be available from the current
Learning administrator interface; since both the new and current learning administration application will
leverage the same database data for determining display of fields and whether they are required, any
changes to record configuration field display or required fields applied from the current learning
administration will be reflected on both the new and current application.
When the new Learning administration is available, the existing tenant level record configurations that
have been defined for field display and mandatory fields will be honored and can still be updated via the
current Learning administrator interface. The Record configuration feature is an upcoming feature which
will be supported from the new administration interface in a future release.
6. Common Components Across All Entities
6A. Entity Header Fields
The header of each of the nine (9) major entities displays immediate information available to the
administrator. The information listed on the header derives from the entity’s detail tab (summary tab)
and its related tabs. As an example, the image below illustrates the Item Header.

17
Item Entity Header
Figure 1.5 – Item Header
Common Entity Header Fields Across All Entities
Each entity header displays relevant information pertaining to the entity. Listed below are common fields
across all the entities.
• Title or Description
• Entity ID
• Entity Image if applicable
• Entity Status
6B. Entity Tabs
The Entity Related Tabs of each of the nine (9) major entities are displayed across the top of the entity
detail area. Availability of an entity related tab depends on the permissions (workflows) granted to an
administrator. Upon accessing an entity, the entity details tab (Summary Tab) is the default landing tab
which will render in edit mode if permission to edit was granted. All other entity tabs will render as view
only; if an administrator has permission to edit an entity detail field or related information, the ‘Pencil
icon’ is available.
Entity Details Tab (Summary Tab) – Default Landing Tab
Figure 1.6 – Entity Detail Tab – Edit Mode

18
6C. Tabular Related Entity Tabs
Depending on the entity and the selected entity tab, the data associated may be presented in a table
format. If data has not been associated, the table will present a message explaining there are no
associations with the entity. The functions available via the table toolbar are specific to the related entity
tab.
Figure 1.7 – Entity Related Tabs – Table and Table Toolbar
Entity Related Tabs Table Components and Descriptions
Table Components
Description
1. Table Title
Displays the Entity Tab title followed by the number of associations tied
to the entity in parentheses. Example: Classes tab menu is selected and
the associated classes with the Item would display as “Classes (14)”
2. Table Toolbar
The Table Toolbar is available within specific entity tabs where the
associated data is presented in a table format. The Table Toolbar
includes functions relevant to the related tab and depending on the
permissions granted to the administrator, may include Add, Copy, Edit,
Remove, Sort, and Grouping functions.
If no associations have been made yet, then the only active function is
the Add function; all other functions will be disabled.
If the administrator only has view permission, then only Sort and
Grouping (if applicable) functions will be available. The Add, Edit, and
Remove functions will not be available.
Table Toolbar functions are as followed:
Dollar Sign Icon – This function is specific to the Library (Catalog) entity
tab within the Item entity. On selection, it displays the Change Library
Price dialog window.
Add Icon – This function displays the related association search
function. The administrator can conduct a search and select from the
search results to Add and make the association.

19
Table Components
Description
Pencil Icon – On selection, the data within the related tab becomes
editable. The administrator can make edits if needed and either save or
cancel the changes.
Remove Icon – At least one of the related data’s checkbox must be
selected for the remove icon to become active. Upon selection, the
association is removed.
Sorting Icon – On selection, a dialog window prompts the administrator
to select the column to sort by and whether it should be in an ascending
or descending order. This function is only available for tables and
columns where it is sensible. Note that most dates are not yet sortable
per chronological order.
Group Icon – On selection, a dialog window prompts the administrator
to select which column to group by and whether it should be in an
ascending or descending order. This function is only available for tables
and columns where it is sensible. (Not shown on image)
3. Table Column Header
Displays the column title for each of the columns. It expands and
collapses to show all the supported tabs when Full Screen is
selected/deselected.
4. Table Row
Each data is displayed from a row. All the rows become editable when
the Pencil icon is selected.
5. Navigate Function
Available in the form of an angle bracket (>) for each data row. On
selection it navigates directly to the selected entity’s detail area. This
function is only available to administrators who have permission
(workflow) to the corresponding entity.
6D. Common Changes Across Entity Related Tab Tables
1. Upon initial display, the table information will be read only. An administrator with edit
permission will see a ‘Pencil icon’ that can be selected to edit the table information.
2. The ID of each related entity will be visible as a new column on each table.
3. Sorting will be available for most columns within tables.
4. The Group function will be available, where sensible, for further organization within tables.
5. If a related entity does not have a value for the title in the administrator’s preferred locale,
tenant locale or English, then the field will display blank, instead of the words “No Title”.
6E. Validation Error Indication and Error Messages
If any of the required fields and/or settings are left blank or do not meet the validations, the system will
outline the field in red. A message will outline the fields that require attention.

20
Figure 1.8 – Error Indicators
Additionally, where numeric values are required, the warning messages are more concise and clearer. For
instance, the current warning “The number entered is too large.” Has been improved to “Please use a
whole number between 0 and 99,999”. Error and warning validation instructional messages have been
improved for clarity across the application.
6F. Confirmation Message Toast
A popup confirmation message displays for a few seconds on the successful modification of an entity.
Figure 1.9 – Changes Saved Confirmation Dialogue
7. Noteworthy Layout Changes
In addition to an enhanced user experience through a common entity manager layout, there are
noteworthy layout changes in the Item related tab Online Content, the Class (Scheduled Offering) related
tab Registrations, and the User entity. The next four sections of this guide will cover these administrator
interface changes.
7A. Creating an Item
Creating a new item is easier and no longer requires a type selection and walkthrough a wizard. On the
new administrator interface, an item is created by completing a form. When the form is saved, the item
is created with a default classification of Other. Based on the associations built with the Item, then the
Item’s classification is automatically updated.
The administrator can build an Agenda Template (Segments) to create an Instructor-Led Item, set the
completion status for online content or build the online content structure to create an Online Item, or
have both an Agenda Template and Online Contents to create an Instructor-Led with Online Content Item
(Blended). If neither an Agenda Template nor Online Content is associated or Completion Status set, then
the Item’s classification will remain as Other. The classification External-Course will continue to be used
for Items that are hosted by Online Content Network providers. The classification Other will continue to
be used for items that have Tasks associated or Items that are physical goods, such as a book. The
following images show the current step-by-step wizard and the new user interface for the Add New Item
function.

21
Add New Item
Current
New

22
7B. Item Entity – Online Content Tab
Building the Online Content association to an Item has being streamlined by both reducing the steps
required to add Online Contents to an Item and by displaying only the fields and settings relevant to the
Online Content type. In the current Learning administrator user interface, the administrator must define
the Online Content settings and other attributes when the Online Content is being added to the Item.
Once completed, the administrator defines the settings for the entire Online Content from the Modify
Settings option. In the new Learning administrator interface, the administrator adds the Online Contents
and organizes the content structure first, then defines settings that drive the launch, user course
progression, completion, and objectives behavior. These settings may be specific to a content type in the
structure, or apply to the entire Online Item.
This restructure of Item and Online Contents association results in a streamlined experience, while
maintaining the same functionality as the current Learning Administration. Below, are images of the
Online Content tab from both the current and new administration user interfaces.
Online Content Tab
Current
New

23
Online Content Tab Components
Online Contents that are associated with an Item will be available from the Online Content tab. An
administrator can add additional Online Contents, organize them, make edits, delete, and navigate to the
Online Content settings page where settings are defined per each Online Content. Below is an image of
the Online Content tab and a descriptive table of its components.
Figure 2.0 – Online Content Page
Online Content Page Components and Description
Components
Description
1. Tab Title
Displays the Online Content Tab Title followed by the number of
Online Contents associated with the item in parenthesis. Example:
Online Contents (7). The Root and Folder content types do not count
towards this number.
2. Table Toolbar
The Table Toolbar includes the following functions:
• Online Content Settings – See the Online Content Settings
Section for detailed information.
• Remove – on selection, removes the association.
• Expand All – on selection, displays all the Online Contents that
are part of the content structure.
• Collapse All – on selection, collapses all the Online Contents
and only displays the root and folder rows.
3. Checkbox
Available per each Online Content, the checkbox works in conjunction
with the remove function that is available from the Table Toolbar.
4. Title
Displays the title of each of the added Online Contents. Each Online
Content is shown as it has been organized by the administrator.
5. Content ID
Displays the content ID per each Online Content.

24
Components
Description
6. Content Type
Displays the type of content that has been added. These are the types
of Online Contents:
• Root – represents the Item Title
• Folder – defines how the content is to be completed by the
user as organized within the folder
• AICC, SCORM, Browser, Document – Launch method
• Exam Object – PQE
• Quiz
• Exam
• Content Package
7. Overflow Menu
The overflow menu, represented by the three (3) dots, display
different actions depending on the selected content.
If selection is from the Root, then the content options are:
• Add Content Object
• Add Content Package
• Add Assessment
• Add Exam Object – PQE
• Create New Folder
If selection is from a Folder, then the content options are:
• Add Content Object
• Add Content Package
• Add Assessment
• Add Exam Object
• Create New Folder
• Edit
• Move
If selection is from an individual content type, then the options are:
• Edit
• Move
When adding content from a Root or a Folder, the content will be
added as the last row on the Root or Folder from where the action to
add was selected.
8. Caret Arrow Icon
On selecting the Caret Arrow icon, the administrator will navigate to
the online content object.
9. Entity Footer
Save and Cancel actions are available for the administrator whenever
updates are made to the Online Content tab or if any changes were
made to the Online Content Settings page.

25
Online Content Tab Without Any Online Contents Associated to the Item
When there are no Online Contents associated with the item, a corresponding message is shown followed
by an option to select a content type and start building the content structure.
Online Content Tab Without Any Content Types
Current
New
Adding Online Contents to an Item
When adding an Online Content to an Item, the administrator will focus on simply adding the Online
Contents to the Item and building the content structure. Below are the different content types that can
be associated with an Item.
Add Online Contents to an Item
Current
New

26
The administrator selects the option to add an Online
Content. By default, the first option is to Add a Content
Object, followed by the other Online Contents and the
option to Create a New Folder. The order in which these
are available from the menu has been decided based on
best practices.
Add a Content Object to an Item
Current
New
The administrator searches for a content object that has
already been created and selects it. Provides the object
title and selects option to confirm or cancel.
No other setting is defined from this dialogue.
Note: The Use Objectives function from the dialogue has
been discontinued and will not be part of the new
administrator interface. However, the use of Objectives is
still supported and is managed from the Content Object
entity, where objectives can be associated.
Add a Content Package to an Item
Current
New

27
The administrator searches for a content package that has
already been created and selects it. Selects option to
confirm or cancel.
No other setting is defined from this dialogue.
Add an Assessment to an Item
Current
New
The administrator searches for an assessment that has
already been created and selects it. Provides the
Assessment Name and selects option to confirm or cancel.
No other setting is defined from this dialogue.
Add an Exam to an Item
Current
New

28
The administrator searches for an exam that has already
been created and selects it. Provides the exam title and
selects option to confirm or cancel.
No other setting is defined from this dialogue.
Note: The Time Exam and Review Options available from
the current Add Exam Object dialogue will no longer be
available in the new Learning administrator interface.
These settings work in support of the Exam Object (PQE)
content object which will be deprecated at the end of
2020.
Create a Folder
Current
New
The administrator selects the option to create a folder.
Provides the folder title and selects option to confirm or
cancel.
No other setting is defined from this dialogue.
T
Save or Cancel from the Online Content Tab
Once the administrator adds the Online Content, then the Save or Cancel options are presented. On
selecting save, the administrator may see the validation error indication with the detailed messages the
administrator must address on the Online Contents or Online Settings dialogue.
Figure 2.1 – Save and Cancel buttons

29
Online Content Settings
In the current administrator user interface, the administrator defines the completion status, the system
behavior after completion, and other settings per content type as they are adding these to the item. In
the new administrator user interface, all these settings are completed from the Online Content Settings
dialogue, which displays the Online Contents as they were organized by the administrator, along with the
different settings needed to define the Launch, Course Progression, Completion and Objectives for the
item.
By default, the Launch tab is the first tab shown. The order in which these tabs are displayed aligns with
the order in which the user interacts with the online item; from launching the course, progressing
through course, to completion. Improvements have been made to display only the relevant fields based
on the Online Content type that was added to the item; for instance, the administrator will only see a
failure status field if the Online Content added is an Exam Object, Assessment, AICC or SCORM. Below are
the images of each of the Online Content settings tabs with a descriptive table of each field and setting.
Launch Tab from Online Content Settings Dialogue
On this tab the administrator defines the launch behavior of the Online Contents.
Figure 2.2 – Online Content Settings Launch Tab

30
Launch Tab Components and Description
Fields & Settings
Description
1. Tab Title
Displays the Launch Tab Title.
2. Content is Available for Launch
Switcher to indicate when the Online Contents are
ready to be accessed by the user. If this setting is set to
ON, then on saving the Online Content tab, the Item
header will update the field from Not Available for
Launch to Available for Launch.
3. Contents Available Only During Specified
Segments of a Scheduled Offering
This switcher is only available when the Item is a
Blended Item (Instructor-Led with Online Content
Item).
4. Skip Content Structure Page on Launch
This setting indicates system behavior when a user
launches the course. The system either presents the
Content Structure page or skips it and takes the user
directly to the first incomplete Online Content.
Note: This setting is not available if Course Home is
enabled as the user is always taken to the Course
Player upon launch.
5. Days from Launch to Expiration
This textbox is for the administrator to indicate the
number of days a user has, after launching the content,
before their progress resets because of inactivity and
they must start the course from the beginning.
6. Title
Displays the object title of each of the Online Contents
that have been added. Each Online Content is shown as
it has been organized by the administrator.
7. Content Type
Displays the type of content that has been added.
8. Downloadable
This column is for the administrator to indicate if the
user can download the Online Content if administrator
selects the checkbox. On selection, a field is available
to provide the URL.
9. Restrict Access to Other Objects When
This Assessment is in Progress
This column is for the admin to indicate if the user is
restricted from accessing other Online Contents while
taking the corresponding assessment.
10. Parameters
This field is for content launch URL Parameters
11. OK, Cancel
The administrator either confirms or discards the fields
and settings made.

31
Course Progression Tab from Online Content Settings Dialogue
On this tab the administrator defines the course progression of the Online Contents.
Figure 2.3 – Online Content Settings Course Progression Tab
Course Progression Tab Components and Description
Fields & Settings
Description
1. Tab Title
Displays the Course Progression Tab Title.
2. Title
Displays the title of each of the Online Contents that
have been added. Each Online Content is shown as it
has been organized by the administrator.
3. Content Type
Displays the type of content that has been added.
4. Force Sequential Completion of Content
This column allows the administrator to indicate
whether the user must complete the Online Contents
within the folder in a sequential order. Administrator
can select the checkbox from Root which auto selects
the checkboxes for any Folders within the content
structure.
5. Enable Assessment Review
This column is shown when one or more Online
Contents are an Assessment and allows the
administrator to indicate if a user can review the
assessment after completion.
6. Exam Duration
This textbox is for the administrator to indicate the
amount of time a user has to complete the exam.
7. OK, Cancel
The administrator either confirms or discards the fields
and settings made.
32
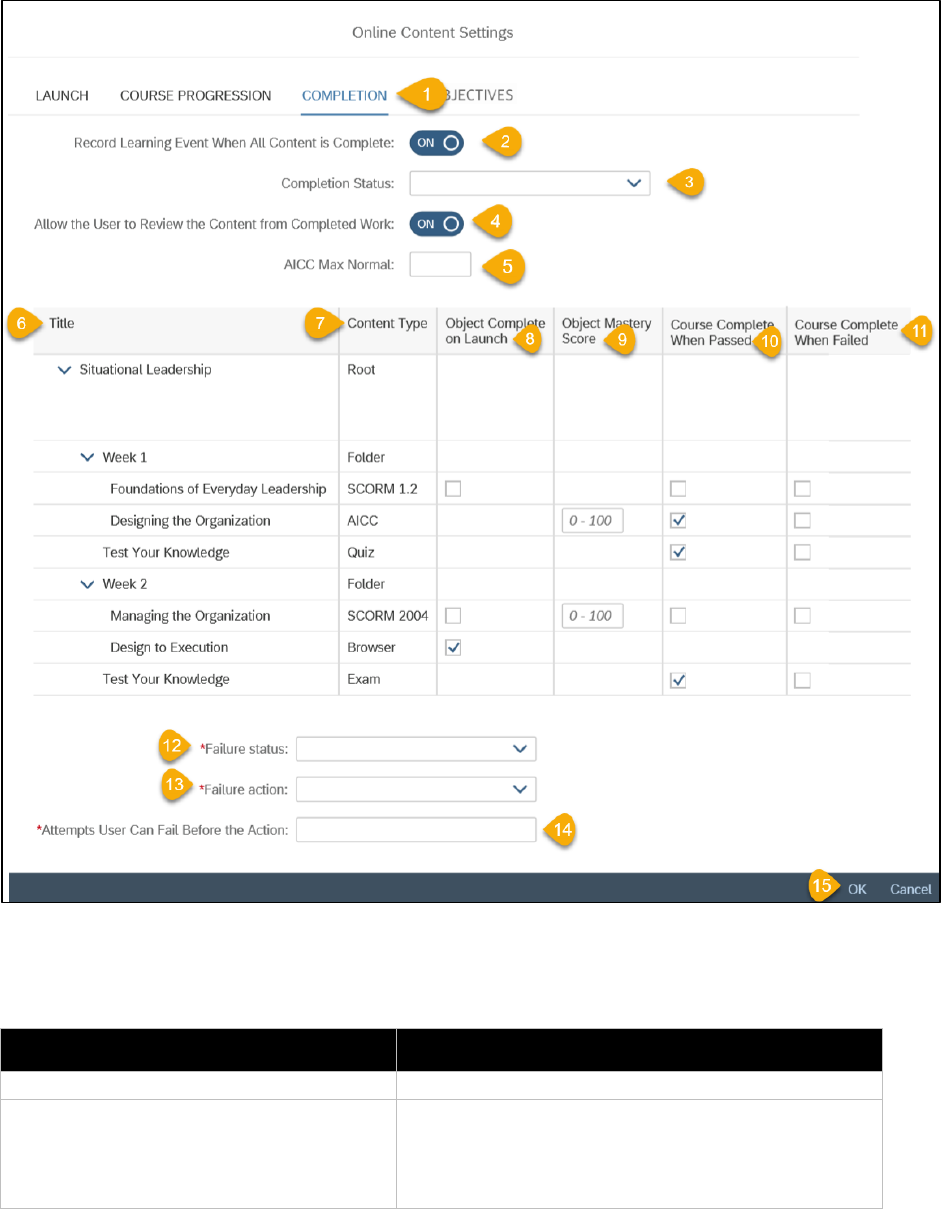
Completion Tab from Online Content Settings Dialogue
On this tab the administrator defines the completion behavior of the Online Contents.
Figure 2.4– Online Content Settings Completion Tab
Completion Tab Components and Description
Fields & Settings
Description
1. Tab Title
Displays the Completion Tab Title.
2. Record Learning Event When All
Content is Complete
This slider when switched on, automatically marks
the Item complete (and adds to the user’s Learning
History) after the user completes all the objects that
make up the Item’s content structure.

33
Fields & Settings
Description
3. Completion Status
Drop-down is shown to select the completion status
the user receives upon completing the Item.
4. Allow the User to Review the Content
from Completed Work
Switcher indicates whether the user can review the
Online Contents from their Completed Works page.
5. AICC Max Normal
This textbox represents the maximum number of
content objects that a user can access without
completing it and receive credit for it.
6. Title Header
Displays the title of each of the Online Contents that
have been added. Each Online Content is shown as
it has been organized by the administrator.
7. Content Type
Displays the type of content that has been added.
8. Object Complete on Launch
This column presents the option for content
completion to take place when the user launches
the online object. This is only applicable for SCORM,
document, and browser.
9. Object Mastery Score
The content object mastery score is the score
required by the user to complete the
selected content object.
10. Course Complete When Passed
This column presents the option for course
completion to take place when the user passes the
AICC, SCORM, Exam, Quiz, and Exam Object (PQE)
content types.
11. Course Complete When Failed
This column presents the action to take place when
the user fails the AICC, SCORM, Exam, Quiz, and
Exam Object (PQE) content types.
12. Failure Status
Drop-down is shown to select the failure status the
user receives upon failing the item. This field is only
displayed if at least one Online Content is marked
“Course Complete When Failed”.
13. Failure Action
Set a failure action to control what happens when a
user fails the online portion of the learning item.
14. Attempts User Can Fail Before the
Action
The administrator can specify the number of times
the user can attempt the content prior to obtaining
a failure status.
15. OK, Cancel
The administrator either confirms or resets the
fields and settings made.

34
Objectives Tab from Online Content Settings Dialogue
On this tab the objectives that are associated to the content objects will be available as read-only.
Figure 2.5 – Objectives Tab
Objectives Tab Components and Description
Fields & Settings
Description
1. Tab Title
Displays the Objectives Tab Title.
2. Title
Displays the title of each of the Online Contents that
have been added. Each Online Content is shown as it
has been organized by the administrator.
3. Content Type
Displays the type of content that has been added.
4. Use Objectives
This column displays the objectives associated with
content objects (except for Folder, Content Package).
5. OK, Cancel
The administrator either confirms or discards the fields
and settings made.
Updates to the Online Content Tab
When one or more users have completed an Item that has online contents associated with it, the system
will not allow an administrator to Add, Remove, or Move the Online Contents, because this is ultimately
changing the content structure which warrants creating a new revision. The administrator will have to
revise the Item if these modifications are needed. This system behavior is only taking place on the new
Learning Administrator interface. A message will display at the top of the Online Content tab
communicating to the administrator that if updates are needed then revision of the Item is required.
35
The following functions will not be available, once the Item has been completed by at least one user:
• Add Content Types
• Remove Content Types
• Move the Content Types to be displayed in a different order
The following functions will remain available:
• The Online Content Settings function remains available and the administrator can make updates
to the Launch, Course Progression, Completion, Objectives Tabs
• If a Folder content type is part of the content structure, only the Folder Name can be edited
• For any Content Objects, only the Content Object Name can be edited
• For any Content Object, the navigate to the Content Object function remains available
The following functions remain unchanged in the application:
• Updates to a Content Object can still be completed from the Content Object itself
• Deleting User’s Learning History while testing Content is still available
7C. Classes Entity (Scheduled Offerings)
The Classes (Scheduled Offerings) entity has been improved to provide a greater work area for tasks such
as managing the user registration, creation of reserved seats (Slots), and the advanced registration
functions. Each of these tasks will have its respective related tab, giving the administrator a more focused
view. Additionally, the various email notifications relevant to a class (scheduled offering), have been
organized to be rendered from one location for simplicity.
Class Entity Feature Location Changes
Overall, the Class (Scheduled Offering) entity functionality has not changed. Some functions will be a
related tab or have been moved to a more appropriate area.
• The Advanced button and dialogue – will be a related entity tab
• The Settings button and dialogue – The email notification settings displayed from this
dialogue has moved to the Class’s Details Tab, as part of the form and setup of a Class
(Scheduled Offering). Also, the remove from learning plan field has been moved to the
registration grouping on the summary tab.
• The Reserve Seats (Slots) function – will be a related entity tab
Below, are the images of the Class entity from both, the current administration and new administration
user interfaces.

36
Classes (Scheduled Offering)
Current
New

37
The Class (Scheduled Offering) Entity Header
The class (Scheduled Offering) entity header has information that has been surfaced to the top for the
administrator to promptly gather a class’s details. It will display the class’s title (Derived from the Item’s
Title), class ID (scheduled Offering ID), display time zone (Scheduled Offering’s time zone or the time zone
in the administrator preferred time zone based on the preferences settings and the Class field “Use time
zone of this scheduled offering”), along with the scheduled date & time, the primary instructor, primary
location, key registration count, and the class’s status (Scheduled Offering status). Most of the actions
from the Actions drop-down menu will continue to navigate the administrator to the existing pages as
these are not impacted by the Flash replacement. Below is an image of the class (Scheduled Offering)
entity header.
Figure 2.6 – Class Entity Header (Scheduled Offering)
The Class (Scheduled Offering) Details Tab
The Class (Scheduled Offering) entity’s default tab is the Details tab, which is currently accessed from the
View All action and titled Additional Settings. On the new administration UI this will be the first tab and
presented in a form layout. It has been organized into specific groupings relevant to the class
information. At the top of the form, there is a new message, that has been added to provide greater
clarity in terms of the time zone that is used to display the date and times. Additionally, the time zone of
the Class is displayed as a reference. The administrator has the option to view dates in the Class time
zone as long as “Always display Scheduled Offerings in this time zone” in their preferences is not checked.
Below is an image of the current and new
Details tab (Summary Tab).

38
Classes (Scheduled Offering) Details
Current – View All Form
New – Class Summary Tab

39
The Registration Tab and Its Functions
The registration tab displays all registered users for the class (scheduled offering) and has been redesigned
to provide a focused area for managing user registration along with the actions easily found on the page.
Below are side-by-side images of the registration functions on both the current registration tab and the new
administrator user interface tab.
The Registration Tab
Current
New
The Registrations tab displays all registered users including
registration, completion status and segment attendance, all from
one table view. The Group feature allows the Administrator to
group registered users based on their Registration status,
Organization, or Completion status.
Changing a User’s Registration Status
Current
The administrator has a drag & drop or
hover over the User option.
New
Select the Overflow menu, represented by three dots (…) shown
from an individual user’s row. Options to edit the user’s
registration status or to remove the user are displayed. Upon
selecting the Edit option, the user’s registration status or position
in the waitlist can be updated from a dialogue which displays
registration information.

40
On hovering over, the Modify option is
available.
If the administrator withdraws the user, they can enter a
cancellation reason if enabled.
Sorting & Grouping Based on User’s Registration Status
Current
Sorting is done based on the non-enrolled
users only.
Filtering is done on two separate panes
for non-enrolled and enrolled users.
New

41
Sorting functionality is available across all the columns within the
registration table.
Filtering is replaced by the Grouping function.
Settings and Advanced Functions
Current
Email notifications for specific users is
defined from the Settings button.
New
The administrator can set the Email setting notifications, as well
as the “On User Removal” setting, from the Details tab (Summary
Tab).

42
Current
Finance Tasks are available from the
Advanced button.
New
Advanced functions have a respective related tab. The edit mode
is displayed on selecting the ‘Pencil icon’.
View Orders is available, and upon selecting the Order Number
link, the current Order Management dialogue is displayed.

43
Adding Reserve Seats (Slots)
Current
Adding Reserved Seats (Slots) is done
from the Add Users drop-down.
New
Adding and management of Reserved Seats (Slots) is done from
its respective tab. Upon selecting the Add icon, The Add Slots
dialogue is available.
Adding Users
Current
Adding Users to a Class via different
methods is available from a drop-down.
New
Adding Users to the Class remains available from a drop-down.
These options navigate to the current administrator user
interface pages.

44
The Time Slots (Segments) Tab
The Time Slots (Segments) tab is presented in a table format along with the Table Toolbar which renders
the add, remove or copy a Segment functions. Record Attendance and editing a Time Slot (Segment) is
also available from the overflow menu represented via three dots shown from the Time Slot’s (Segment)
row. Below are side-by-side images of the Time Slots (Segments) and its functions from both the current
and new administrator interface.
Segments Table
Current
Segments are presented in a Calendar
View or a List View.
New
Time Slots (Segments) are presented in a List View format,
similar to the current List View but with additional columns for
the segment title and for conflicts identified while adding a
resource to the segment. (Calendar option is no longer
available).
Add a Time Slot (Segment)
Current
On selecting the plus icon, the Add
Segment dialogue.
New

45
Note: The Add a Time Slot (Segment) function is available from
the Table Toolbar.
Virtual Setting for a Time Slot (Segment)
Current
The administrator must select the
Segment is virtual checkbox to view
the required fields to set up a virtual
Segment.
New
The Virtual slider, upon selection displays the fields needed to
set up a Virtual Time Slot (Segment).

46
Adding Resources and Applying them to All Time Slots (Segments)
Current
The administrator can add the
resources needed for the Segment
and have all or some resources
assigned to all the other Segments
associated to the class.
New
Adding resources to a Time Slot (Segment) is available from a
drop-down menu. Adding each resource navigates to current
administrator user interface search pages.
Similar to the current user interface, the resources can be
assigned to all the time slots (segments).

47
Edit a Time Slot (Segment)
Current
The Administrator selects the
hyperlinked scheduled time &
description of the Segment and is
presented with the Edit Segment
dialogue.
New
The administrator selects the overflow menu, represented by
three dots, and selects the Edit Time Slot (Edit Segment) option.
The Edit Time Slot (Edit Segment) dialogue is displayed, allowing
the administrator to make any necessary edits. The layout is
similar to the current administrator user interface, with the
exception that the Virtual slider is positioned above the
resources table (On scrolling down on the dialogue the
Resources table is displayed as shown in the image below).

48
Copy a Time Slot (Segment)
Current
The double document icon on
selection presents the option to copy
the Segments within the day.
New
Similarly, the copy time slot (segment) action is available but
from the action column. It’s the same icon but from the action
column.

49
Remove a Time Slot (Segment)
Current
Remove function is available by
selecting the Select All or individual
Segments.
New
Removing Time Slots (Segments) function is available from the
Table Toolbar, which works in conjunction with the checkboxes,
allowing to select and remove individual or multiple Time Slots
(Segments).
Record Attendance
Current
Recording attendance dialogue is
available by selecting the Attendance
hyperlink.
New
The administrator selects the overflow menu and is presented
with the option to Record Attendance. Upon selection, the
current administrator interface for the Record Attendance
dialogue is available.

50
Resend Registration Notification
Current
New
This notification will be available from the Class’s Header’s
Action options.
Conflict Warning Dialogue
Current
Conflict warning is shown from the
Segment in the form of a warning
icon.
New
From the Time Slots (Segments) table, a conflict column has
been added to notify the administrator of any conflicts. Upon
selection the conflict warning dialogue is available.

51
7D. User Entity
The user entity’s fields, currently available within the additional settings dialogue, have been organized
within groups that are relevant to the information these fields provide. Additionally, as the new Learning
Administration builds a more fluid integration with the Human Experience Management Platform, the
non-native user’s personal and employment information will be managed from the Human Experience
Management Platform and available as read only within the new Learning Administration application.
The following non-native user fields will be managed from Platform:
Personal Information:
• First Name
• Middle Name (MI)
• Last Name
• Address
• City
• State/Providence
• Postal Code
• Country
• External ID
• Email Address
Employment Information:
• Job Title
• Employee Status
• Location
• Full Time
• Hired Date (Hired)
• Termination Date (Terminated)
• Job Code
• Employment Type
52
• Regular/Temp
The following user fields will be managed in LMS until support is available in Platform for External
Learner:
• Organization
• Manager (Supervisor)
Note: A message will display at the top of the User Details Tab (Summary tab) communicating to the
administrator that certain fields on the page are read-only because they contain HR data and should be
maintained and managed in the core HR system of record.
For users accounts that are managed within the Learning application (The user is a Learning “Native User”
and does not authenticate via the Human Experience Management Platform), the user entity fields will
continue to be editable and supported. For detailed functional and terminology changes for the User
entity, access the Entities Field Changes spreadsheet by clicking here.
8. Preparation Checklist
The table below lists configurations and set ups that an administrator can review now in preparation to
the new Administrator interface.
Configuration/Set Up Question
If Yes, Take this Action
Explanation
Is System Administrator>
Configuration> System
Configuration>
LMS_ADMINISTRATOR>
emailValidationEnabled set to
false?
Ensure all email addresses are
properly formatted for the following:
• User> Email Address
Assignment
• Profile> Contact Email
• Item> Contact’s Email
• Scheduled Offering> Email
• Catalog> Contact Email
• Coupon> Owner Email
• Subscription> Owner Email
• Purchase Order> Balance
Notification Email(s)
Since email addresses are used
by the system to send email
notifications, all email
addresses on major entities
will be validated when saving
the entity in the new Learning
Administration application.
Note that connectors will not
be impacted.
Are you using Item> Ratings
field?
Enable user to rate items instead of
an administrator populating this field.
This field has been deprecated
and removed as the
functionality is replaced by
allowing user ratings. The
intent of this field was to allow
an administrator to manually
tabulate a rating based on
learner surveys. Now that
learners can rate the item, this
field is no longer necessary.
Are any major entity related
entity tabs hidden in System
Check the current records
configurations, take note of the entity
tabs that are not visible and check for
Related Entity tab visibility in
the new administrator UI is
controlled via workflow versus

53
Configuration/Set Up Question
If Yes, Take this Action
Explanation
Administrator> Configuration>
Record Configuration?
its respective workflows. Remove
workflow from administrator role to
maintain it being hidden.
record configuration. The tab
will always appear if there is
not a specific workflow for
that tab.
Do you have administrators
with view only access?
Be aware that they will now be able
to view the value for Approval Process
fields without needing the Search
Approval Process workflow.
Currently in view or edit mode
an administrator cannot see
the value for domain, approval
process, withdraw approval
process unless they have the
corresponding search
workflow. In the new
application, Administrators will
be able to view the Domain set
on an entity without Search,
Edit or View Domain workflow
as long as they have the View
Item or Edit Item workflow.
The value will be read only
when the administrator is in
either view or edit mode
without Search Domain
workflow, and the
administrator will be able to
change the Domain for an
entity if they have Search
Domain workflow. Note that a
workflow is still required to
view any custom column labels
and values.
Do your administrator roles,
that can access reports, exclude
the Search Reports workflow?
Add Search Reports for administrators
with this role to access the Reports
menu.
The Search Reports workflow
controls access to reports in
the new Learning
Administration.
Do you have number fields on
an item with values greater
than 99,999? (Length, Credit
Hours, Contact Hours, CPE
Hours, Min Registration, Max
Registration, Registration
Threshold, Gamification Base
Points or Prep Time)
Ensure that field values that exceed
99,999 are reduced to a value of
99,999 or less.
Item ‘number’ fields will be
limited to values ‘blank’ and 0
through 99,000 (whether
decimal or whole numbers),
except for the two fields: Initial
Number, and Retraining
Number, as they have special
validation rules based on the
associated Basis field selection.
This change streamlines the
validation messages to the
administrator.
Are you using Organization
Groups?
Create an Organization Custom
Column to manage grouping.
As noted in Section 9. This
functionality is being
deprecated.

54
Configuration/Set Up Question
If Yes, Take this Action
Explanation
Limitation: An organization can only
have 1 referenced value for a custom
column.
Are you using User > Position,
Picture, Coach, Password,
Resume, Prior Months of
Service, Prior Years of Service?
Migrate this data to the Human
Experience Management Platform.
These fields have been
deprecated within Learning as
the functionality is replaced by
managing users in the Human
Experience Management
Platform. Please access the
User tab within the Entities
Field Changes spreadsheet for
additional information.
Do you have administrator roles
with a workflow that grants
access to a related entity tab,
for any of the 9 major entities,
and that related entity tab is
disabled via the System
Administrator > Configuration >
Module Tab?
Remove the workflows from the
administrator role to prevent
administrators from accessing the
related entity tab.
The new entity manager
displays the related tabs
primarily based on workflows
and does not honor the
Module Tab configurations.
Have you customized the
DEFAULT_ADMIN_INTRO via
the System Administrator>
Application Admin> User
Introduction?
Create a new User introduction and
populate the Data field with your
customized content. Then select this
new panel ID as the default
introduction message from the
Introduction Panel ID drop-down
option in System Administration >
Configuration > Global Variables page.
The existing content was
intended to be maintained by
SuccessFactors only and will
be overridden with the release
of Learning Administration
Application.
Do you have terminology in
custom reports (titles, field
labels) that you would like to
update to match the new
taxonomy for Learning?
If text shown on your custom report is
using a custom label created by your
company, find your label in
References> Geography> Labels and
edit the label value. If text shown on
your custom report is in the report
code, update the report code, save
and publish.
Updates to terminology may
have an impact on reports that
use application labels being
updated to the new
terminology.
9. Removed Functionality
Below is a list of all removed functionality. This functionality will not be available from the new Learning
Administration user interface and will be removed from the current application on the second half of
2020. The Related configurations and permissions (workflows) associated with these functionalities will
also be removed. With the release of the new Learning Administration Application, Customer Support
will answer how-to questions but will not fix or patch the legacy application.

55
Removed Functionality
Information/Notes
Administrator Power Search bar with command and keyword
Search
Power Search Synchronization and
Optimization automatic processes are
also being removed.
Guide Me Mode and Recommended Next for performing a
task
Related configuration is also being
removed.
The out-of-the-box Welcome to SuccessFactors
Administration video/tutorial and the Home page quicklinks
These are aspects of the Flash
application interface that are being
removed. Recommendation is
provided in Section 3 of this
document.
Configuring fields and tab order of the 9 major entities and
corresponding personalized views.
Additionally, these entities will be
removed from System Administrator>
Configuration> Module Tab.
Field and tab order will be set based
on best practices which will apply to
all administrator users.
Organization Groups
Customers can create an Organization
Custom Field to manage grouping.
External Reports
Lack of use.
Purchasing Assistant
An administrator can purchase on
behalf of a learner using proxy mode.

56
Removed Functionality
Information/Notes
Registration Assistant
An administrator can register a learner
into a class from the class entity.
Chargeback Adjustment tool within Commerce (functionality
is available via other means)
An administrator can adjust a charge
via Scheduled Offering> Advanced;
Learning Event Editor or Order
Management.
Administrator’s ability to rate an Item
Enable user to rate items instead of an
administrator populating this field.
User entity’s Prior months of Service, Prior years of Service,
Coach, Position and Resume fields
Note: Image only shows two fields. Remaining fields are
accessible by selecting the View All link.
Customers should use the -Platform
for this employee information.

57
Removed Functionality
Information/Notes
Organization Dashboard (User side and settings on User
record)
Customers can use Work Force
Analytics (for a cost), develop a
custom report, or wait for new reports
through SAC.
Performance main menu
Talent Profile
Competency Assessment
Performance references (Competency Categories,
Competency Sources, Competency Types)
These are now managed in Talent.
Removal of Legacy Plateau Features
The new Learning Administration Application will run concurrently with the legacy application for one
release. The legacy version containing Flash components within Learning will be removed from the user
and administrator side. This will include the following Legacy Plateau features. For any removed feature
the corresponding settings or configuration will also be removed:
• Organization Initiative, Succession Planning, Assessments and Skills Inventory on User entity
• Ability to Add Competency
• Talent Profile
• Job Family
• Positions
Job Family and Positions were part of the Performance Module of Plateau which has been deprecated.
Customers should use the Platform Job Profile Builder functionality.
Accessibility Notes
The “Turn Accessibility On” link in Flash is not necessary in the new Administration interface as the
application can be used with standard keyboard shortcuts so no onscreen instructions are required for
navigation and removing Flash improves the use of screen readers.
10. For More Information
Visit the Customer Community blog to stay informed on the upcoming release of the new Learning
Administration Interface. Share feedback on this guide and post questions in the comments section.
